Google’s automated ranking systems are designed to present helpful, reliable information that’s primarily created to benefit people, not to gain search engine rankings, in the top Search results. This page is designed to help creators evaluate if they’re producing such content.
Self-assess your content
Evaluating your own content against these questions can help you gauge if the content you’re making is helpful and reliable. Beyond asking yourself these questions, consider having others you trust but who are unaffiliated with your site provide an honest assessment.
Also consider an audit of the drops you may have experienced. What pages were most impacted and for what types of searches? Look closely at these to understand how they’re assessed against some of the questions outlined here.
Content and quality questions
Does the content provide original information, reporting, research, or analysis?
Does the content provide a substantial, complete, or comprehensive description of the topic?
Does the content provide insightful analysis or interesting information that is beyond the obvious?
If the content draws on other sources, does it avoid simply copying or rewriting those sources, and instead provide substantial additional value and originality?
Does the main heading or page title provide a descriptive, helpful summary of the content?
Does the main heading or page title avoid exaggerating or being shocking in nature?
Is this the sort of page you’d want to bookmark, share with a friend, or recommend?
Would you expect to see this content in or referenced by a printed magazine, encyclopedia, or book?
Does the content provide substantial value when compared to other pages in search results?
Does the content have any spelling or stylistic issues?
Is the content produced well, or does it appear sloppy or hastily produced?
Is the content mass-produced by or outsourced to a large number of creators, or spread across a large network of sites, so that individual pages or sites don’t get as much attention or care?
Expertise questions
Does the content present information in a way that makes you want to trust it, such as clear sourcing, evidence of the expertise involved, background about the author or the site that publishes it, such as through links to an author page or a site’s About page?
If someone researched the site producing the content, would they come away with an impression that it is well-trusted or widely-recognized as an authority on its topic?
Is this content written or reviewed by an expert or enthusiast who demonstrably knows the topic well?
Does the content have any easily-verified factual errors?
Provide a great page experience
Google’s core ranking systems look to reward content that provides a good page experience. Site owners seeking to be successful with our systems should not focus on only one or two aspects of page experience. Instead, check if you’re providing an overall great page experience across many aspects. For more advice, see our page, Understanding page experience in Google Search results.
Focus on people-first content
People-first content means content that’s created primarily for people, and not to manipulate search engine rankings. How can you evaluate if you’re creating people-first content? Answering yes to the questions below means you’re probably on the right track with a people-first approach:
Do you have an existing or intended audience for your business or site that would find the content useful if they came directly to you?
Does your content clearly demonstrate first-hand expertise and a depth of knowledge (for example, expertise that comes from having actually used a product or service, or visiting a place)?
Does your site have a primary purpose or focus?
After reading your content, will someone leave feeling they’ve learned enough about a topic to help achieve their goal?
Will someone reading your content leave feeling like they’ve had a satisfying experience?
Avoid creating search engine-first content
We recommend that you focus on creating people-first content to be successful with Google Search, rather than search engine-first content made primarily to gain search engine rankings. Answering yes to some or all of the questions below is a warning sign that you should reevaluate how you’re creating content:
Is the content primarily made to attract visits from search engines?
Are you producing lots of content on many different topics in hopes that some of it might perform well in search results?
Are you using extensive automation to produce content on many topics?
Are you mainly summarizing what others have to say without adding much value?
Are you writing about things simply because they seem trending and not because you’d write about them otherwise for your existing audience?
Does your content leave readers feeling like they need to search again to get better information from other sources?
Are you writing to a particular word count because you’ve heard or read that Google has a preferred word count? (No, we don’t.)
Did you decide to enter some niche topic area without any real expertise, but instead mainly because you thought you’d get search traffic?
Does your content promise to answer a question that actually has no answer, such as suggesting there’s a release date for a product, movie, or TV show when one isn’t confirmed?
Are you changing the date of pages to make them seem fresh when the content has not substantially changed?
Are you adding a lot of new content or removing a lot of older content primarily because you believe it will help your search rankings overall by somehow making your site seem “fresh?” (No, it won’t)
What about SEO? Isn’t that search engine-first?
There are some things you could do that are specifically meant to help search engines better discover and understand your content. Collectively, this is called “search engine optimization” or SEO, for short. Google’s own SEO guide covers best practices to consider. SEO can be a helpful activity when it is applied to people-first content, rather than search engine-first content.
Get to know E-E-A-T and the quality rater guidelines
Google’s automated systems are designed to use many different factors to rank great content. After identifying relevant content, our systems aim to prioritize those that seem most helpful. To do this, they identify a mix of factors that can help determine which content demonstrates aspects of experience, expertise, authoritativeness, and trustworthiness, or what we call E-E-A-T.
Of these aspects, trust is most important. The others contribute to trust, but content doesn’t necessarily have to demonstrate all of them. For example, some content might be helpful based on the experience it demonstrates, while other content might be helpful because of the expertise it shares.
While E-E-A-T itself isn’t a specific ranking factor, using a mix of factors that can identify content with good E-E-A-T is useful. For example, our systems give even more weight to content that aligns with strong E-E-A-T for topics that could significantly impact the health, financial stability, or safety of people, or the welfare or well-being of society. We call these “Your Money or Your Life” topics, or YMYL for short.
Search quality raters are people who give us insights on if our algorithms seem to be providing good results, a way to help confirm our changes are working well. In particular, raters are trained to understand if content has strong E-E-A-T. The criteria they use to do this is outlined in our search quality rater guidelines.
Search raters have no control over how pages rank. Rater data is not used directly in our ranking algorithms. Rather, we use them as a restaurant might get feedback cards from diners. The feedback helps us know if our systems seem to be working.
Reading the guidelines may help you self-assess how your content is doing from an E-E-A-T perspective, improvements to consider, and help align it conceptually with the different signals that our automated systems use to rank content.
Ask “Who, How, and Why” about your content
Consider evaluating your content in terms of “Who, How, and Why” as a way to stay on course with what our systems seek to reward.
Who (created the content)
Something that helps people intuitively understand the E-E-A-T of content is when it’s clear who created it. That’s the “Who” to consider. When creating content, here are some who-related questions to ask yourself:
Is it self-evident to your visitors who authored your content?
Do pages carry a byline, where one might be expected?
Do bylines lead to further information about the author or authors involved, giving background about them and the areas they write about?
If you’re clearly indicating who created the content, you’re likely aligned with the concepts of E-E-A-T and on a path to success. We strongly encourage adding accurate authorship information, such as bylines to content where readers might expect it.
How (the content was created)
It’s helpful to readers to know how a piece of content was produced: this is the “How” to consider including in your content.
For example, with product reviews, it can build trust with readers when they understand the number of products that were tested, what the test results were, and how the tests were conducted, all accompanied by evidence of the work involved, such as photographs. It’s advice we share more about in our Write high quality product reviews help page.
Many types of content may have a “How” component to them. That can include automated, AI-generated, and AI-assisted content. Sharing details about the processes involved can help readers and visitors better understand any unique and useful role automation may have served.
If automation is used to substantially generate content, here are some questions to ask yourself:
Is the use of automation, including AI-generation, self-evident to visitors through disclosures or in other ways?
Are you providing background about how automation or AI-generation was used to create content?
Are you explaining why automation or AI was seen as useful to produce content?
Overall, AI or automation disclosures are useful for content where someone might think “How was this created?” Consider adding these when it would be reasonably expected. For more, see our blog post and FAQ: How Google Search views AI-generated content.
Why (was the content created)
“Why” is perhaps the most important question to answer about your content. Why is it being created in the first place?
The “why” should be that you’re creating content primarily to help people, content that is useful to visitors if they come to your site directly. If you’re doing this, you’re aligning with E-E-A-T generally and what our core ranking systems seek to reward.
If the “why” is that you’re primarily making content to attract search engine visits, that’s not aligned with what our systems seek to reward. If you use automation, including AI-generation, to produce content for the primary purpose of manipulating search rankings, that’s a violation of our spam policies.
“I want to own my website” Sooner or later, every web design company needs to address this request. Simple as it sounds, it really is complicated. A website is built with many assembled parts and you may be surprised to learn who legally owns each part.
The following website terminology is a guide of what you really own and what you’re really just leasing.
To keep up with the digital world, Mastercard is removing their name from the logo as part of a “reinvention” of the brand.
As a company following the digital updates so well that they even adapt the biometric fingerprint verification, Mastercard evolves their logo once again.
If you are an entrepreneur, it’s a fact that you are constantly on the quest to find new ways to grow your business and make connections that will contribute to the growth of your small business.
Networking is one of the oldest tricks in the book – but if done right, it can take you a long way on your journey to establishing successful business relationships.
Marketing is probably one of the most important key factors in growing your business. The modern era offers many avenues to explore when it comes to gaining and retaining clients, all whilst promoting your business and service offering. Social media platforms offer the opportunity to advertise and reach cold audiences, printed collateral allows your target market to get hands-on with your brand, and referrals mean prospective clients hear about you from those they trust.
An eCommerce store needs a formidable online presence—of which a good website and quality products are just the beginning. The real challenge lies in letting probable customers know that your brand exists amidst the digital racket. This is where search engine optimization (SEO) and social media marketing come in.
When a client asks, “Why aren’t we gaining more followers?” or “How do our social channels increase our revenue?” it’s a signal to revisit your social media goals.
Goals are no longer vanity targets like hitting 10,000 followers. They’ve become the foundation for meaningful results and client satisfaction. Whether it’s growing brand awareness, increasing website traffic, or boosting conversions, clear, actionable goals make it easier to prove the value of your agency’s work.
To design efficient and memorable logos in 2025, you need a blend of creativity and strategic thinking. As the trends and technologies in graphic design continue to evolve, understanding them is essential to staying ahead of the curve and delivering modern solutions created customary or by logo makers.
Women’s accessories sold by Shein, Temu and AliExpress contained toxic substances sometimes hundreds of times above acceptable levels, authorities in South Korea found. 144 products from the retailer were tested, and multiple products from all companies failed to meet legal standards. Seoul officials have asked for the products to be removed from sale.
In order to build a website, you first got to decide what platform you’re going to build your website with.
What do I mean by “platform”?
Well, back in 2005 when I got started with web development, most sites were created using HTML (code), CSS, and PHP. Each of these took a lot of time to learn and were difficult to master.
That’s why most people still think setting up a website from scratch is difficult or requires a lot of coding and design skills – but that’s no longer true.
In 2022, content management systems (CMS) like WordPress have made creating a website accessible to everyone.
To put it simply, a CMS (or website building platform) is a user-friendly platform for building websites and managing your own online content, instead of creating a website from scratch using HTML, PHP, and other coding languages.
Popular Site Building Platforms in 2022
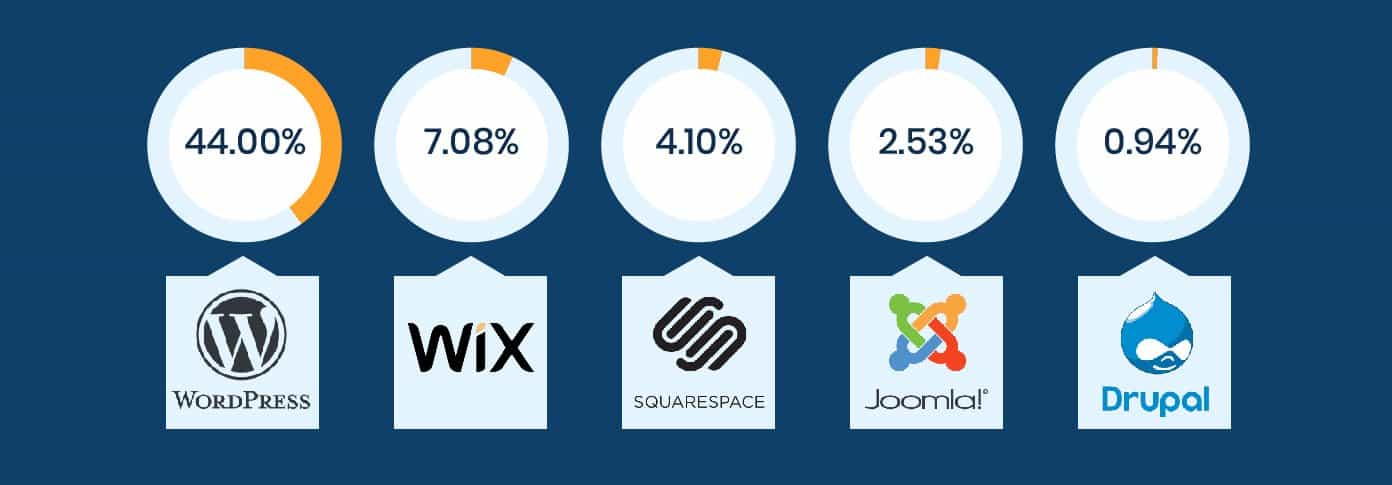
To better understand which are the most popular content management systems, I dug up some recent statistics from W3 Techs and BuiltWith.
Just take a look at this graph below:
Data credit: BuiltWith
As you can see, nearly half of the websites on the Internet are running on the WordPress website platform.
But what makes them a better option than others?
Why use WordPress and not website builders?
1. It’s FREE (no recurring subscriptions, open-source)
Unlike website builders or web design software, WordPress doesn’t cost a dime to download, install or use. It’s built by web developers and there’s a large developer community who have designed beautiful free themes and templates, making it easy to get going fast.
2. It’s highly customizable and user-friendly
If you know how to use Google Docs, you already know how to add your own content. WordPress can be easily expanded with free add-ons to handle just about any site you can imagine – from small business websites to e-commerce sites. With WordPress “plugins” you’ll be able to add contact forms, subscription forms, image galleries, stores, and so on for your website. And it’s all pretty simple.
3. Your site will be ‘responsive’. Meaning it’ll work on smartphones & tablets, too
The website you build will instantly be responsive, looking great on every mobile device, smartphone, and tablet. No need to hire a web developer for that.
4. Help available from the community
With so many people using the platform (webmasters, small-business owners, bloggers), it’s easy to find fast help when you need it. You can get help from here for free or you can hire thousands of WordPress developers from here.
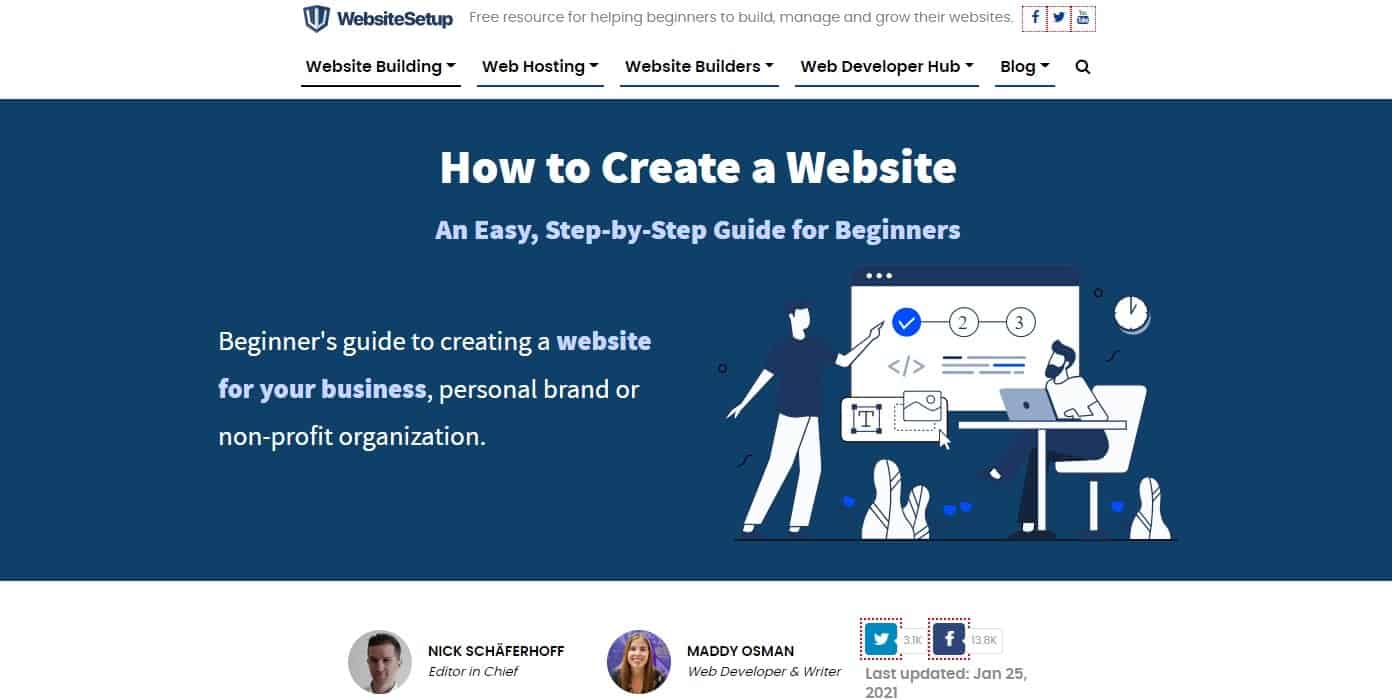
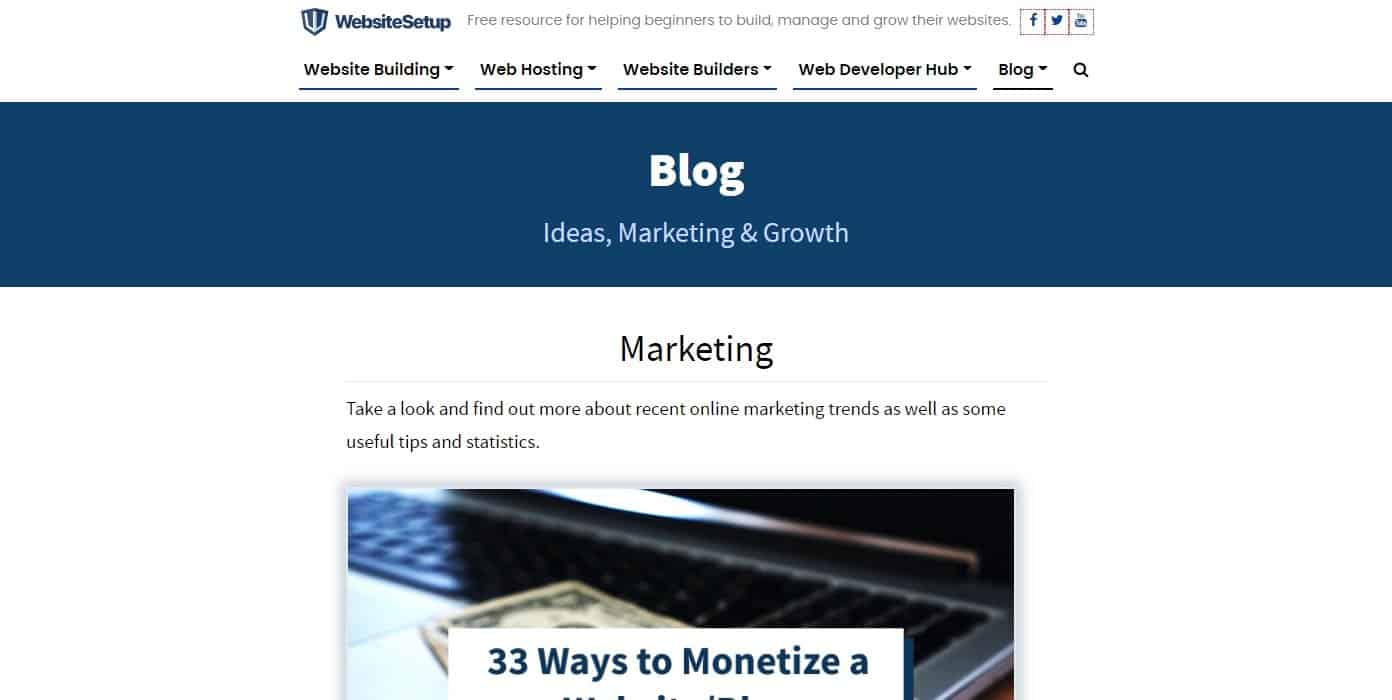
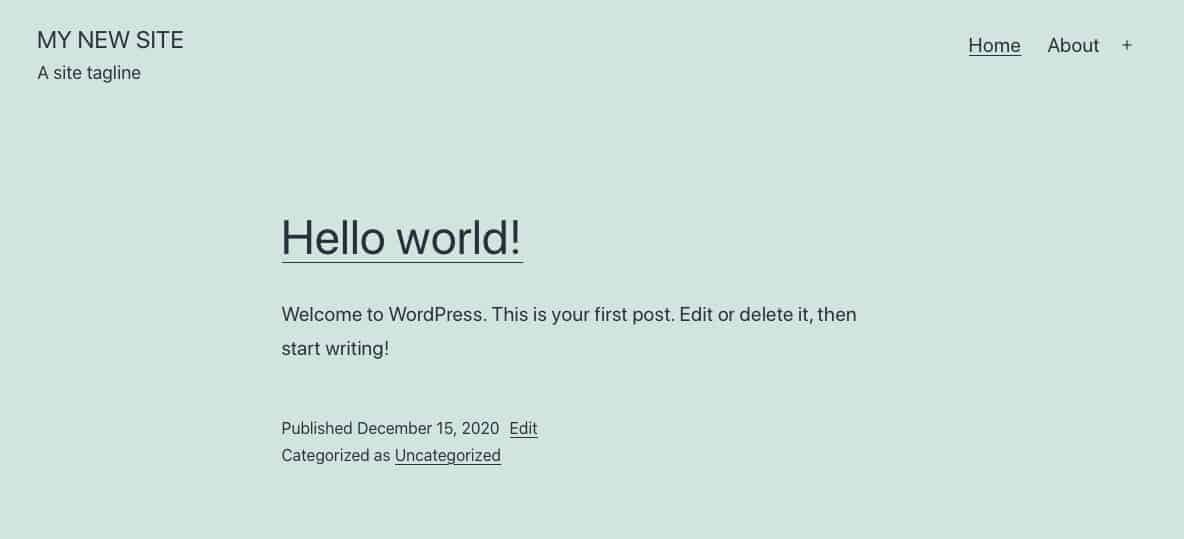
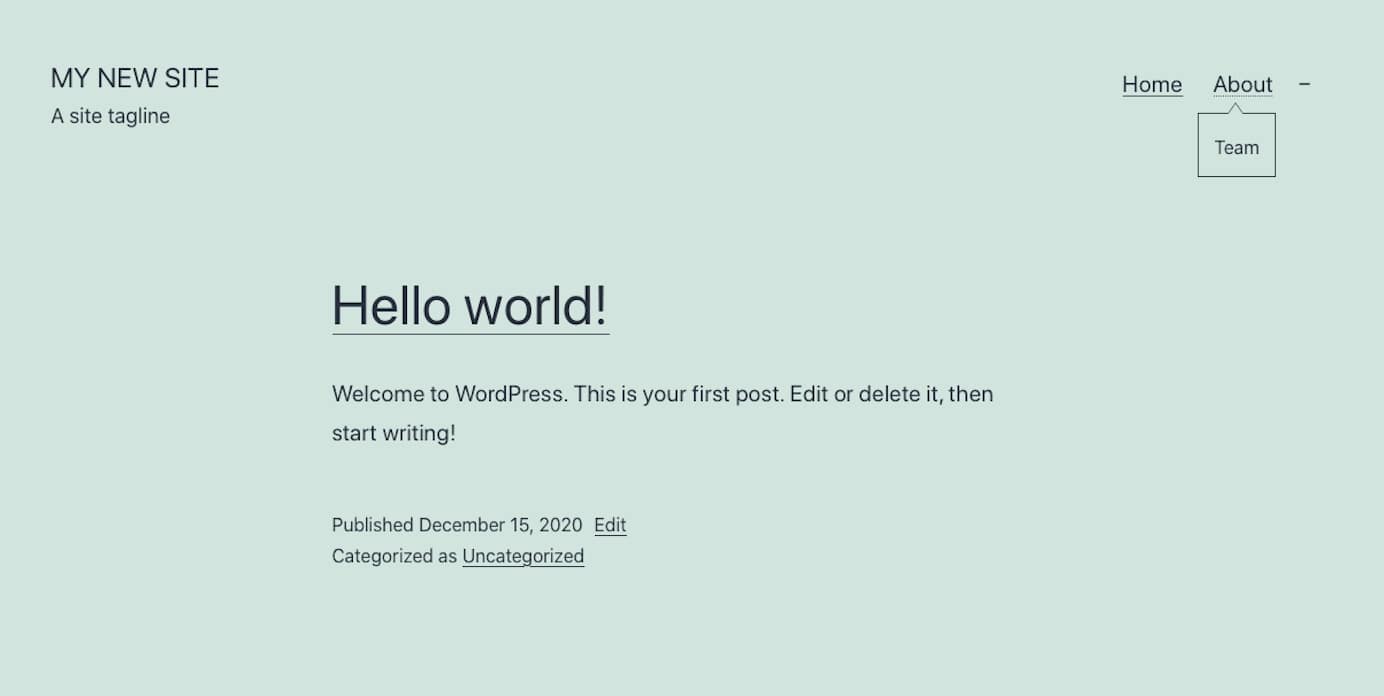
In fact, I built WebsiteSetup.org using WordPress, too. Below are samples of my homepage and ‘blog’ page:
WebsiteSetup Homepage
WebsiteSetup Blog Page
Are there any good alternatives for WordPress?
There are some.
But, I would still use WordPress.
Wix is an easy-to-use website builder with a simple drag and drop interface, but it has a higher cost, is not suitable for larger sites and it’s impossible to migrate your website out if the need should arise.
Squarespace is a very aesthetically beautiful website builder which makes creating beautiful websites easy, but it comes at a higher monthly cost and doesn’t have a function to migrate your website out.
Drupal is a powerful platform that is popular with experienced coders and web developers, but it has a high learning curve that makes it not the best option for beginners.
Joomla is almost like WordPress and is a good tool for website building, but it does require at least some basic understanding of how to write code to make things work the way that you want.
If for some reason you don’t want to build your site with WordPress, check out my Drupal, Joomla, HTML5 and website builder guides as well.
WHAT NEXT?
At this point, you don’t need go looking for WordPress. Right now, you don’t need to to install it nor download it.
To make sure your website is set up the right way, it’s important to complete the following steps below:
In Step 2, I’ll walk you through the process of choosing a domain name and finding a space to host your site.
In Step 3, I’ll show you how to install and customize your WordPress website. Don’t worry – I’ll walk you through the process, with lots of images as a reference.
Step #2: Find a Domain Name and Host
Full Disclosure: This guide is reader-supported. If you click on our links, we may earn a commission. Thanks for supporting us.
In order to get a new website online, there are two things that you’re going to need:
A domain name (a web address like yoursitename.com)
Website Hosting (a service that connects your site to the internet)
The WordPress platform itself is free, but hosting and domain name are not. However, the combined cost is still less than a coffee, with around $3 – $5 a month.
In order to look professional, you need to have your own domain name, instead of having a free domain that belongs to someone else (for example, yourbusiness.my-free-website.com.)
And, having a quality hosting service will also help you make sure that your website won’t go down and that it loads quickly (very important for everyone who visits your pages.)
Where do I get a domain name and hosting?
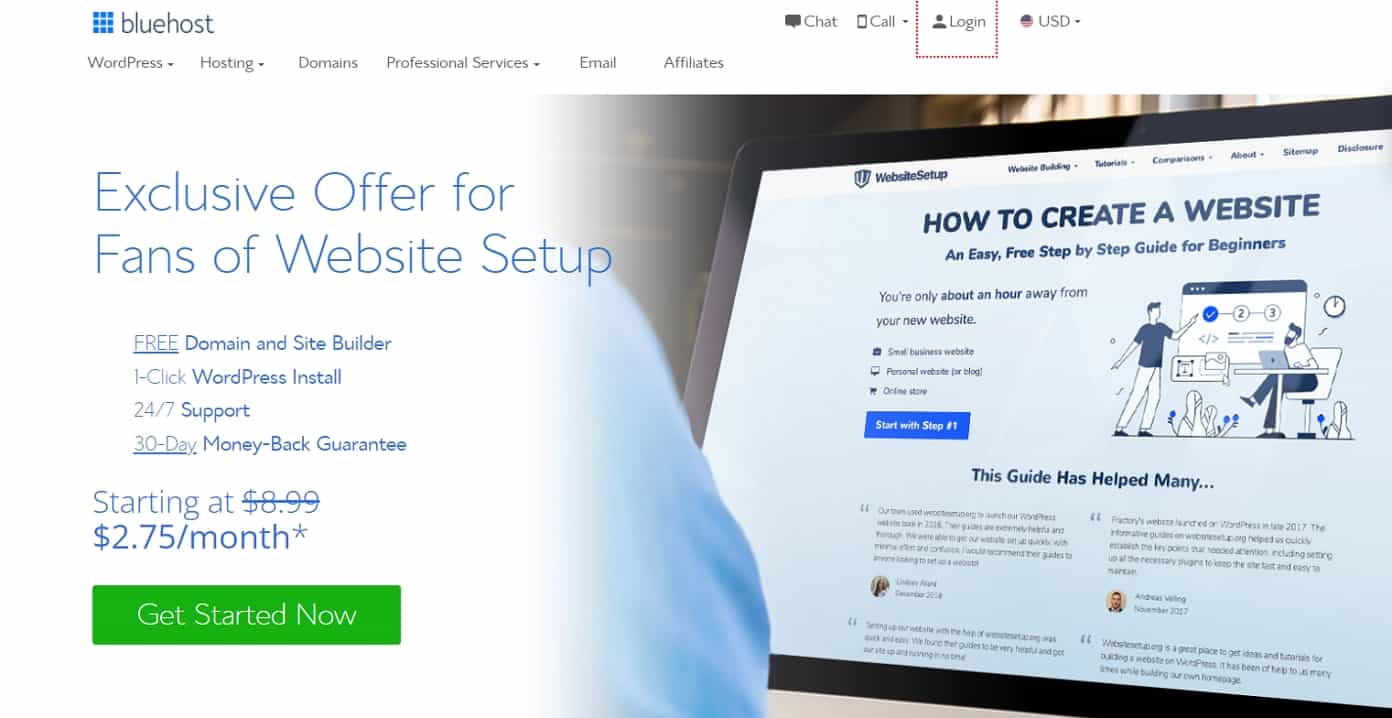
I’ve mostly used www.Bluehost.com as a web hosting and domain registrar for myself and for my web development projects.
Their website hosting costs less than a movie ticket ($2.75/mo) and they throw in a FREE domain name (a nice perk to have).
Of course, you can try other web hosting providers and even try to host your site by yourself, but it’s a very complicated process and often wouldn’t be capable of serving your website visitors. So save yourself some money and get a proper web host.
With your own domain name, you are also able to get a professional email account(s) like, yourname@YourWebsite.com – this is much more professional than a regular Yahoo or Gmail address, especially if you need multiple email accounts.
Already have a domain name and hosting? Go ahead and skip to step 3, where I’ll explain how you can set up your website.
If you’re setting up a business website, your domain name should match your company name. For example: YourCompanyName.com
If you’re planning on making a personal website for yourself then YourName.com can be a great option.
For this site (WebsiteSetup), I chose WebsiteSetup.org
Domain names usually end with .com, .org or .net, but in recent times, a large number of domain extensions (the last part of the web address, like .com or .org) have come out, ranging from .blog to .party.
My best advice? Avoid the unusual extensions and go with .com, .net or .org unless they precisely describe your website – and even then, it is usually better to go with a more common extension.
Any additional tips for choosing my domain name?
There are a few things that can help you choose your domain name:
#1 Is it brandable? For example, if you make a site about poetry then best-poetry-website.net is not a good choice: poetryacademy.com or poetryfall.com is much better.
#2 Is it memorable? Short, punchy and clear domain names are much easier to remember. If your domain name is too fuzzy, too long or spelled in a strange way, visitors may forget it.
#3 Is it catchy? You want a domain name that rolls off the tongue, describes what you (or your business) does and sticks in the head. Coming up with a cool name can be a bit tough since there are more than 200 million active domain names in the world right now – but don’t give up.
There’s one rule that always applies to domain names: If you like it, go for it.
WHAT NEXT?
Do some brainstorming to come up with a unique domain name that reflects your future website, business or blog.
Secure your web hosting and domain name. For this, I recommend using Bluehost.com, but you can pick any web host that’s reliable and trustworthy.
If you have any questions/suggestions for this guide don’t hesitate to contact me. Remember: I’m here to help!
1. Install WordPress Site
There are two possible ways to install WordPress, one MUCH easier than the other.
1. TO CREATE A WEBSITE WITH WORDPRESS, USE ONE-CLICK-INSTALLATION:
Almost all well-established and reliable web hosting companies have integrated one-click installation for WordPress these days.
If you chose to sign up with Bluehost or any other similar hosting company, you should find your “one-click installation” either in the account creation process or in your account control panel.
For example, these are the steps you need to follow to install WordPress on Bluehost (the process is very similar or even the same on all the most popular web hosting companies):
2. MANUAL INSTALL (if your web hosting provider doesn’t have an easy way to do it)
If for some odd reason (some hosting companies don’t provide one-click-install for WordPress) you don’t have the option to install WordPress automatically, look at this manual guide below:Installing WordPress Manually (Click to expand)
2. Choose a Theme for Your Site (Free or Premium)
For the next step, we’ll be diving into WordPress themes and how to use and customize them.
WordPress themes are design templates that make changing your site’s looks a lot quicker and easier.
Luckily, WordPress has loads of themes to choose from. The official WordPress theme directory alone contains more than 8,000, which are completely free to use.
You can access themes directly from within WordPress without having to navigate to an external site.
For that, simply go to Appearance > Themes, and click the large + sign that says Add New Theme.
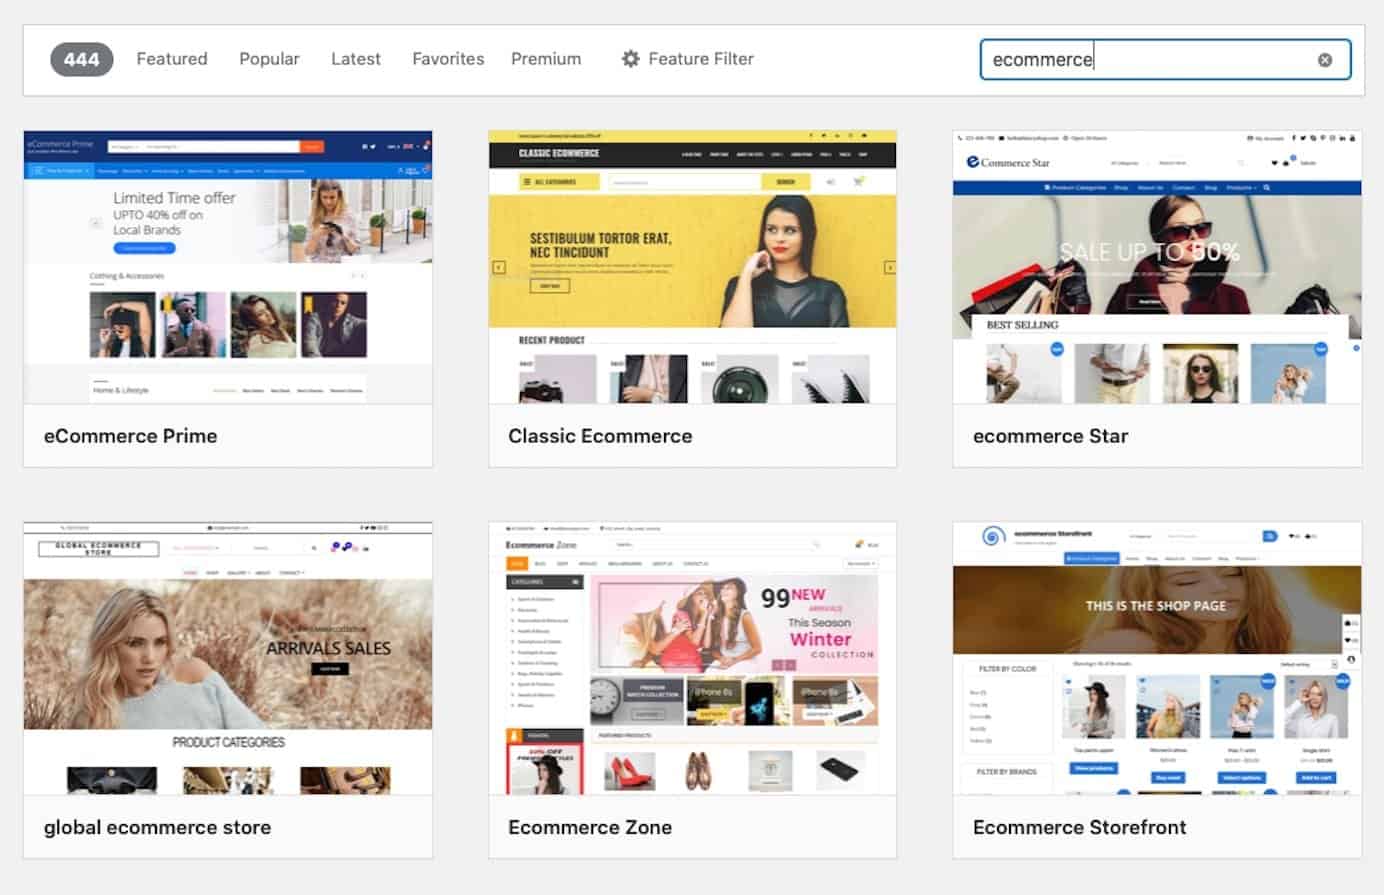
Then use the search bar to find a theme that suits your site.
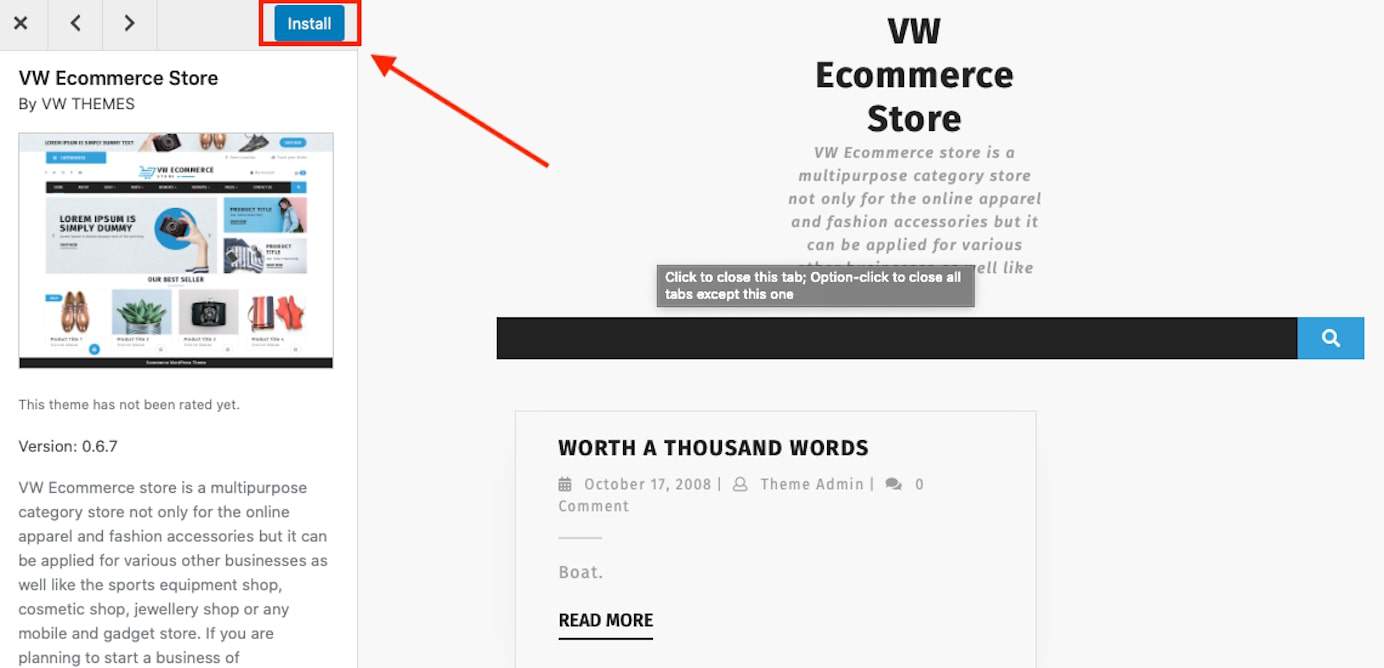
You can click on any theme in the listing to view a demo of it and read more about its features on its Details & Preview screen.
Once you find a theme you like, install it by clicking the Install button in the Details & Preview screen.
Once the install process is complete, click the Activate button that appears where the Install button used to be.
If what’s available in the official theme directory doesn’t suit your needs, check out premium theme markets such as:
Before getting to site customization, you need to have some content on your site.
After all, it’s hard to customize your site when there’s nothing on it to show the changes. What you need in terms of content will vary depending on the subject matter of your site and your goals.
However, there are a few key pages that nearly every site has:
Homepage
About page
Contact page
In deciding which pages to add, consider what information would be most helpful to your visitors. You’ll also need to think about visual content, such as photos.
To make things easier, some WordPress themes come with page templates for specific page types. Others also come with more than one layout option for each page.
To take advantage of these, go to Appearance > Customize.
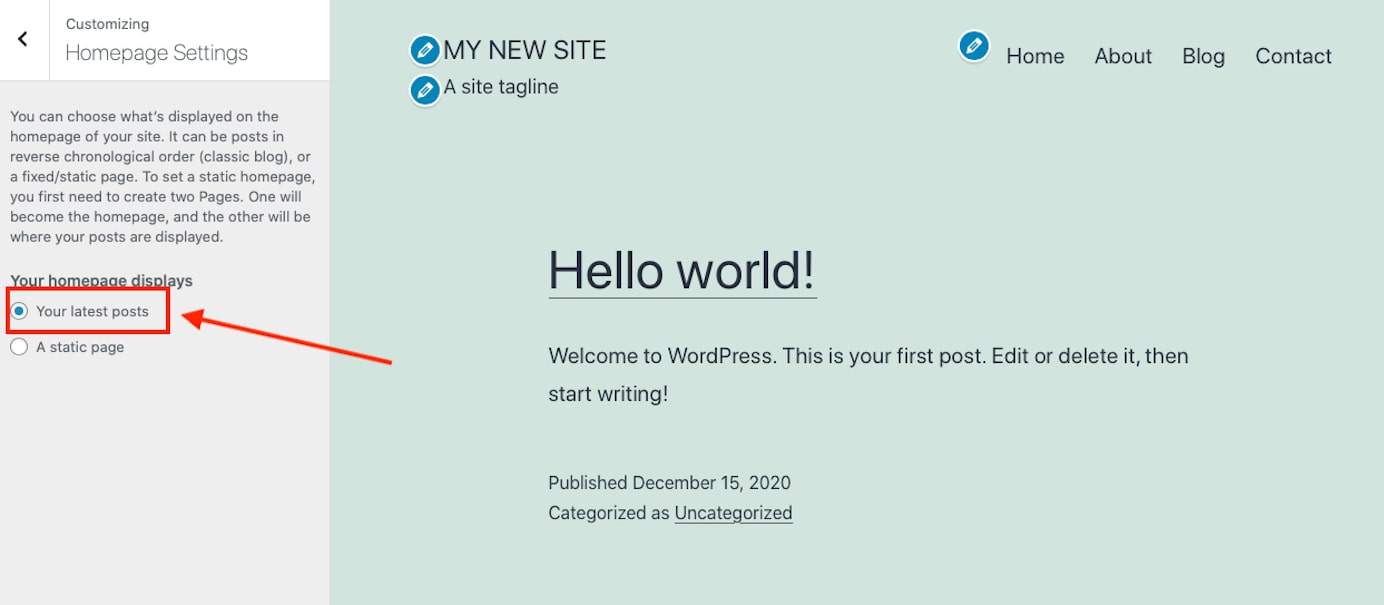
In this example, we’re using the latest WordPress default theme, Twenty Twenty-One to create a site. By default, it uses a static page as the homepage that you can configure under Homepage Settings. Use the dropdown menu to select which page you want to serve as your website’s homepage.
Alternatively, if you want your homepage to feature your latest blog posts, check choose the option Your latest posts.
Confirm your choices by clicking Publish in the upper left corner.
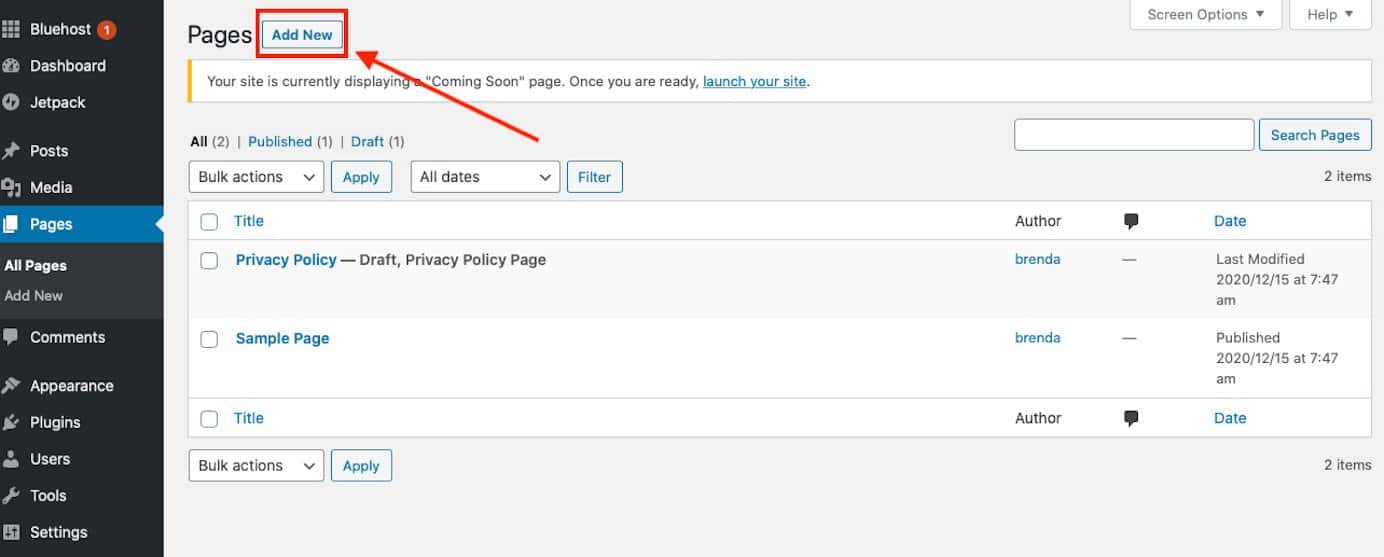
After that, you can move on to creating new pages for your site. For that, in the main dashboard, go to Pages > Add New.
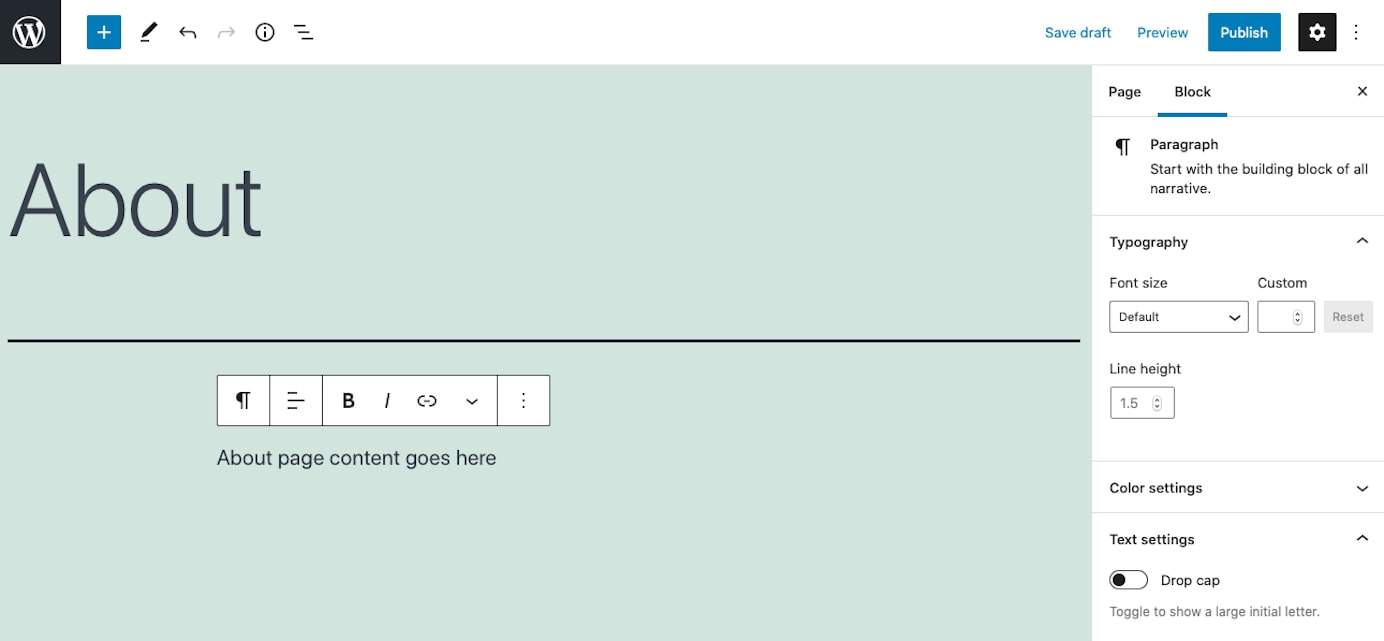
The Twenty Twenty-One theme relies on the Gutenberg editor, so here I can add page titles and content.
Within this page, you can add features like images and formatting.
Repeat this process to add additional pages to your site.
4. Make Sure Your Website is Well-Organized
Think of your website as a library.
Your website structure will become increasingly important the more content you add to your website.
When learning how to create a website, you need to get expert at organizing your site in a way that makes sense to your visitors and easy for them to get around it.
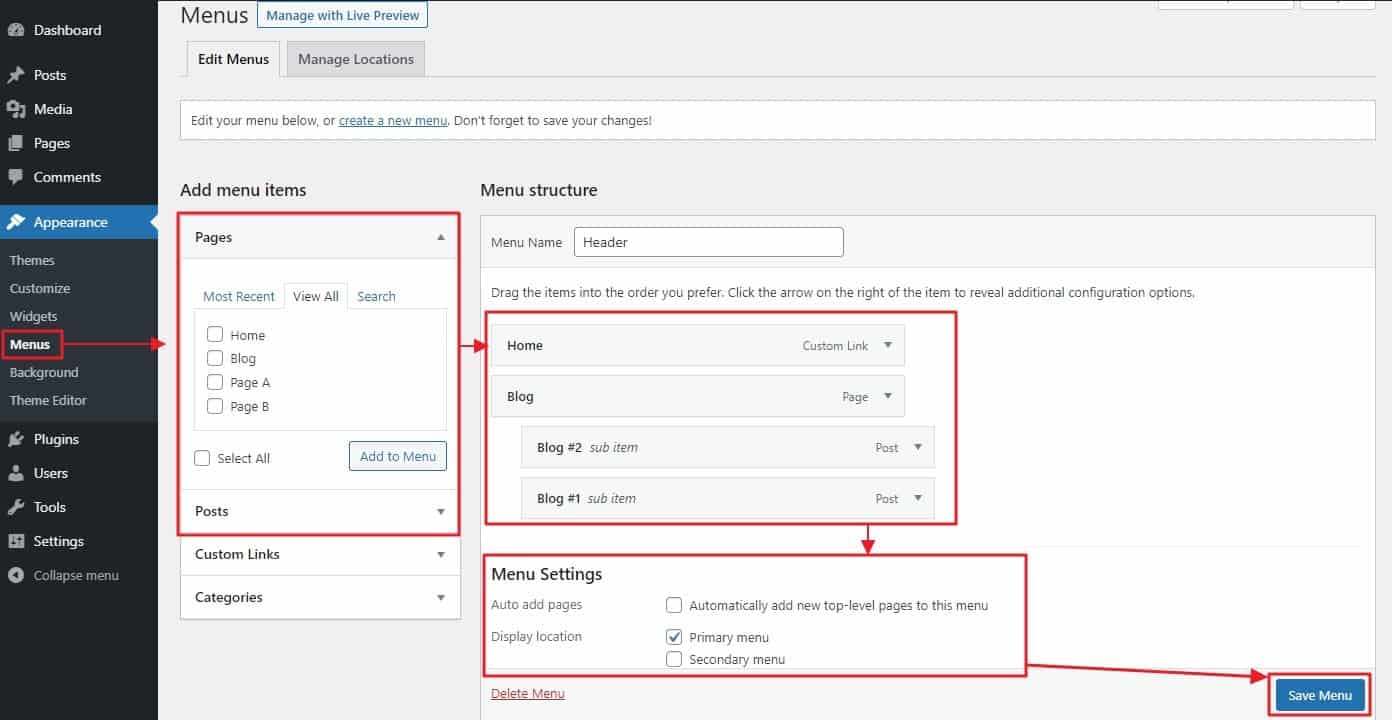
A crucial part here is the navigation menu. Once you’ve created some pages, it’s time to make them available to your visitors on the site. You can do that under Appearance > Menus.
The first step here, is to give your new menu a name, then click Create Menu.
After that, you can choose which content to add to it on the left. For example, tick the boxes next to pages you want to appear in the menu, then click Add to Menu.
You can drag and drop menu items to your desired order and even turn them into sub-items by moving them underneath others like below. Once you are satisfied, choose the menu position where you’d like for this menu to appear (in this case Primary menu).
Click Save Menu again and go to your site’s front end to see the new menu in action.
Ultimately, you want to reflect a structure that makes sense for your site and helps visitors get to where they need to go.
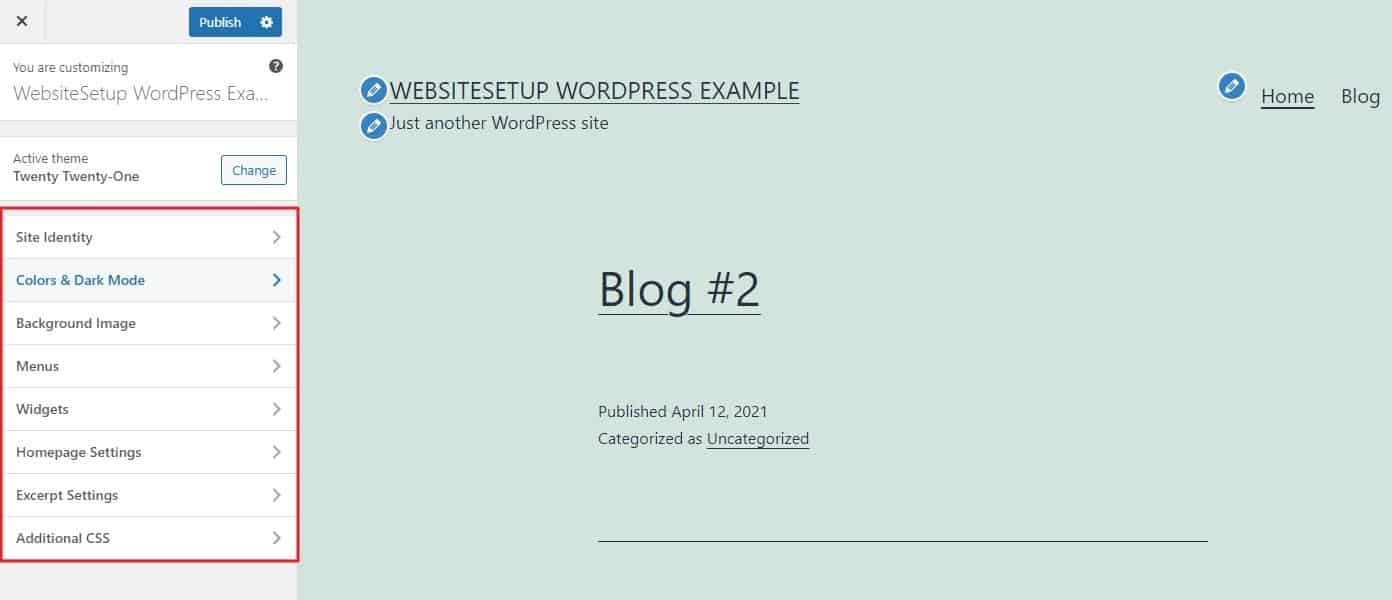
5. Additional Customization Options
For additional customization options, go back to Appearance > Customize. When you look around, you will see that it offers a lot more options to make changes to your site. You are able to modify other parts of your site like:
Title and tagline
Colors
Typography
Background image
Menus
Widgets
You can also make adjustments to your homepage, blog page, and add custom code. The options that appear will vary depending on which theme you’ve installed.
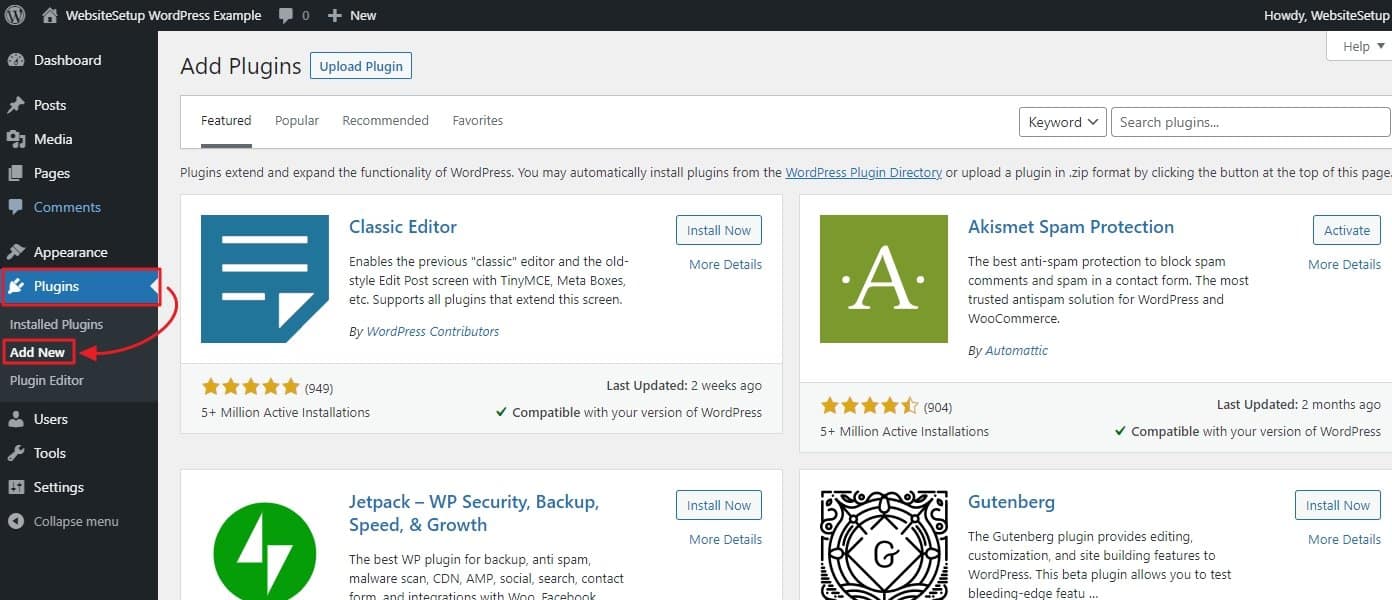
Beyond theme customization, there are many plugins available for WordPress, both free and premium. In the official WordPress plugin directory alone, you can find close to 60,000 plugins that can add all kinds of new features and functionality to your site. Plus, there are many more available from third-party marketplaces.
To install new plugins, navigate to Plugins > Add New.
You’ll be presented with a list of some of the most popular plugins currently available. Use the search field to find anything else you are looking for.
To get plugins onto your site, hit the Install Now button. Wait until it has been downloaded and then click Activate. You can find all plugins on your site plus the possibility to activate, deactivate, and delete them under Plugins in the WordPress main menu.
As to what plugins you should install, some choices worth considering include:
Yoast SEO – A top search engine optimization plugin that adds on-page optimization prompts to every page and post plus the option to customize Open Graph social media tags.
Jetpack – Includes a wide range of features to improve website speed, optimization, social media integration, digital marketing, contact forms, and site search.
Smush – This plugin compresses images that are uploaded to WordPress, which saves storage space, and speeds up page load times.
WooCommerce – This is the most popular e-commerce store plugin for WordPress and makes it easy to set up an online store. More on it further below.
MonsterInsights – This plugin adds Google Analytics to your WordPress dashboard.
If you want even more control over how your website looks, you can install a page builder plugin. These plugins add drag-and-drop functionality to your site, which means you can visually build entire web designs — not just individual pages and posts. A few popular choices include:
Elementor – This all-in-one website builder offers visual website editing, fast load times, and a vast selection of templates to choose from.
Divi – Developed by Elegant Themes, Divi provides another straightforward way to customize websites.
Beaver Builder – An easy-to-use page builder plugin that speeds up website design considerably.
6. Add a Blog (Optional)
Not every website needs a blog. However, creating one can be a good idea to regularly publish fresh content, display your expertise, and provide additional value for your visitors.
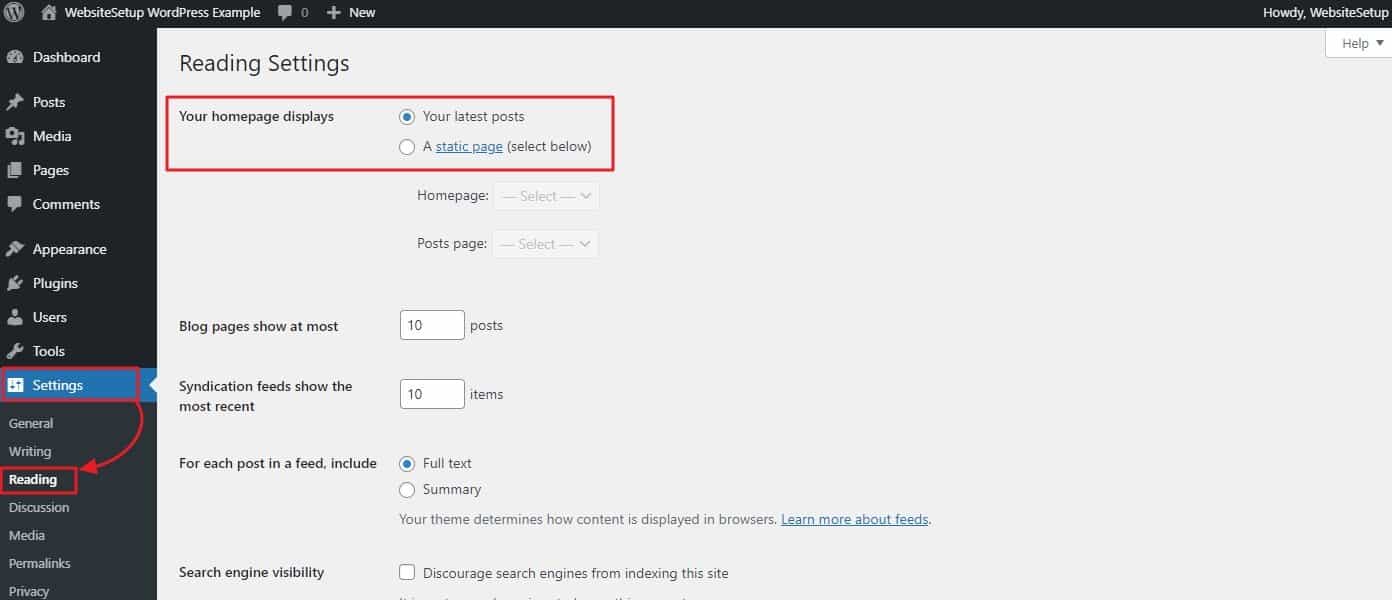
To add a blog in WordPress, you first have to select a blog page. Above, I have already covered that you can configure your homepage to automatically display your latest posts. However, if you want a dedicated blog page instead and keep your homepage static, you first need to create it.
This is as simple as setting up an empty page (Pages > Add New), naming it Blog (or whatever you want but Blog makes sense because it will automatically create the address yoursite.com/blog for your blog page), and publishing it. Then, pick it as your Posts Page either under Appearance > Customize > Homepage Settings or under Settings > Reading.
When saved, all blog posts will automatically appear on your chosen page. Don’t forget to add it to your navigation menu!
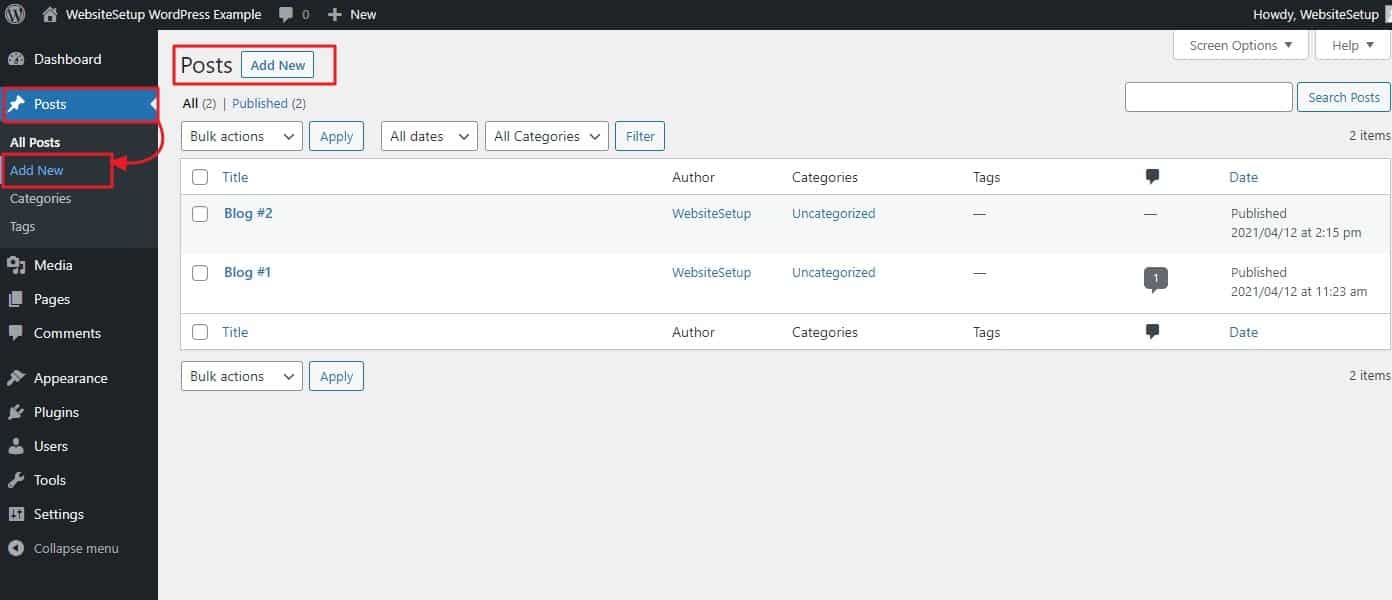
To add blog posts to your website go to Posts > Add New.
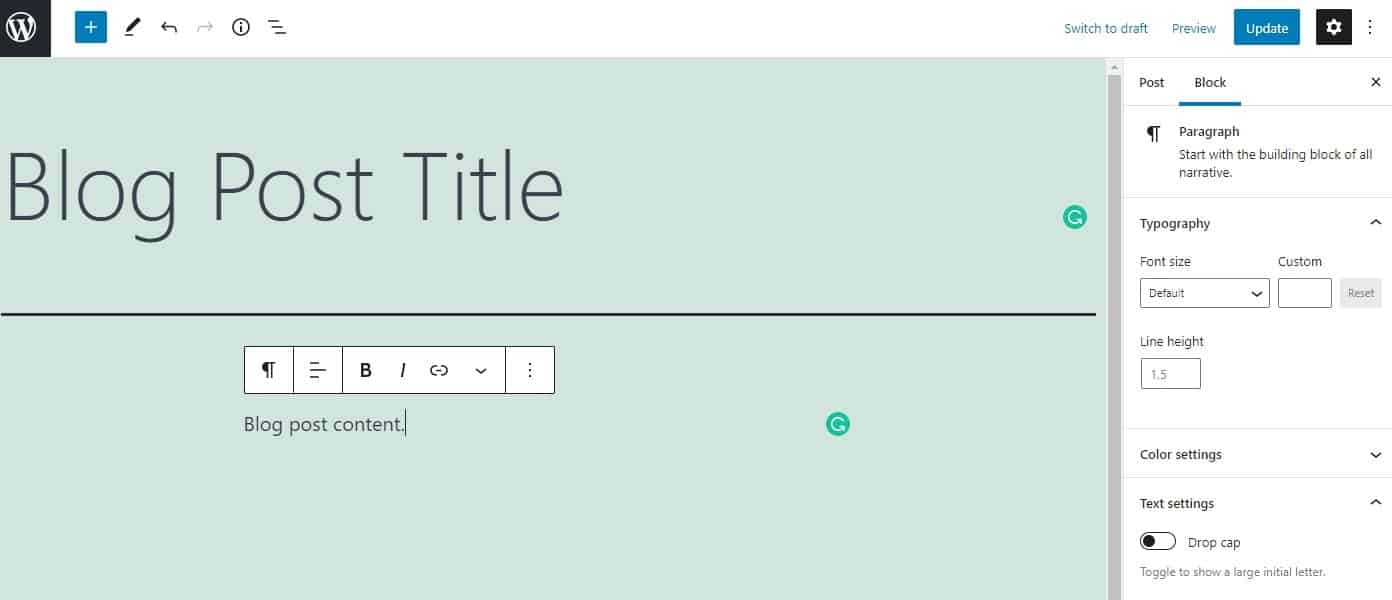
This will get you to the same content editor that you used earlier for your pages. Add a title and content to your blog post. Include images and formatting, headers, lists, and anything else it needs. In the sidebar on the right you also find options to apply categories and tags, define an excerpt, and set up a featured image.
Once you’re done making changes, click Publish. Your first post is completed, well done!
7. Adding an Online Store (Optional)
Not every website needs an ecommerce store. But if you want to know how to make a website and include an online store, keeping reading.
The most popular plugin for this purpose is WooCommerce.
You can set it up quickly, it offers many payment options, and a wide range of optimized themes to create an online shop. Plus, it has a variety of extensions available for purchase to customize your e-commerce site and adapt it to many purposes.
To learn how to add an online store to your website, follow this guide.
8. Configure SSL
A secure sockets layer (SSL) on your website means data sent to your website’s visitors is kept secure. SSL is an important search ranking factor, and it’s essential to ensure a positive user experience by prioritizing user privacy and security.
To check that SSL is active on your new website with Bluehost, do the following:
Log into Bluehost.
Go to My Sites.
Click Manage Site.
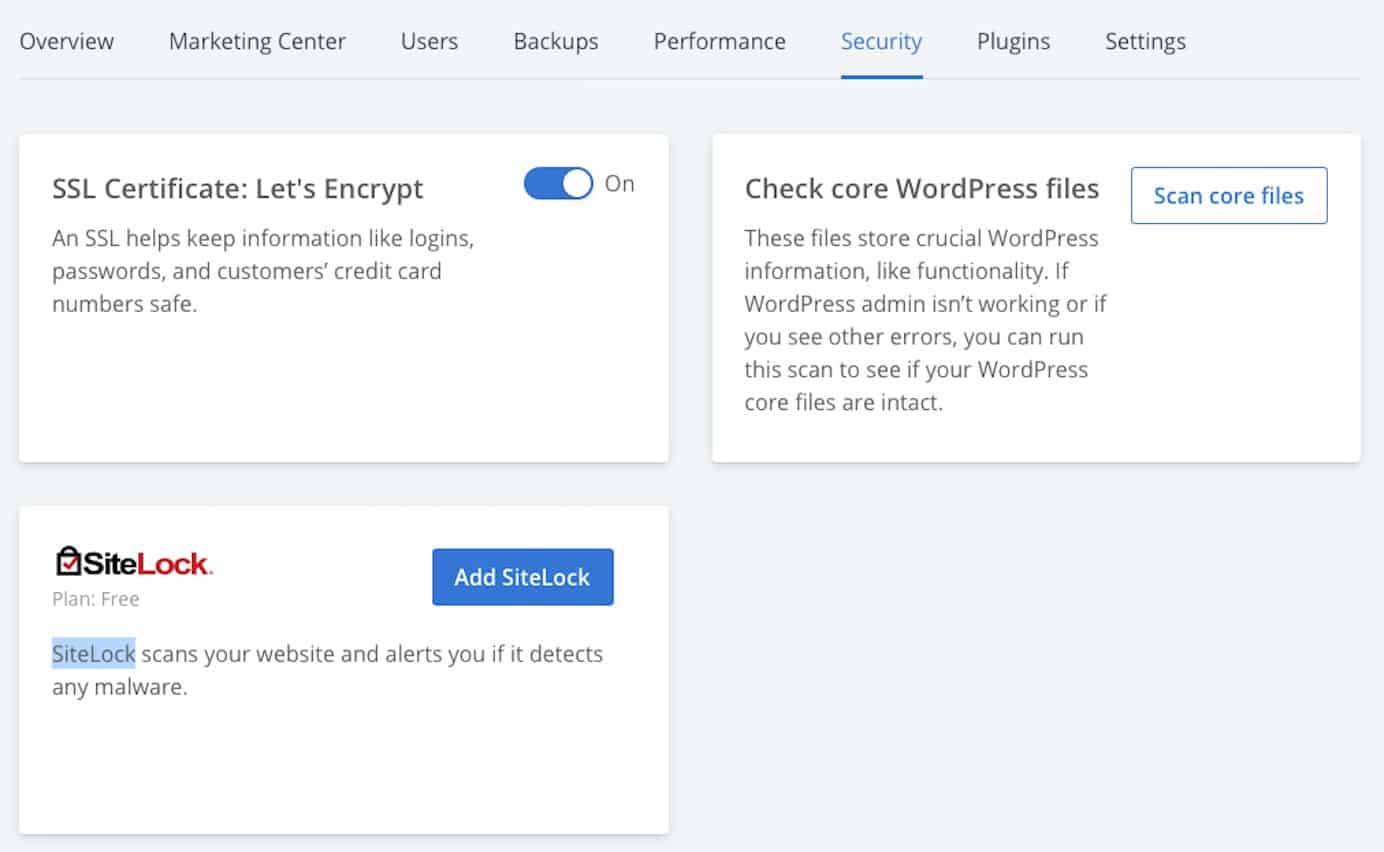
Find the Security tab on the next screen.
Under the section that says Security Certificate, verify your Free SSL Certificate or SSL Certificate: Let’s Encrypt status. The toggle should be switched to On.
Verify SSL is set up by visiting your site again. A lock icon should appear next to the domain name in your web browser’s address bar.
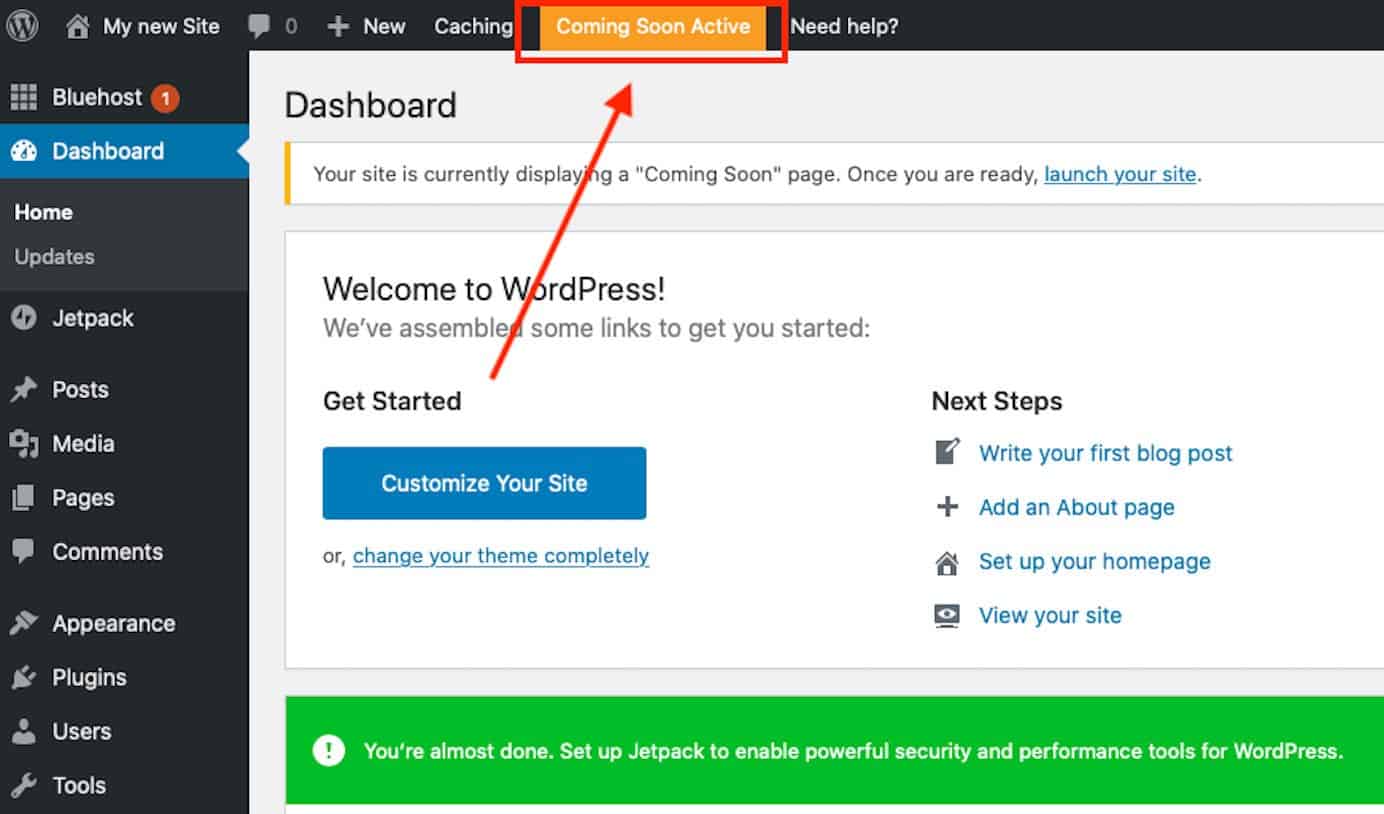
9. Launch Your WordPress Website
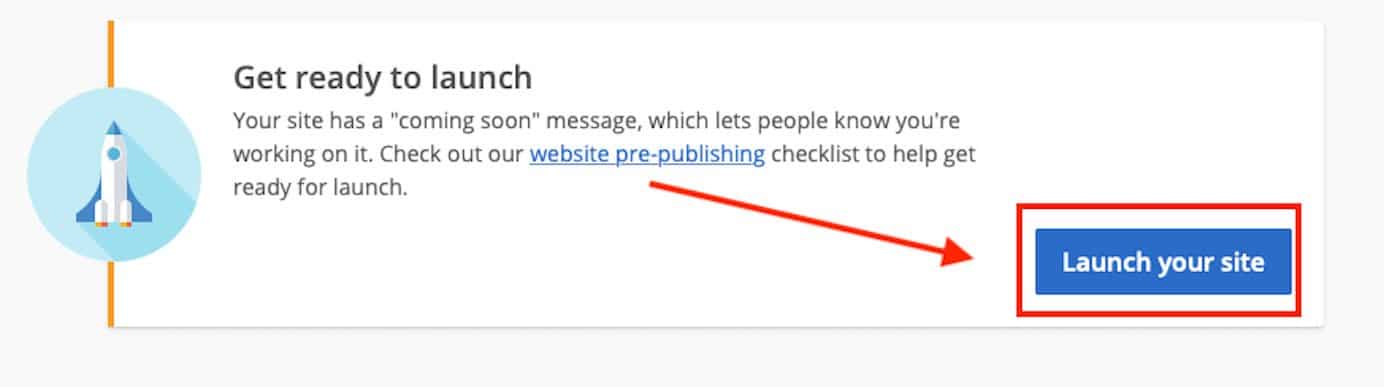
Once your site is ready, it’s time to officially launch it. Make sure to double-check your settings and proofread your posts and pages one more time. If everything looks good, click the link at the top of the dashboard that says Coming Soon Active.
After that, scroll down and hit the button that says Launch your site.
Now you can check your live website.
Click through each page to make sure all links work, your text looks good, and your images are formatted properly (you can use this checklist for reference).
Congratulations! You’re now the proud owner of a new website.
Learning how to make a website is no small feat, even with a detailed guide to help you along the way.
At the same time, it can be very satisfying when you acquire a new skill and start seeing your hard work pay off.
But don’t stop here. Use your new knowledge to learn more and implement more complex functionalities and features. This way, you won’t just learn how to make a website but exactly the site you want.
An Easy, Step-by-Step Guide for Beginners
Starting your very 1st website or helping someone? websitesetup.org has some great walkthroughs for domain, hosting & CMS!
When you use WordPress to write content and publish them online, you usually heard the term WordPress permalinks. This term is critical to learn from the SEO point of view for every user. This is commonly known as a link that helps you to reach a specific section of the content.
In this post, we try to bring you Complete comprehensive content about WordPress Permalinks. What are they? How do they Work? How should you implement them? And any more. But before getting into deep, let us know What WordPress Permalinks actually are?
What are WordPress Permalinks?
As per the official definition provided by WordPress,” Permalinks are the permanent URLs to your individual weblog posts, as well as categories and other lists of weblog postings.” Whether your website has archive pages, posts, or even 404 error pages, all of them have their own WordPress permalinks.
Suppose your domain/homepage is www. example.com, then the archive pages or your blog pages would be www.example.com/blog to understand this term better.
Or if your website has other pages such as contact us, home, or about us page, then the WordPress permalinks of these pages would be as follows:
Contact us – www.example.com/contactus
Home – www.example.com/home
About us – www.example.com/about-us
Or Www.example.com/?p=123
These both URLs are the types of WordPress permalinks you have which we will discuss later. In addition, whenever you post content on your blog, each post has its own permalink. It becomes accessible due to your theme template files, which have a template tag that fetches the Post URL and converts them into clickable links.
And Here the WordPress comes into play, and it uses these clickable links to use in your blog listing by showing them within an <a> element.
Some other terms related to WordPress Permalinks
To continue this post, we would like to let you know about the meaning of some more terms related to WordPress permalinks, and it will be easy for you to understand the difference between them. As we have already mentioned above, WordPress permalinks are the complete links to the post or any page of a website.
And the slugs are like the final, ready to use and unique part of WordPress permalinks. For example, the permalink of the About us page is www. example.com/about-us, then the slug would be about-us. These are generated by WordPress automatically based on the various parameters that you have in your permalink settings.
And if you are not happy about your default WordPress permalinks, you have the option to customize it as per your choice, which we will see in the later section of this post.
Types of WordPress Permalinks
There are generally three different types of permalinks are available.
Plain or Ugly WordPress Permalinks
Pretty WordPressPermalinks
Plain or Ugly WordPress permalinks: Plain or ugly permalinks are the links WordPress assigns by default without any customization or alterations. It usually looks like the example given below:
1
<strong>http://example.com/?p=N</strong>
Each element in the permalink given above have its own meaning, such as N denotes the Post ID number. To your surprise, these links work fine on all servers, but the only downside of plain permalinks is that it doesn’t look nice like other options available.
Pretty WordPress Permalinks: A well-structured, easy to read, understand, and SEO-friendly URL termed Pretty WordPress permalinks. You can easily enable them in your WordPress settings. Let us take some examples to understand better how they are different from Ugly permalinks.
From the above-mentioned examples, you can easily see the main difference between them. In the ugly permalink, it shows you the P variable with the post id number. Whereas in the pretty WordPress permalink, you can see an easy-to-understand and read post slug.
WordPress has provided you with four formats that you can pick from permalink settings to make it more informative and structured. Just look out the image below and see all the options.
WordPress permalinks: Pretty permalinks
But another thing you must keep in mind is that you are not limited to use only the above pretty WordPress permalinks settings. WordPress provides you customization options by using structure tags.
Why you need to use Pretty WordPress permalinks?
Pretty WordPress Permalinks not just look good and easy to remember, but they have two more benefits: it is SEO friendly, and another enhances UX. You might have curious to know how Pretty URLs helps in SEO benefits? Well, search engines use your URL to determine what your page or content page is all about. And if they found your permalink related to the content or page, the search engines find it genuine and legitimate to give them priority in their search engine rankings.
In terms of UX(User Experience), Pretty WordPress permalinks not just help search engines understand the post or content it links, but a user can also easily read and understand the post it links to. For example: If you about us have URL like example.com/?p=245, it is tough to determine and remember such URLs rather than example.com/about-us.
How to implement better Permalinks, Slugs, and SEO?
As we have already mentioned in the above sections about the Slugs, these are the last part of your page or post URL. slot automaty online And if you have already gone through the WordPress permalink settings page, the title of the page or content is used in Url. For example, if your content is about “How to monetize your blog?”, it will be automatically generated as an example.com/how-to-monetize-your-blog/.
From the above example, you can see that anyone can easily tell what the content will be all about by looking at the URL. In addition, search engines can easily determine these URLs as pretty WordPress permalinks that have focus keywords.
But it is not enough; you can even improve the slugs for better results by following some tips such as your slug should be not soo lengthy, and it should be long enough to include your focus keyword and be easy to remember.
For example, if a post/page has a Pretty link as ” How to monetize your blog,” it might be better if you use slug as Monetize-blog. And if your website has multiple posts on the same focus keyword and you want to differentiate each one with a different slug. For example, if you have another content on the same focus keyword, ” monetize your blog,” with a different topic such as What are the benefits of monetizing your blog?
In this case, you could use “monetize-your-blog–benefits,” and the pretty permalink would be example.com/monetize-your-blog.
Slugs and User Experience
After knowing the SEO benefits of WordPress, pretty permalinks, now we shall talk about its User Experience benefits (UX).
As per Jacob Nielsen, the following points have been mentioned about what a website must have.
Easy to learn and type URLs
Easy to remember and spell Domain names
Permalink should not change
Short and clean URLs
Urls should not get hacked or provide security from all the malware or hackers attacks.
In addition to the above worth points, A permalink should never be either removed or altered in any case; it has been shared and used in multiple ways on the internet that provided you credibility. Another point to remember is that an URL must be clean and easy to understand so that even a non-expert user can easily understand and remember it.
No doubt, it is not impossible to edit or alter your permalink completely of a post that you have already published. But it is not a good practice and can potentially harm your website DA and even search engine rankings. This is because the original permalink may have been shared on the internet.
Still, if you need to make some edits to change your old permalink with a new one completely, make sure you practice the WordPress directing methods.
How to setup Permalink in your WordPress Website?
WordPress has provided you with multiple options to change the WordPress permalinks and choose whatever you want your permalink should look like.
You can change WordPress permalinks as
As soon as you setup your website, you can change your permalink settings to pretty permalinks.
You have the option to edit or alter slugs for each posts, when you are writing a post and editing them.
You can use WordPress best redirecting practices to point your old/outdated permalink to the new one.
You can even compose or create your own plugin to change the way permalink are designed.
You have the option to change the permalink structure for tages and categories.
WordPress Permalink Settings Page
After you set up your website, the first thing you need to do is to configure your WordPress permalinks settings page. Go to your WordPress Dashboard > Settings > Permalinks.
WordPress Permalink Settings page
Common Settings are defined as:
Plain: This option only uses post ID in the URL. However, it can be easily read by browsers but it won’t work for humans like us and the search engines. e.g- yoursite.com/?p=123.
Day and Name: This option uses the date of posts that publised on and the name or title of the post. In the above picture it is showing as: yourwebsite.com/2022/08/30/sample-post/.
Month and Name: Similar too Day and Name, this option uses the Month and Name of the post that you publish. e.g- yourwebsite.com/2022/08/sample-post/.
Numeric: Just like the Plain option, it also uses the post ID. It can alsoo be easily readable by the browsers but won’t work for humans like us. e.g- yourwebsite.com/archives/123.
Post name: Unlike other options that has post ID,month or date, this option uses your the name of the post in the slug. e.g- yourwebsite.com/sample-post/
Custom structure: With this option, you can create your custom structure. You can use certain tags that help you to grab the information from your that will doesn’t change in near future.
Optional Settings
Apart from the above permalink settings that you find, there is an optional settings field also provided that lets you set a custom structure for your category and tag archives.
If you like, you may enter custom structures for your category and tag URLs here. For example, using topics as your category base would make your category links like http://example.com/topics/uncategorized/. If you leave these blank, the defaults will be used.
How can you edit or Change Permalinks and Slugs for each pages and post?
After successfully setting up pretty permalinks on your website, the next thing you need to do is to edit your Pretty permalinks to get better results and optimize as per the search engine and users’ standards.
To optimize WordPress permalinks and slugs of each page and post of your website. It is highly recommended that you must practice this while editing or writing your content. If you have a directly edited slug of any content or page, you have unintentionally also changed its URL. And if the old link was shared anywhere on the internet by your users will be no longer exist and return a 404 error page.
Hence, to carefully carry out the same process, you need to go to your WordPress dashboard > posts > select the post you want to edit.
After that, on the right-hand side of the post creating a screen, you will find the permalink option under the post tab as shown in the picture below:
from the above image, you can see in the post-editing screen on the right-hand side a permalink option is provided under the post section. When you click on it, you fill an automatically generated slug displayed in the URL slug.
Now you can edit this section to make your permalink short, clear, and SEO-friendly that focuses on your target keyword. But before editing it, make sure you have copied the old slug in your notepad or somewhere else so that when you set up redirecting (In case you are editing the old content), the old link cab used.
After editing, now click on the update button to save the changes and hit on Publish button to make it live. But one thing must keep in mind is that you must not forget that if you have to make changes in the slug of an existing post, it could result in a 404 Error for the users who shared the original link. Hence after completion of editing, do not forget to set up redirection.
Changing WordPress Permalinks settings for Archive pages
If you are looking for WordPress permalinks settings, especially for individual archive pages, you need to change the “category” or “tag” in the permalink settings page. However, you also have an option to change the slug of each tag or category.
How to change slugs for Tags and Categories?
To change the slugs for tags and categories, you need to go to your WordPress dashboard > Posts > categories or Posts> Tags. Look out for the tags or category that you want to alter or chance and click on it. Now type in a slug if you want to, or else, the WordPress will automatically generate and assign one, per the tag or category.
However, it is not necessary to have this, it only makes sense when you have categories or tags, and if you choose it for later, you are required to complete the whole redirection.
WordPress permalink settings in Ecoomerce
If you are looking to change WordPress permalinks settings for an eCommerce website, if you are using the woo-commerce plugin, then it creates custom post types and all the taxonomies by itself, and all these permalinks are generated by default.
However, you can still make changes to the permalink and slugs for every custom post and taxonomy.
Changing Product Category, Tag, and Attribute Permalinks
To change product category, tag, and attribute permalinks, you can go either by using slug or the structure. However, both these works are almost similar for regular tags and categories.
Editing Product category Slug
For editing the product category slug, you need to go to your Products > Attributes. Still, before editing your attribute, you must keep in mind that it is a whole different process, and you have to also deal with attribute terms too.
Editing Permalink structure
For editing the Permalink structure, you need to go to your Dashboard Settings > Permalinks and scroll down for the Optional field, where you will find more Woocommerce permalink options. And you can edit the permalink settings for woo-commerce custom taxonomies.
Product cateogory base: By default it is set as product-category but it can be changed as per the terminologies you use in your online store. But one thing you must ensure that whatever you make amendments in your settings, it should not clash with your settings that you have set up for regular categories.
Product tag base: By default it is set as product-tag, but it can also be changed as per your choice. And ensure that it should not also clash with your settings that you have set up for regular post tags.
Product attribute base: Apart from the above two taxonomies, it works differently by having a different structure. The product you add it will by default asigned a slug for each and every attribute name with attributes itself.
Suppose you wish to make some changes in the slug for every tag or category. It would help if you went to your Product section followed by categories or Tags and make changes the way you do with categories and tags.
If you want to edit the slug for an individual category or tag, go to Products > Categories (or Products > Tags) and edit these in the same way you would post tags and categories.
While editing or creating a new attribute, all the procedures will be the same, just as you would for editing categories and tags. i.e., you use the slug option to set up the slug. Or, in another way, if you’re looking to edit the slug for an existing attribute, you need to click on the Edit link just below the attribute you would like to edit.
After completing editing attributes, the find thing you need to do is to click on the Update button to save your changes.
If you are looking to edit or make some changes in the Attribute term slugs, go to attribute > and click on configure terms link just beneath the attribute. You will find a complete list of the terms for that particular attribute.
Now, you have the option to edit the slug for each term that is being listed, just like you edit for tags and categories.
How to change WordPress permalinks of products?
If you want to edit permalinks of products, go to your WordPress Dashboard > Settings > Permalinks and Lookout for Product Permalinks filed.
When you look at the product permalinks section, you will find the following fields to choose from:
Default: These slug will be show if you have already activated pretty permalinks, and it will use slug of each product by default.
Shop base: You will be using shop instead of product in the slug.
Shop base with category: In addition to shop you will be also using category nam e of the product into the URL.
Custom base: This section let you customize your own permalink structure, anyhow. And another important thing you must note that, you simply cannot left or remove the base completely.
When you are done with opting for the suitable option as per your requirement, the next thing you need to do is to click on the save changes button to save your changes.
Changing WordPress Permalinks Using WordPress plugins
If you found all these permalink settings quite tedious, WordPress has always provided you with alternative solutions in terms of WordPress plugins. Using a third-party WordPress plugin will help you out to make changes or editing your permalinks over what WordPress has provided you with default permalink settings options.
Permalink Manager Plugin is considered one of the most advanced and highly rated WordPress permalinks editor plugins that let you customize and control the structures of URLs for all the pages, custom posts, and posts. And when a new custom permalink is active, the errors such as 404 and copy content errors will be avoided by automatically redirecting them to the new custom permalink you have defined.
The Custom WordPress Permalinks plugins are best suitable for customizing your URLs of any post, page, category, or tag the way want to. And you do not need to worry about 404 errors; all the old WordPress permalinks will be redirected to the new address without any issue.
Changing WordPress permainks in phpMyAdmin
If you have basic knowledge of WordPress files and using phpMyAdmin, then you can do almost anything through it, including editing permalinks. This comes to the handy and best alternative solution when there is something issue with your WordPress dashboard, and you are unable to access it through your WordPress permalinks Settings page.
But before that, you must make a complete backup of all the files and databases to avoid any mishap during permalink editing.
The First step is to access your phpMyadmin by logging in to your Cpanel by typing your database username and password. At the top of the page, you can see the Databases option. Click on it to open and select the database you want to work with.
Select the wp_options as shown in the picture above and look out for the permalink_structure.
Select the wp_options table and find the permalink_structure entry in the option_name column. You might need to navigate beyond the first page of entries.
As shown in the above picture, you can see on the left side of permalink_structre; an Edit link has been provided. Click on it to add the permalink structure that you wish to use.
Click the Edit link on the left for that entry, then under the option_value field, add the permalink structure you want to use. Use the tags that we identified earlier for use in the Permalinks settings screen.
Once done with editing, You can click on the Go button to save your WordPress permalinks.
How to change WordPress Permalinks in Images?
To your surprise, images that you use in your post or content have their own permalinks. And when you upload any media file, such as images or videos, to your website, it will generate multiple links for each media file.
The first one is the link to the original image, and another is the links created when you set media sie settings.
How it created Link to the origal image or the image you upload?
As we have already mentioned that whenever you upload an image or any media, WordPress will create a unique link to the file it is saved on your server. You must have noticed a path named wp-content/uploads while configuring server files.
The image files or the pathname consists mainly of the date on which the image was uploaded. It helps to avoid conflict between the images. If you have uploaded an image of the same file name but on a different date, it won’t create any big issue.
For example, if you have uploaded an image with the name Image001.jpg on a month, say June 2021, the WordPress link will generate as example.com/wp-content/uploads/06/Image002.jpg where the number 06 in the link indicates the month of file upload.
It also works the same way with other media files or documents. For example, example.com/wp-content/uploads/06/emploees.doc. And you might have thought, what if you upload a file with the same name in the same month. Well, WordPress resolve this situation by adding up a number to the end of the file name.
So whenever you upload another file, either image001.jpg or emploees.doc, again in the same month, the file will be saved with the name image001-1.jpg and employees-1.doc.
If you wish to check out the working condition of the original file that you have uploaded or want to link to the original file, check out the procedure how you can find the link.
To find the link to the file, you need to go to your WordPress Dashboard > Media > Library and click on the file that you want to know its link to. A pop-up editing image window will open and showing the File URL and other file details on the right side.
WordPress Permalinks for different sized images or any media files
We have already mentioned in the previous section of this post that WordPress also creates permalinks for the images based on their file size. Whenever you set a file size for any image, a permalink will be created automatically. To do this, you need to go to your WordPress dashboard> Settings > Media.
So whenever you upload an image with a large file size exceeding the large value settings, WordPress will automatically create copies with three different file sizes per the media settings, i.e., Large, Medium, and thumbnail.
However, WordPress won’t name these files as per their different sizes; a user may change its name as per their requirement shortly. Hence, alternatively, WordPress uses the dimension as in the file name and store them at the same place where the original image is being located. i.e in the wp-content/uploads.
To find the URL of all the images of different sizes, the easiest method will be by accessing the WordPress files via the FTP client and find out all the images you have uploaded in a particular month.
For example, let us suppose I have uploaded an image with the file name Image001.jpg. The WordPress will create a copy of the same file with different file sizes using the media settings as follows:-150×150.jpg
Image001-150×150.jpg
Image001-300×300.jpg
Image001-1024×1024.jpg
Redirecting WordPress Permalinks
In the previous sections, we have discussed how you can edit your slug or change your WordPress permalinks. And we have also mentioned the consequences that you may face during editing WordPress permalinks. i.e., your users might face a 404 error page, or it can also affect your SEO.
However, to avoid this or to fix this problem, the best thing you can do is to redirect your old permalink or URLs to the new ones that you have edited or created.
How to Redirect each and every Pages or Posts that you have created?
Redirecting every page or post from the old permalink to the new one that you have edited or created, the first and the most important step you need to do is to set up a redirecting rule.
If you’re with WPOven, You can do redirecting by following these simple steps.
Redirects are server-side rules to handle incoming requests and redirect them for your visitors. The WPOven redirect tool redirects any incoming request for a Domain that is not added to your WPOven dashboard and redirects it to the destination set by you.
Step 1 : Access the Redirect section.
The redirect section can be accessed from your WPOven dashboard, from the ‘Server‘ section. You need to select the server to which you want the request to redirect. Now in this section, you will notice the ‘Redirects’ tab. Click on the ‘Redirects‘ tab to set up the redirect rule.
Step 2 :Create a Redirect.
Once you open the ‘Redirects‘ section, you will see the Redirect Manager. Here you will be able to see all the redirect rules that you have set up for this server.
Click on the ‘New Redirect‘ button to add a new redirection rule. Here you will see a form that looks like the form shown below.
The 2 fields for the form :
Source : This field will take the regular expression for the URL you wish to redirect from. Also note that the domain for this URL should not already be added to your WPOven dashboard, otherwise the redirection will not work. The path entered should be a PCRE/PHP regular expression (you can learn about Regular expressions here) and it should not include any starting or ending delimiters.For Example, if you wish to redirect themes.wpoven.com to blog.wpoven.com, you would enter the source field as : ^(.*?)themes.wpoven.com/$
The ‘^’ indicates the starting of the regular expression and ‘$’ the end.
‘(.*?)’ Symbol catches the protocol of the request, i.e http:// or https://
Destination : Here we will enter the destination path where the visitor will be redirect to,If you wish to add the matched variables from the regular expression from the source field, you can enter them as $1, $2, $3 …..For example, continuing with the previous example, the destination URL for the Redirect to blog.wpoven.com, would be : $1blog.wpoven.com
Where $1 is the matched expression from the symbol ‘(.*?)’
Once you have entered both fields, press the ‘Add Redirect’ button to save the redirect. You should now be able to see your redirect on the Redirect Manager page for the server. To edit an already existing Redirect, you can click on the ‘Manage’ button from the Redirect manager page.
In case you are not able to set up the redirect or require any assistance with it, please feel free to contact our support team. They will be happy to help you.
How to redirect Archive pages?
If you like to explore more easy and simple alternatives for WordPress permalinks redirection, you can go for the WordPress redirection plugin. This is an ultimate redirection tool that helps you out to redirect URLs easily.
But before using that, you need first to enable the Regex function. To enable it, Go to your WordPress dashboard > Tools > Redirection > Add new redirection.
Now on the right side, you have URL options to choose from. polskie gry kasyno And Select URL Options/Regex from the Dropdown list.
In the Source URL field, You can enter ^(.*?)themes.wpoven.com/$. The entry for Target URL needs to take the source $1blog.wpoven.com. This will exactly be the way we have done through WPOven Dashboard.
What if WordPress Permalinks are not Working as planned?
Sometimes, even after taking all the necessary steps, you might still found some issues with WordPress Permalinks, and it will not work as planned. To troubleshoot such problems, you can follow our recommended solution:
At times, When you register a new post type or taxonomy, and it doesn’t work as expected. You do not need to worry about it. You can resolve this issue by Got to your WordPress dashboard > Settings > permalinks and refresh settings. And even you do not need to make certain changes to it or click on the save changes button. It can work even you open the Permalink Settings page once.
This happens because WordPress cannot determine whether a custom post type or taxonomy means there is a change in permalink settings.
And even the issue persists, you can also check out these alternate solutions.
Check your Permalink settings, that you have done it correctly or not. Ensure that you have not missed anything or typed the wrong data.
Check out whether you have typed the correct URL in the browser or not.
Check is there any issue with your redirection plugin if you are using a redirection plugin. fortuna zakłady online opinie And cross verify all its settings too.
Examine that you have made any changes to the slug of any post you have created and edit if required.
Try clearing your website cache and check if the issues persists.
verify via phpmyadmin and edit WordPress permalinks if requried.
Summary
WordPress permalinks can do wonders for your WordPress website if you know how to configure and properly implement them. Not just can it enhance user experience, it has the potential to boost your search engine rankings too.
Hence, you add quality information and help you to boost up your website performance. We tried to bring you detailed and comprehensive material on WordPress Permalinks. We have tried to cover all the aspects of WordPress permalinks that you can use in your Website. Whether it is for e-commerce websites, optimizing images, posts, or pages.
If you have anything worth mentioning about more WordPress permalinks, please share your valuable ideas in the comment section below. We love to hear from you.
Frequently Asked Questions
What are permalinks in WordPress?
Permalinks are the permanent URLs to your individual weblog posts, as well as categories and other lists of weblog postings.” Whether your website has archive pages, posts, or even 404 error pages, all they live their own WordPress permalinks.
Where do I find permalinks in WordPress?
You can find the WordPress permalink in the editor section of pages or posts. Usually located on the right-hand side of the editor where a default permalink can be easily shown.
Can I change permalinks in WordPress?
In short, Yes, you can change permalinks in WordPress after or before published the post or page. However, it is not recommended to edit or change the WordPress permalinks after publishing your content or making your page live. It can lead to a 404 error, and if the post has been shared multiple times, there are chances that your backlinks will be lost.
To provide the best experiences, we use technologies like cookies to store and/or access device information. Consenting to these technologies will allow us to process data such as browsing behavior or unique IDs on this site. Not consenting or withdrawing consent, may adversely affect certain features and functions.
Functional
Always active
The technical storage or access is strictly necessary for the legitimate purpose of enabling the use of a specific service explicitly requested by the subscriber or user, or for the sole purpose of carrying out the transmission of a communication over an electronic communications network.
Preferences
The technical storage or access is necessary for the legitimate purpose of storing preferences that are not requested by the subscriber or user.
Statistics
The technical storage or access that is used exclusively for statistical purposes.The technical storage or access that is used exclusively for anonymous statistical purposes. Without a subpoena, voluntary compliance on the part of your Internet Service Provider, or additional records from a third party, information stored or retrieved for this purpose alone cannot usually be used to identify you.
Marketing
The technical storage or access is required to create user profiles to send advertising, or to track the user on a website or across several websites for similar marketing purposes.


 Data credit: BuiltWith