What Are WordPress Permalinks? How To Configure Correctly 2022?

Posted OnBy Rahul Kumar  |
WordPress Permalinks

When you use WordPress to write content and publish them online, you usually heard the term WordPress permalinks. This term is critical to learn from the SEO point of view for every user. This is commonly known as a link that helps you to reach a specific section of the content.

In this post, we try to bring you Complete comprehensive content about WordPress Permalinks. What are they? How do they Work? How should you implement them? And any more. But before getting into deep, let us know What WordPress Permalinks actually are?

As per the official definition provided by WordPress,” Permalinks are the permanent URLs to your individual weblog posts, as well as categories and other lists of weblog postings.” Whether your website has archive pages, posts, or even 404 error pages, all of them have their own WordPress permalinks.

Suppose your domain/homepage is www. example.com, then the archive pages or your blog pages would be www.example.com/blog to understand this term better.

Or if your website has other pages such as contact us, home, or about us page, then the WordPress permalinks of these pages would be as follows:

  • Contact us – www.example.com/contactus
  • Home – www.example.com/home
  • About us – www.example.com/about-us

Or Www.example.com/?p=123

These both URLs are the types of WordPress permalinks you have which we will discuss later. In addition, whenever you post content on your blog, each post has its own permalink. It becomes accessible due to your theme template files, which have a template tag that fetches the Post URL and converts them into clickable links.

And Here the WordPress comes into play, and it uses these clickable links to use in your blog listing by showing them within an <a> element.

To continue this post, we would like to let you know about the meaning of some more terms related to WordPress permalinks, and it will be easy for you to understand the difference between them. As we have already mentioned above, WordPress permalinks are the complete links to the post or any page of a website.

And the slugs are like the final, ready to use and unique part of WordPress permalinks. For example, the permalink of the About us page is www. example.com/about-us, then the slug would be about-us. These are generated by WordPress automatically based on the various parameters that you have in your permalink settings.

And if you are not happy about your default WordPress permalinks, you have the option to customize it as per your choice, which we will see in the later section of this post.

There are generally three different types of permalinks are available.

  1. Plain or Ugly WordPress Permalinks
  2. Pretty WordPressPermalinks

Plain or Ugly WordPress permalinks: Plain or ugly permalinks are the links WordPress assigns by default without any customization or alterations. It usually looks like the example given below:

1 <strong>http://example.com/?p=N</strong>

Each element in the permalink given above have its own meaning, such as N denotes the Post ID number. To your surprise, these links work fine on all servers, but the only downside of plain permalinks is that it doesn’t look nice like other options available.

12 https://example.com/?p=123 – <strong>ugly permalink</strong>https://example.com/blog/posts – <strong>pretty permalink</strong>

From the above-mentioned examples, you can easily see the main difference between them. In the ugly permalink, it shows you the P variable with the post id number. Whereas in the pretty WordPress permalink, you can see an easy-to-understand and read post slug.

WordPress has provided you with four formats that you can pick from permalink settings to make it more informative and structured. Just look out the image below and see all the options.
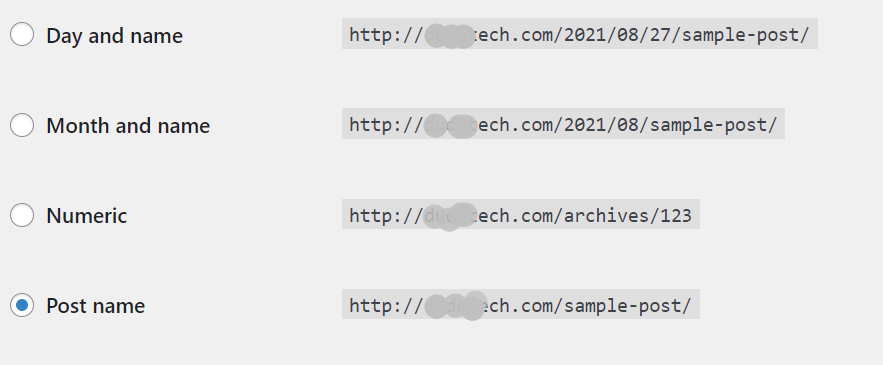
Wordpress permalinks
WordPress permalinks: Pretty permalinks

But another thing you must keep in mind is that you are not limited to use only the above pretty WordPress permalinks settings. WordPress provides you customization options by using structure tags.

Pretty WordPress Permalinks not just look good and easy to remember, but they have two more benefits: it is SEO friendly, and another enhances UX. You might have curious to know how Pretty URLs helps in SEO benefits? Well, search engines use your URL to determine what your page or content page is all about. And if they found your permalink related to the content or page, the search engines find it genuine and legitimate to give them priority in their search engine rankings.

In terms of UX(User Experience), Pretty WordPress permalinks not just help search engines understand the post or content it links, but a user can also easily read and understand the post it links to. For example: If you about us have URL like example.com/?p=245, it is tough to determine and remember such URLs rather than example.com/about-us.

As we have already mentioned in the above sections about the Slugs, these are the last part of your page or post URL. slot automaty online And if you have already gone through the WordPress permalink settings page, the title of the page or content is used in Url. For example, if your content is about “How to monetize your blog?”, it will be automatically generated as an example.com/how-to-monetize-your-blog/.

From the above example, you can see that anyone can easily tell what the content will be all about by looking at the URL. In addition, search engines can easily determine these URLs as pretty WordPress permalinks that have focus keywords.

But it is not enough; you can even improve the slugs for better results by following some tips such as your slug should be not soo lengthy, and it should be long enough to include your focus keyword and be easy to remember.

For example, if a post/page has a Pretty link as ” How to monetize your blog,” it might be better if you use slug as Monetize-blog. And if your website has multiple posts on the same focus keyword and you want to differentiate each one with a different slug. For example, if you have another content on the same focus keyword, ” monetize your blog,” with a different topic such as What are the benefits of monetizing your blog?

In this case, you could use “monetize-your-blogbenefits,” and the pretty permalink would be example.com/monetize-your-blog.

Slugs and User Experience

After knowing the SEO benefits of WordPress, pretty permalinks, now we shall talk about its User Experience benefits (UX).

As per Jacob Nielsen, the following points have been mentioned about what a website must have.

  1. Easy to learn and type URLs
  2. Easy to remember and spell Domain names
  3. Permalink should not change
  4. Short and clean URLs
  5. Urls should not get hacked or provide security from all the malware or hackers attacks.

In addition to the above worth points, A permalink should never be either removed or altered in any case; it has been shared and used in multiple ways on the internet that provided you credibility. Another point to remember is that an URL must be clean and easy to understand so that even a non-expert user can easily understand and remember it.

No doubt, it is not impossible to edit or alter your permalink completely of a post that you have already published. But it is not a good practice and can potentially harm your website DA and even search engine rankings. This is because the original permalink may have been shared on the internet.

Still, if you need to make some edits to change your old permalink with a new one completely, make sure you practice the WordPress directing methods.

WordPress has provided you with multiple options to change the WordPress permalinks and choose whatever you want your permalink should look like.

You can change WordPress permalinks as

  • As soon as you setup your website, you can change your permalink settings to pretty permalinks.
  • You have the option to edit or alter slugs for each posts, when you are writing a post and editing them.
  • You can use WordPress best redirecting practices to point your old/outdated permalink to the new one.
  • You can even compose or create your own plugin to change the way permalink are designed.
  • You have the option to change the permalink structure for tages and categories.

After you set up your website, the first thing you need to do is to configure your WordPress permalinks settings page. Go to your WordPress Dashboard > Settings > Permalinks.
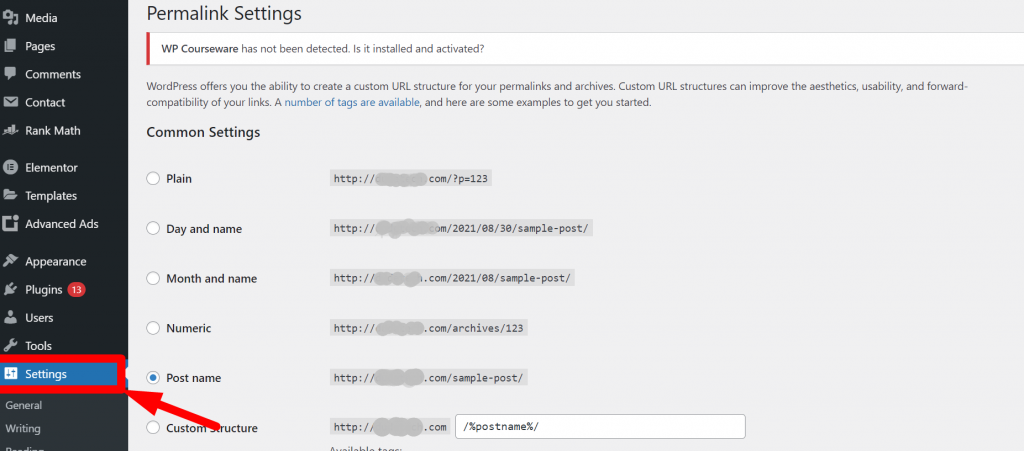
WordPress Permalink Settings page

Common Settings are defined as:

  1. Plain: This option only uses post ID in the URL. However, it can be easily read by browsers but it won’t work for humans like us and the search engines. e.g- yoursite.com/?p=123.
  2. Day and Name: This option uses the date of posts that publised on and the name or title of the post. In the above picture it is showing as: yourwebsite.com/2022/08/30/sample-post/.
  3. Month and Name: Similar too Day and Name, this option uses the Month and Name of the post that you publish. e.g- yourwebsite.com/2022/08/sample-post/.
  4. Numeric: Just like the Plain option, it also uses the post ID. It can alsoo be easily readable by the browsers but won’t work for humans like us. e.g- yourwebsite.com/archives/123.
  5. Post name: Unlike other options that has post ID,month or date, this option uses your the name of the post in the slug. e.g- yourwebsite.com/sample-post/
  6. Custom structure: With this option, you can create your custom structure. You can use certain tags that help you to grab the information from your that will doesn’t change in near future.

Apart from the above permalink settings that you find, there is an optional settings field also provided that lets you set a custom structure for your category and tag archives.

If you like, you may enter custom structures for your category and tag URLs here. For example, using topics as your category base would make your category links like http://example.com/topics/uncategorized/. If you leave these blank, the defaults will be used.

After successfully setting up pretty permalinks on your website, the next thing you need to do is to edit your Pretty permalinks to get better results and optimize as per the search engine and users’ standards.

To optimize WordPress permalinks and slugs of each page and post of your website. It is highly recommended that you must practice this while editing or writing your content. If you have a directly edited slug of any content or page, you have unintentionally also changed its URL. And if the old link was shared anywhere on the internet by your users will be no longer exist and return a 404 error page.

Hence, to carefully carry out the same process, you need to go to your WordPress dashboard > posts > select the post you want to edit.

After that, on the right-hand side of the post creating a screen, you will find the permalink option under the post tab as shown in the picture below:
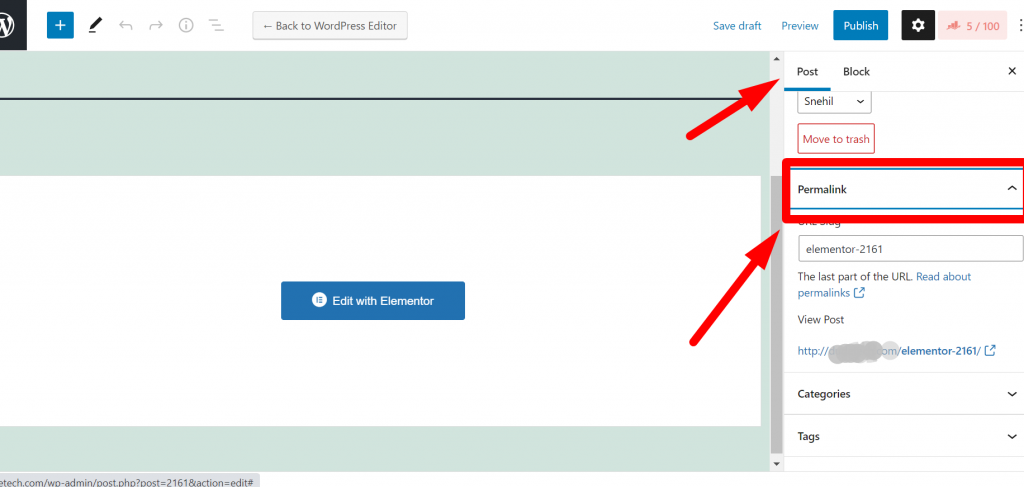
WordPress permalink editing

from the above image, you can see in the post-editing screen on the right-hand side a permalink option is provided under the post section. When you click on it, you fill an automatically generated slug displayed in the URL slug.

Now you can edit this section to make your permalink short, clear, and SEO-friendly that focuses on your target keyword. But before editing it, make sure you have copied the old slug in your notepad or somewhere else so that when you set up redirecting (In case you are editing the old content), the old link cab used.

After editing, now click on the update button to save the changes and hit on Publish button to make it live. But one thing must keep in mind is that you must not forget that if you have to make changes in the slug of an existing post, it could result in a 404 Error for the users who shared the original link. Hence after completion of editing, do not forget to set up redirection.

If you are looking for WordPress permalinks settings, especially for individual archive pages, you need to change the “category” or “tag” in the permalink settings page. However, you also have an option to change the slug of each tag or category.

How to change slugs for Tags and Categories?

To change the slugs for tags and categories, you need to go to your WordPress dashboard > Posts > categories or Posts> Tags. Look out for the tags or category that you want to alter or chance and click on it. Now type in a slug if you want to, or else, the WordPress will automatically generate and assign one, per the tag or category.

However, it is not necessary to have this, it only makes sense when you have categories or tags, and if you choose it for later, you are required to complete the whole redirection.

If you are looking to change WordPress permalinks settings for an eCommerce website, if you are using the woo-commerce plugin, then it creates custom post types and all the taxonomies by itself, and all these permalinks are generated by default.

However, you can still make changes to the permalink and slugs for every custom post and taxonomy.

To change product category, tag, and attribute permalinks, you can go either by using slug or the structure. However, both these works are almost similar for regular tags and categories.

Editing Product category Slug

For editing the product category slug, you need to go to your Products > Attributes. Still, before editing your attribute, you must keep in mind that it is a whole different process, and you have to also deal with attribute terms too.
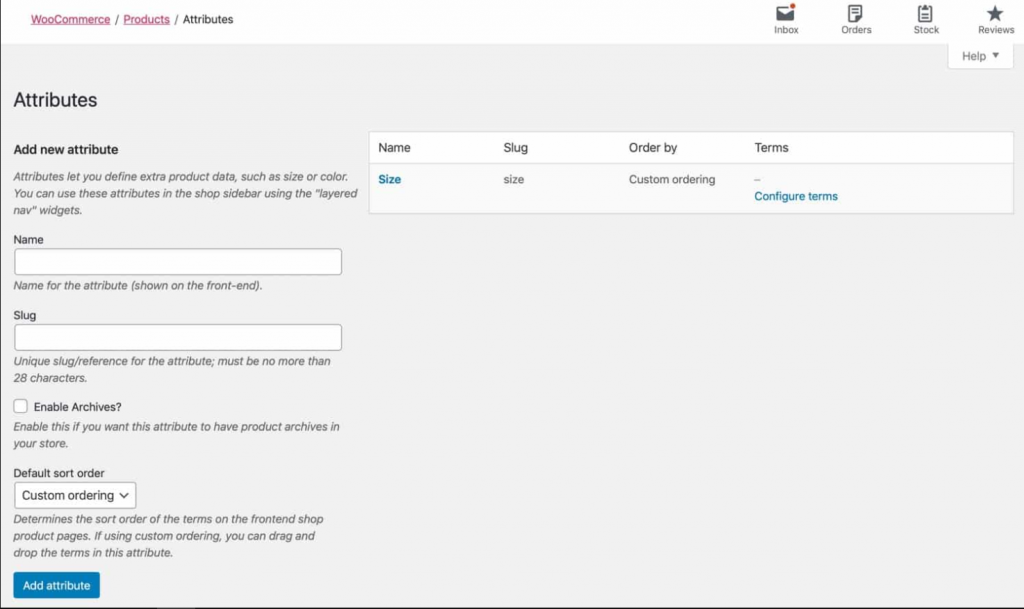
WordPress Permalink Product Attributes

Editing Permalink structure

For editing the Permalink structure, you need to go to your Dashboard Settings > Permalinks and scroll down for the Optional field, where you will find more Woocommerce permalink options. And you can edit the permalink settings for woo-commerce custom taxonomies.

  1. Product cateogory base: By default it is set as product-category but it can be changed as per the terminologies you use in your online store. But one thing you must ensure that whatever you make amendments in your settings, it should not clash with your settings that you have set up for regular categories.
  2. Product tag base: By default it is set as product-tag, but it can also be changed as per your choice. And ensure that it should not also clash with your settings that you have set up for regular post tags.
  3. Product attribute base: Apart from the above two taxonomies, it works differently by having a different structure. The product you add it will by default asigned a slug for each and every attribute name with attributes itself.

Suppose you wish to make some changes in the slug for every tag or category. It would help if you went to your Product section followed by categories or Tags and make changes the way you do with categories and tags.

If you want to edit the slug for an individual category or tag, go to Products > Categories (or Products > Tags) and edit these in the same way you would post tags and categories.
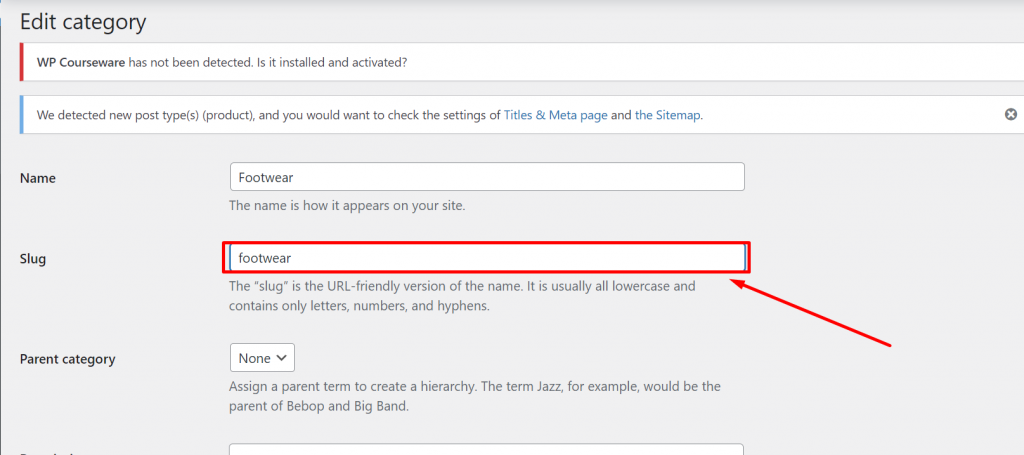
Edit categories

While editing or creating a new attribute, all the procedures will be the same, just as you would for editing categories and tags. i.e., you use the slug option to set up the slug. Or, in another way, if you’re looking to edit the slug for an existing attribute, you need to click on the Edit link just below the attribute you would like to edit.
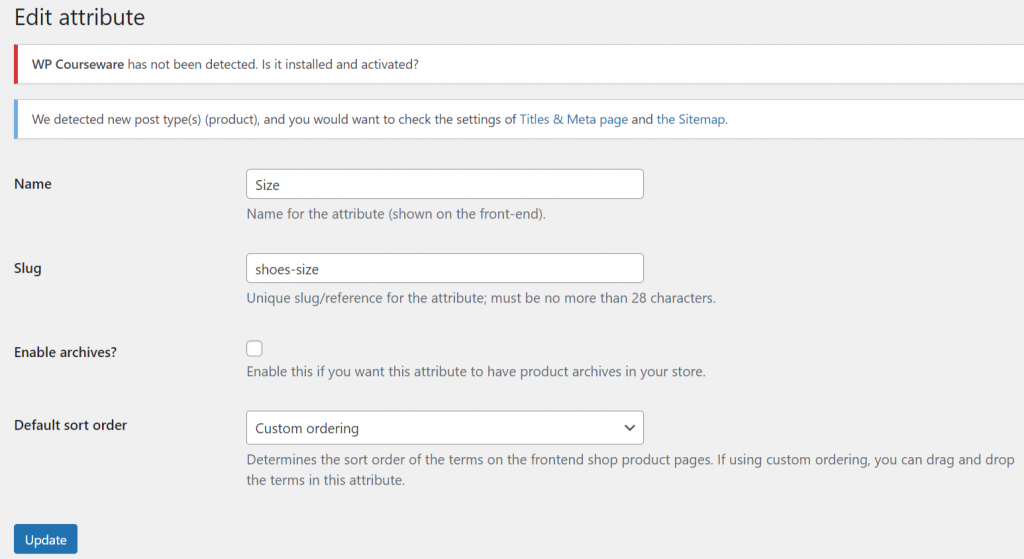
image 7 What Are WordPress Permalinks? How To Configure Correctly 2022?

After completing editing attributes, the find thing you need to do is to click on the Update button to save your changes.

If you are looking to edit or make some changes in the Attribute term slugs, go to attribute > and click on configure terms link just beneath the attribute. You will find a complete list of the terms for that particular attribute.
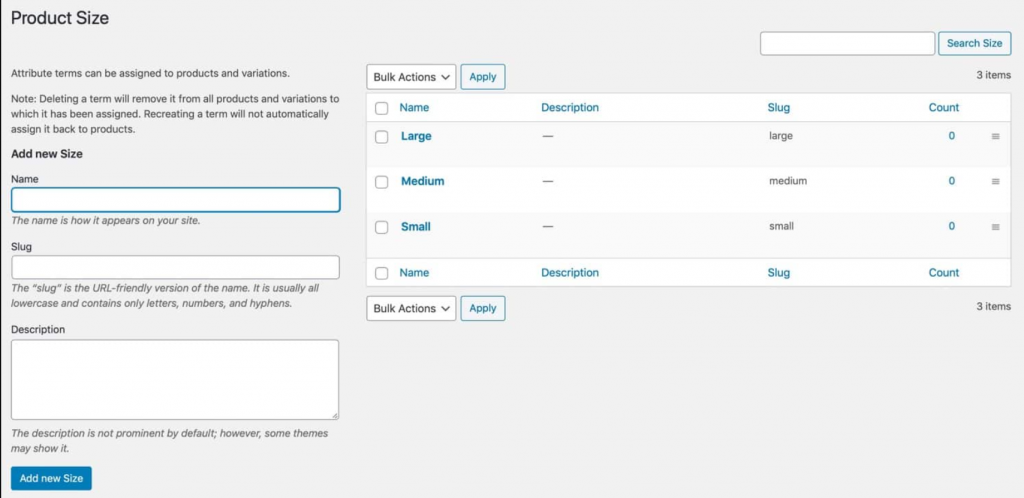
Product Attribute terms listing

Now, you have the option to edit the slug for each term that is being listed, just like you edit for tags and categories.

If you want to edit permalinks of products, go to your WordPress Dashboard > Settings > Permalinks and Lookout for Product Permalinks filed.
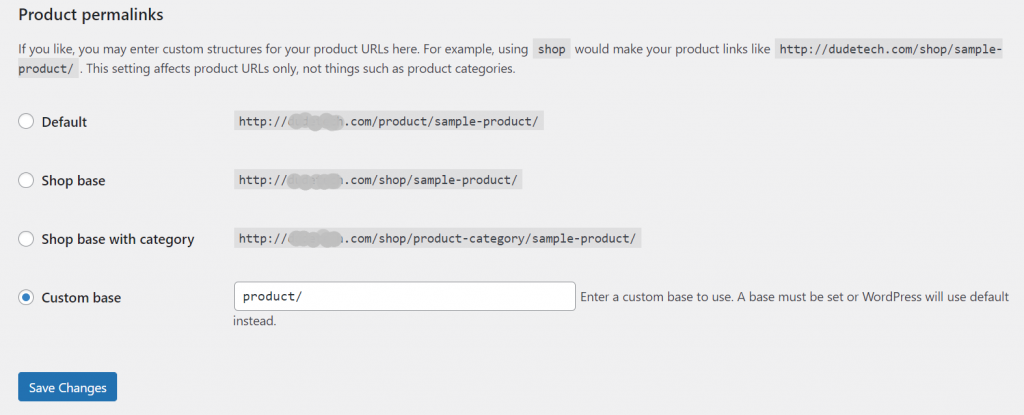
Product Permalink Settings

When you look at the product permalinks section, you will find the following fields to choose from:

  1. Default: These slug will be show if you have already activated pretty permalinks, and it will use slug of each product by default.
  2. Shop base: You will be using shop instead of product in the slug.
  3. Shop base with category: In addition to shop you will be also using category nam e of the product into the URL.
  4. Custom base: This section let you customize your own permalink structure, anyhow. And another important thing you must note that, you simply cannot left or remove the base completely.

When you are done with opting for the suitable option as per your requirement, the next thing you need to do is to click on the save changes button to save your changes.

If you found all these permalink settings quite tedious, WordPress has always provided you with alternative solutions in terms of WordPress plugins. Using a third-party WordPress plugin will help you out to make changes or editing your permalinks over what WordPress has provided you with default permalink settings options.

Permalink Manager Lite
Permalink Manager Lite
Permalink Manager Plugin

Download Now

Permalink Manager Plugin is considered one of the most advanced and highly rated WordPress permalinks editor plugins that let you customize and control the structures of URLs for all the pages, custom posts, and posts. And when a new custom permalink is active, the errors such as 404 and copy content errors will be avoided by automatically redirecting them to the new custom permalink you have defined.

2. Custom Permalinks WordPress plugin

Screenshot 10 4 What Are WordPress Permalinks? How To Configure Correctly 2022?

Download Now

The Custom WordPress Permalinks plugins are best suitable for customizing your URLs of any post, page, category, or tag the way want to. And you do not need to worry about 404 errors; all the old WordPress permalinks will be redirected to the new address without any issue.

Changing WordPress permainks in phpMyAdmin

If you have basic knowledge of WordPress files and using phpMyAdmin, then you can do almost anything through it, including editing permalinks. This comes to the handy and best alternative solution when there is something issue with your WordPress dashboard, and you are unable to access it through your WordPress permalinks Settings page.

But before that, you must make a complete backup of all the files and databases to avoid any mishap during permalink editing.

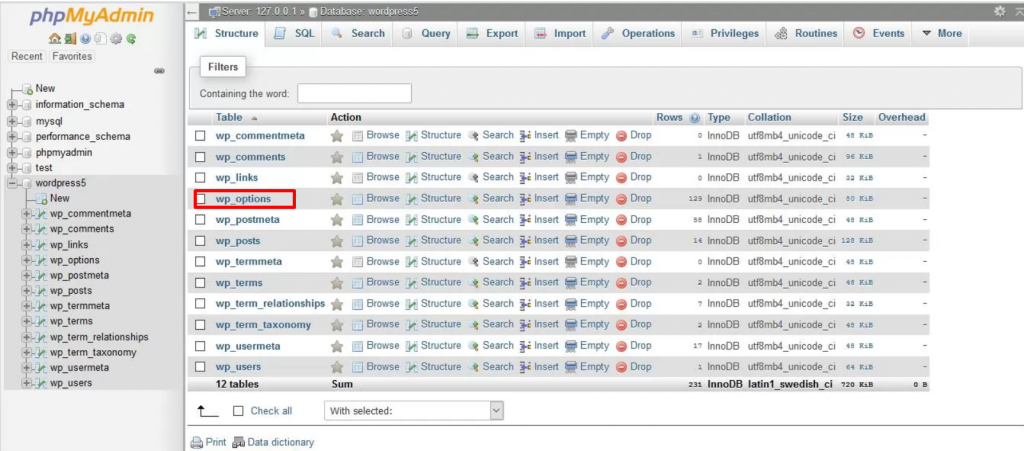
The First step is to access your phpMyadmin by logging in to your Cpanel by typing your database username and password. At the top of the page, you can see the Databases option. Click on it to open and select the database you want to work with.
Screenshot 12 4 What Are WordPress Permalinks? How To Configure Correctly 2022?

Select the wp_options as shown in the picture above and look out for the permalink_structure.

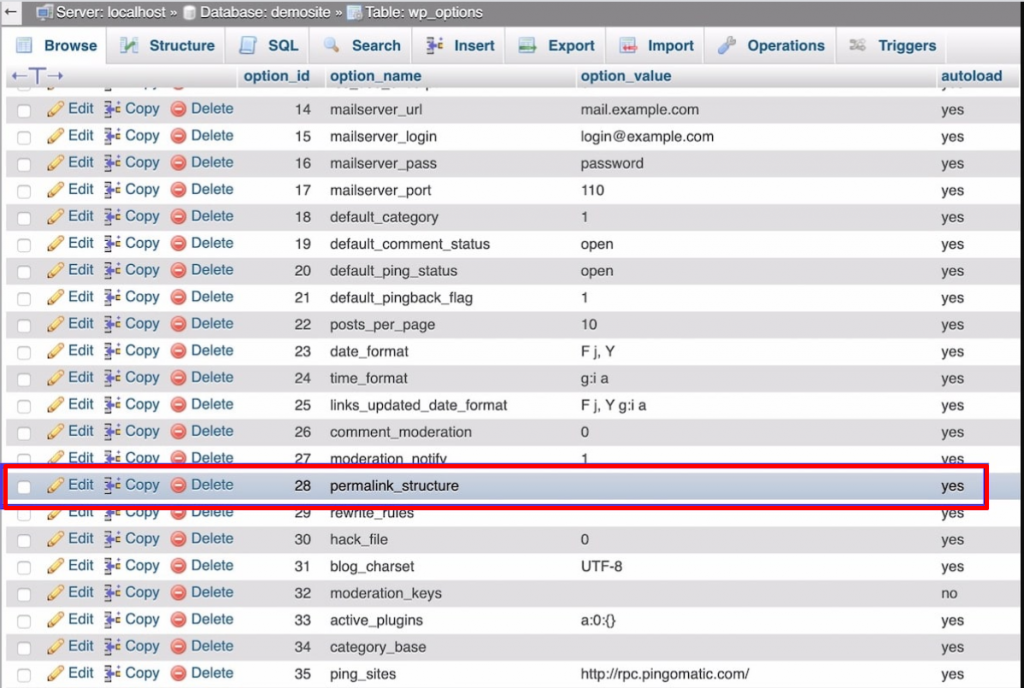
Select the wp_options table and find the permalink_structure entry in the option_name column. You might need to navigate beyond the first page of entries.
Permalink_structure

As shown in the above picture, you can see on the left side of permalink_structre; an Edit link has been provided. Click on it to add the permalink structure that you wish to use.

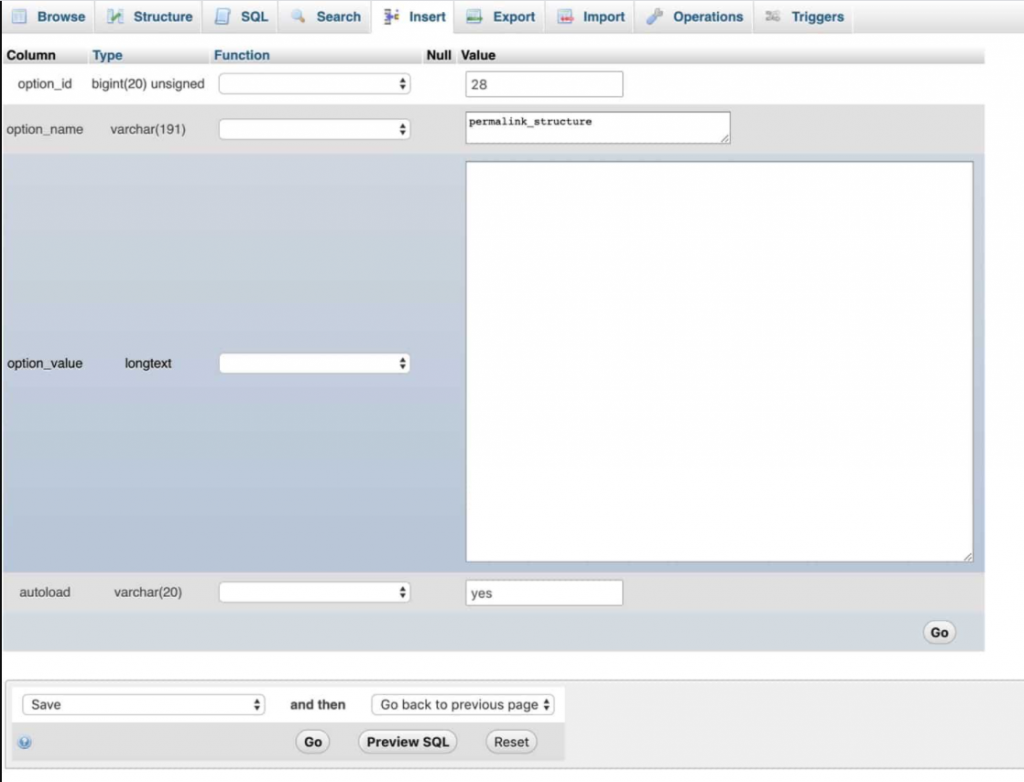
Click the Edit link on the left for that entry, then under the option_value field, add the permalink structure you want to use. Use the tags that we identified earlier for use in the Permalinks settings screen.
Editing Permalink Structure

Once done with editing, You can click on the Go button to save your WordPress permalinks.

To your surprise, images that you use in your post or content have their own permalinks. And when you upload any media file, such as images or videos, to your website, it will generate multiple links for each media file.

The first one is the link to the original image, and another is the links created when you set media sie settings.

As we have already mentioned that whenever you upload an image or any media, WordPress will create a unique link to the file it is saved on your server. You must have noticed a path named wp-content/uploads while configuring server files.

The image files or the pathname consists mainly of the date on which the image was uploaded. It helps to avoid conflict between the images. If you have uploaded an image of the same file name but on a different date, it won’t create any big issue.

For example, if you have uploaded an image with the name Image001.jpg on a month, say June 2021, the WordPress link will generate as example.com/wp-content/uploads/06/Image002.jpg where the number 06 in the link indicates the month of file upload.

It also works the same way with other media files or documents. For example, example.com/wp-content/uploads/06/emploees.doc. And you might have thought, what if you upload a file with the same name in the same month. Well, WordPress resolve this situation by adding up a number to the end of the file name.

So whenever you upload another file, either image001.jpg or emploees.doc, again in the same month, the file will be saved with the name image001-1.jpg and employees-1.doc.

If you wish to check out the working condition of the original file that you have uploaded or want to link to the original file, check out the procedure how you can find the link.

To find the link to the file, you need to go to your WordPress Dashboard > Media > Library and click on the file that you want to know its link to. A pop-up editing image window will open and showing the File URL and other file details on the right side.
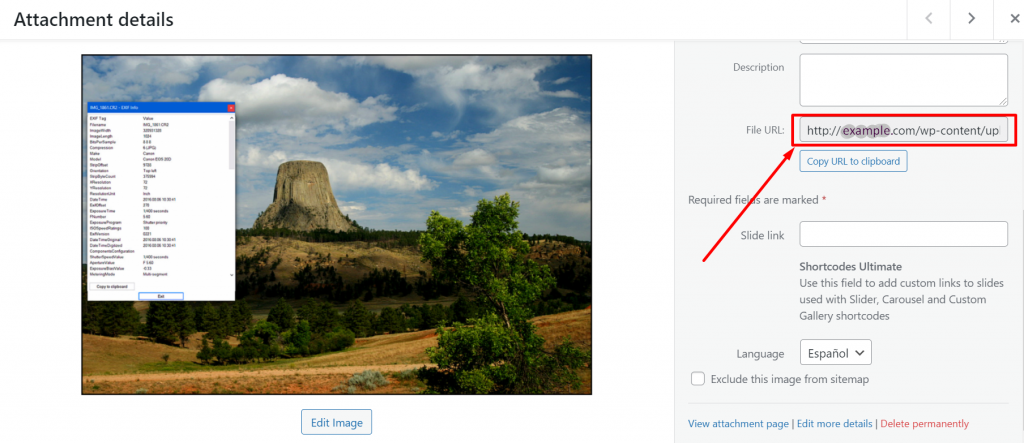
WordPress Image Permalinks

We have already mentioned in the previous section of this post that WordPress also creates permalinks for the images based on their file size. Whenever you set a file size for any image, a permalink will be created automatically. To do this, you need to go to your WordPress dashboard > Settings > Media.
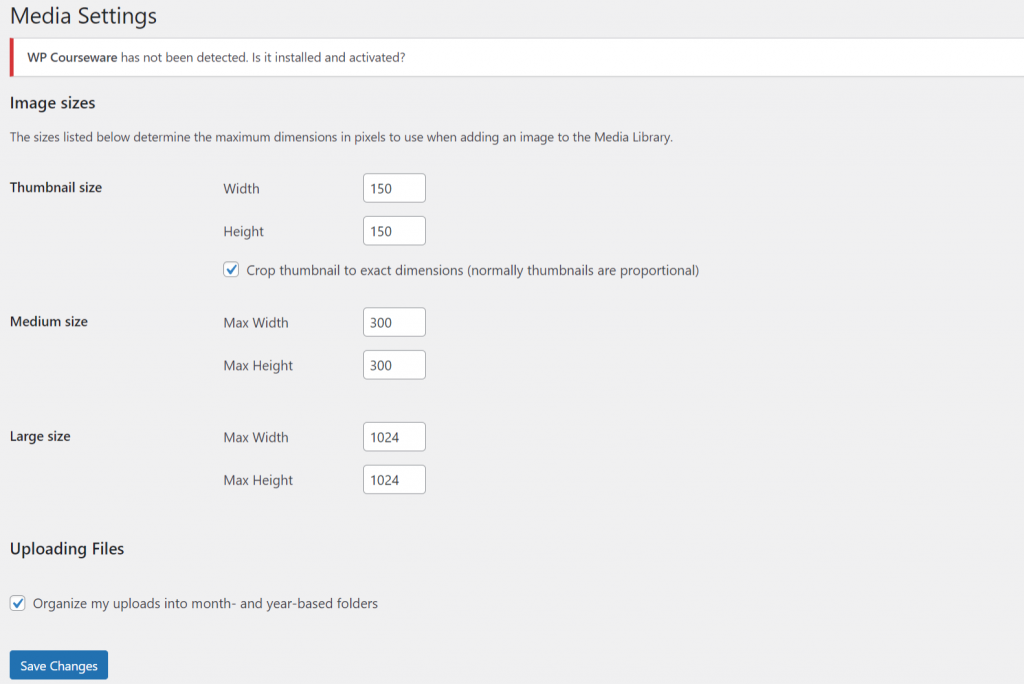
Media file settings page

So whenever you upload an image with a large file size exceeding the large value settings, WordPress will automatically create copies with three different file sizes per the media settings, i.e., Large, Medium, and thumbnail.

However, WordPress won’t name these files as per their different sizes; a user may change its name as per their requirement shortly. Hence, alternatively, WordPress uses the dimension as in the file name and store them at the same place where the original image is being located. i.e in the wp-content/uploads.

To find the URL of all the images of different sizes, the easiest method will be by accessing the WordPress files via the FTP client and find out all the images you have uploaded in a particular month.

For example, let us suppose I have uploaded an image with the file name Image001.jpg. The WordPress will create a copy of the same file with different file sizes using the media settings as follows:-150×150.jpg

  1. Image001-150×150.jpg
  2. Image001-300×300.jpg
  3. Image001-1024×1024.jpg

In the previous sections, we have discussed how you can edit your slug or change your WordPress permalinks. And we have also mentioned the consequences that you may face during editing WordPress permalinks. i.e., your users might face a 404 error page, or it can also affect your SEO.

However, to avoid this or to fix this problem, the best thing you can do is to redirect your old permalink or URLs to the new ones that you have edited or created.

How to Redirect each and every Pages or Posts that you have created?

Redirecting every page or post from the old permalink to the new one that you have edited or created, the first and the most important step you need to do is to set up a redirecting rule.

If you’re with WPOven, You can do redirecting by following these simple steps.

Redirects are server-side rules to handle incoming requests and redirect them for your visitors. The WPOven redirect tool redirects any incoming request for a Domain that is not added to your WPOven dashboard and redirects it to the destination set by you.

Step 1 : Access the Redirect section.

The redirect section can be accessed from your WPOven dashboard, from the ‘Server‘ section. You need to select the server to which you want the request to redirect. Now in this section, you will notice the ‘Redirects’ tab. Click on the ‘Redirects‘ tab to set up the redirect rule.
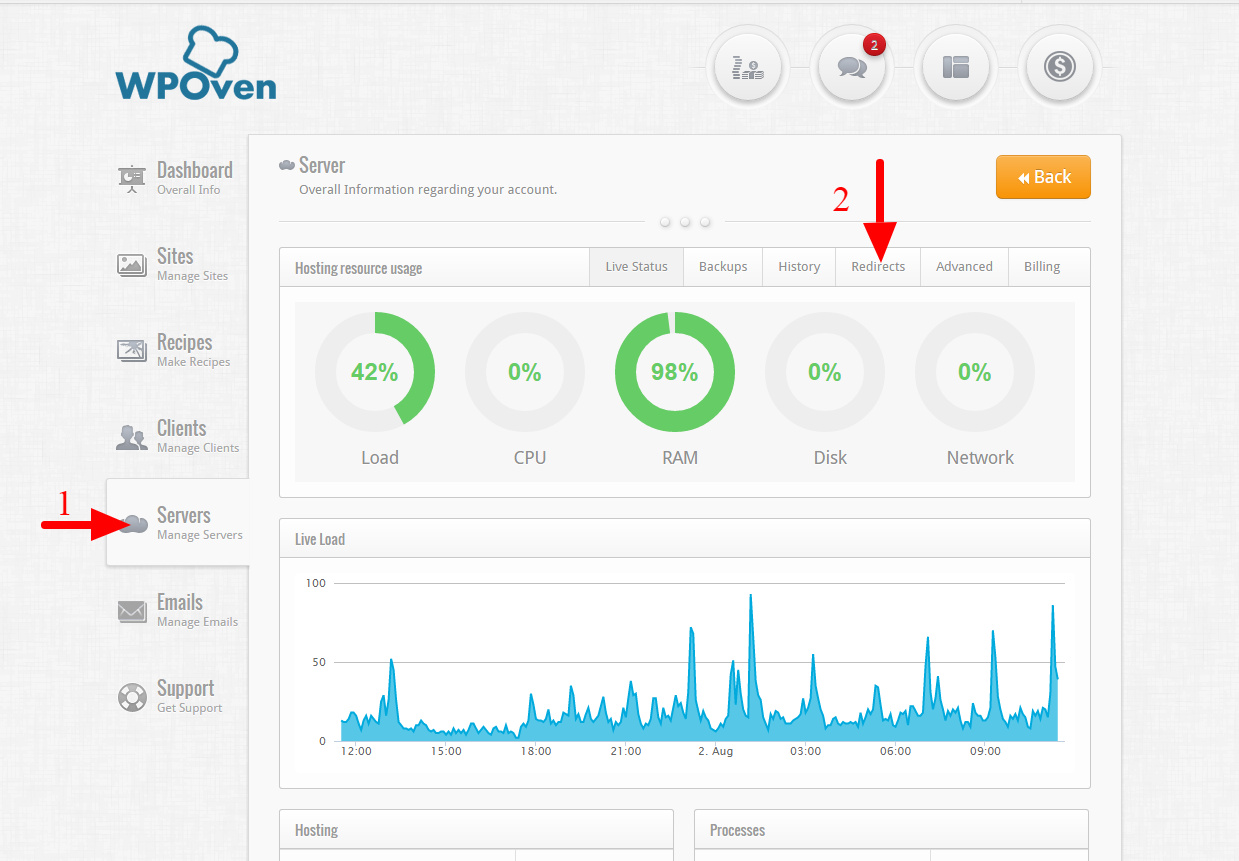
WordPress Permalink Redirecting WPOven

Step 2 :Create a Redirect.

Once you open the ‘Redirects‘ section, you will see the Redirect Manager. Here you will be able to see all the redirect rules that you have set up for this server.
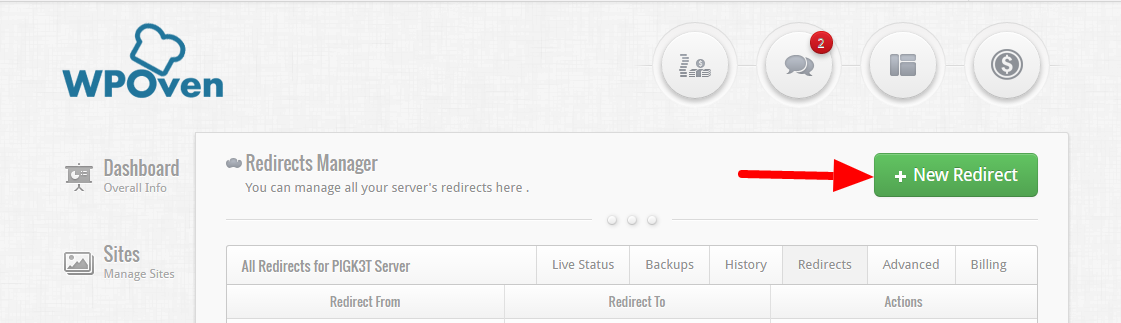
WordPress Permalinks Redirecting WPOven

Click on the ‘New Redirect‘ button to add a new redirection rule. Here you will see a form that looks like the form shown below.
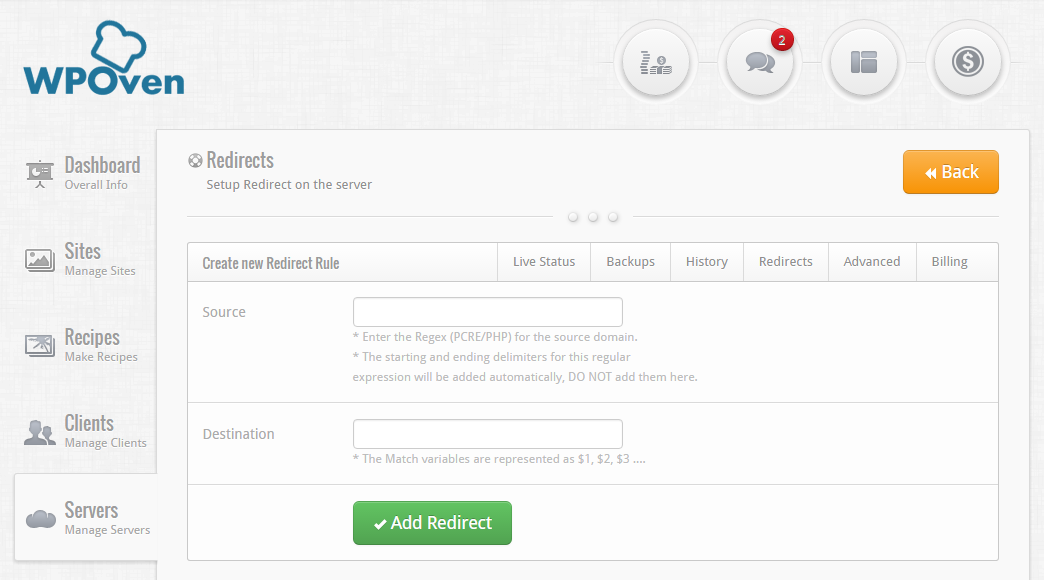
WordPress Permalinks Redirecting WPOven

The 2 fields for the form :

  • Source : This field will take the regular expression for the URL you wish to redirect from. Also note that the domain for this URL should not already be added to your WPOven dashboard, otherwise the redirection will not work.
    The path entered should be a PCRE/PHP regular expression (you can learn about Regular expressions here) and it should not include any starting or ending delimiters.For Example, if you wish to redirect themes.wpoven.com to blog.wpoven.com, you would enter the source field as : ^(.*?)themes.wpoven.com/$

    The ‘^’ indicates the starting of the regular expression and ‘$’ the end.

    ‘(.*?)’ Symbol catches the protocol of the request, i.e http:// or https://

  • Destination : Here we will enter the destination path where the visitor will be redirect to,If you wish to add the matched variables from the regular expression from the source field, you can enter them as $1, $2, $3 …..For example, continuing with the previous example, the destination URL for the Redirect to blog.wpoven.com, would be : $1blog.wpoven.com

    Where $1 is the matched expression from the symbol ‘(.*?)’
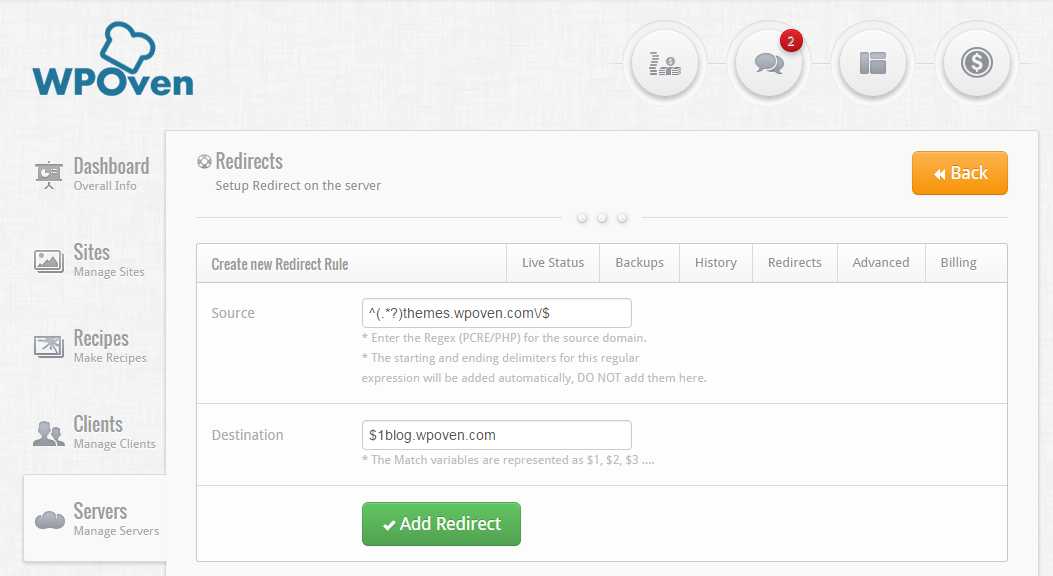
WordPress Permalinks Redirecting WPOven

Once you have entered both fields, press the ‘Add Redirect’ button to save the redirect. You should now be able to see your redirect on the Redirect Manager page for the server. To edit an already existing Redirect, you can click on the ‘Manage’ button from the Redirect manager page.
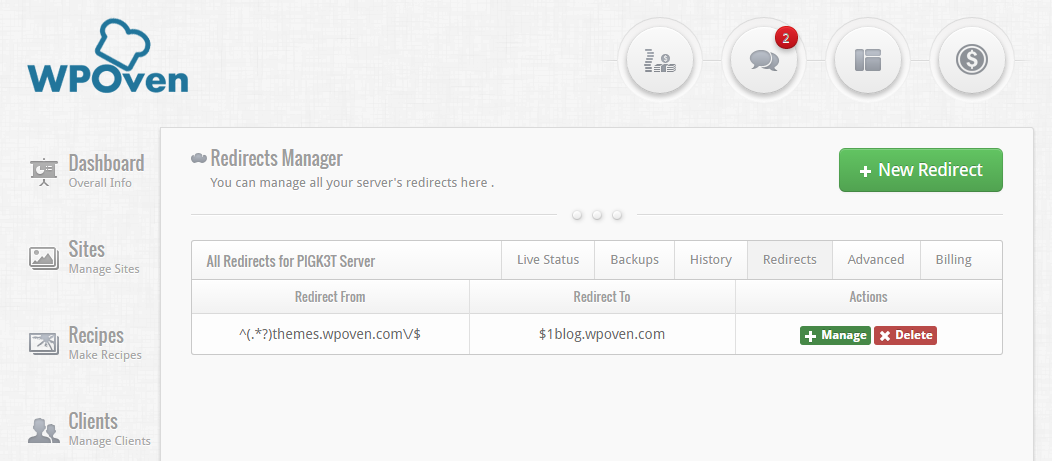
WordPress Permalinks Redirecting WPOven

In case you are not able to set up the redirect or require any assistance with it, please feel free to contact our support team. They will be happy to help you.

How to redirect Archive pages?

If you like to explore more easy and simple alternatives for WordPress permalinks redirection, you can go for the WordPress redirection plugin. This is an ultimate redirection tool that helps you out to redirect URLs easily.

But before using that, you need first to enable the Regex function. To enable it, Go to your WordPress dashboard > Tools > Redirection > Add new redirection.
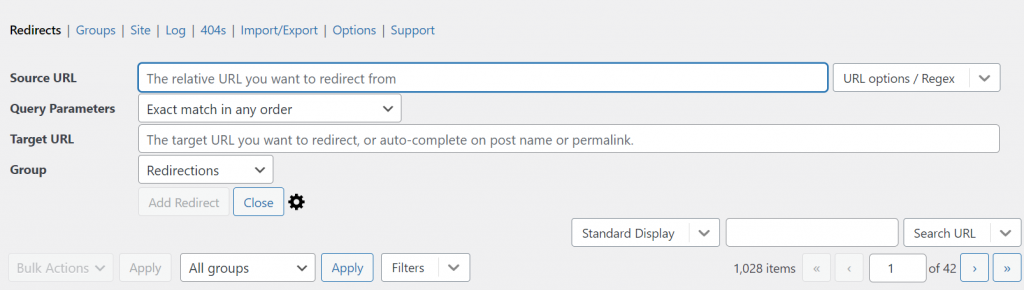
Screenshot 16 3 What Are WordPress Permalinks? How To Configure Correctly 2022?

Now on the right side, you have URL options to choose from. polskie gry kasyno And Select URL Options/Regex from the Dropdown list.

Redirecting using WordPress Redirecting plugin

In the Source URL field, You can enter  ^(.*?)themes.wpoven.com/$. The entry for Target URL needs to take the source $1blog.wpoven.com. This will exactly be the way we have done through WPOven Dashboard.

Sometimes, even after taking all the necessary steps, you might still found some issues with WordPress Permalinks, and it will not work as planned. To troubleshoot such problems, you can follow our recommended solution:

At times, When you register a new post type or taxonomy, and it doesn’t work as expected. You do not need to worry about it. You can resolve this issue by Got to your WordPress dashboard > Settings > permalinks and refresh settings. And even you do not need to make certain changes to it or click on the save changes button. It can work even you open the Permalink Settings page once.

This happens because WordPress cannot determine whether a custom post type or taxonomy means there is a change in permalink settings.

And even the issue persists, you can also check out these alternate solutions.

  1. Check your Permalink settings, that you have done it correctly or not. Ensure that you have not missed anything or typed the wrong data.
  2. Check out whether you have typed the correct URL in the browser or not.
  3. Check is there any issue with your redirection plugin if you are using a redirection plugin. fortuna zakłady online opinie And cross verify all its settings too.
  4. Examine that you have made any changes to the slug of any post you have created and edit if required.
  5. Try clearing your website cache and check if the issues persists.
  6. verify via phpmyadmin and edit WordPress permalinks if requried.

Summary

WordPress permalinks can do wonders for your WordPress website if you know how to configure and properly implement them. Not just can it enhance user experience, it has the potential to boost your search engine rankings too.

Hence, you add quality information and help you to boost up your website performance. We tried to bring you detailed and comprehensive material on WordPress Permalinks. We have tried to cover all the aspects of WordPress permalinks that you can use in your Website. Whether it is for e-commerce websites, optimizing images, posts, or pages.

If you have anything worth mentioning about more WordPress permalinks, please share your valuable ideas in the comment section below. We love to hear from you.

Frequently Asked Questions

What are permalinks in WordPress?

Permalinks are the permanent URLs to your individual weblog posts, as well as categories and other lists of weblog postings.” Whether your website has archive pages, posts, or even 404 error pages, all they live their own WordPress permalinks.

Where do I find permalinks in WordPress?

You can find the WordPress permalink in the editor section of pages or posts. Usually located on the right-hand side of the editor where a default permalink can be easily shown.

Can I change permalinks in WordPress?

In short, Yes, you can change permalinks in WordPress after or before published the post or page. However, it is not recommended to edit or change the WordPress permalinks after publishing your content or making your page live. It can lead to a 404 error, and if the post has been shared multiple times, there are chances that your backlinks will be lost.

Static vs. Dynamic Websites: Here’s the Difference

Static vs. Dynamic Websites: Here’s the Difference

Written by Jamie Juviler

woman using a computer to view static vs. dynamic websites

During your research into website design and development, you might have come across two terms used to describe types of websites: “static” and “dynamic.”

If you’re building your own website, opting for a static or a dynamic website is one of the first major decisions you’ll need to make, since it will determine how your web pages are stored and delivered to visitors in their browsers.

To help you understand the difference, let’s break down what it means for a website to be static or dynamic, and discuss the pros and cons of each approach. Finally, we’ll share some examples of popular dynamic websites to give you a better sense of what they can do.

Static vs. Dynamic Website

The difference between static websites and dynamic websites is that static websites appear the same for every user that accesses them and only change when a developer modifies the source files, whereas dynamic websites can present different information to different visitors.

No matter how complex a website appears to be, at its core a web page is just an HTML file displayed in a web browser. When you visit a website, your browser sends a request to the web server that hosts the website, and the server responds by sending back an HTML file (along with some other related files). Your browser processes this HTML file and shows it to you as a page.

Ultimately, both static and dynamic websites generate HTML files, but what makes a website “static” versus “dynamic” depends on how the server creates this HTML file before sending it to you. To understand the difference, let’s first unpack how static websites work.

What is a static website?

A static website is made up of a fixed number of pre-built files stored on a web server. These files are written in HTML, CSS, and JavaScript, which are called “client-side” languages because they execute in the user’s web browser. When a user requests a page from the server with a URL, the server returns the HTML file that is specified by the URL and any accompanying CSS and/or JavaScript files.

During this exchange, the web server does not alter the files before they’re shipped to the user, so the web page will look the exact same to everyone who requests it. The content is “static” — the only way to change how the website looks is by manually changing the content of the files.

This doesn’t mean that static websites can’t be interactive or engaging. They can still have clickable links and buttons, images and video, CTAs, forms, digital downloads, and animations powered by CSS or JavaScript. With enough skill, you can even get a static website to look pretty nice. But, a static site will always look the same to everyone.

Common examples of static websites include resume websites, portfolio websites, brochure websites, one-off landing pages, and other informational or read-only sites. These websites are small (three to four pages or fewer), limited in content, and don’t require personalized content or frequent updates.

Static Website Advantages

Most benefits of static websites stem from their simplicity. Static sites are the easiest kind of site to build and maintain from scratch. If you want to launch a basic website quickly and cheaply, static sites are a solid option. With knowledge of HTML and CSS, you can code up a decent one without too much effort or cost.

Static websites also tend to be faster than dynamic websites on the user’s end. This is because pages on static websites are already built and require minimal back-end processing. The server only needs to retrieve the requested files and deliver them to the client. Static websites are also easier to cache due to lack of variation in content. Site speed, also called website performance, is crucial for a positive user experience and also affects search engine ranking.

Static Website Disadvantages

As you can probably guess, a static website isn’t the best option in many cases. The most apparent issue is scalability: Any time you want to make a site-wide content update, like changing the header of your pages, you’ll have to alter each individual HTML file. Plus, whenever you want to add a new page, you’ll have to manually create a new HTML file. For large websites, this simply isn’t practical.

Another disadvantage of static websites is lack of personalization. If you can’t tailor content to visitors, you might miss an opportunity to create a more engaging experience for visitors. Sure, a static site can display information about your business, but what if you could show visitors different information based on, say, their location? For that, you need a dynamic site.

Finally, there are many types of sites that just aren’t possible to build statically. For instance, ecommerce websites typically let users add products to their carts and check out, functions you can’t do with a static site unless you rely on third-party tools.

For these reasons, most websites that you use today are built dynamically. Next, let’s explore what that means.

What is a dynamic website?

Unlike a static website that displays the same content to all visitors in the same format, a dynamic website presents different information to different visitors. The content that a visitor sees can be determined by several factors, such as their location, local time, settings and preferences, and/or actions they’re taken on the website (e.g., shopping habits), making for a more tailored and interactive experience.

To achieve greater flexibility on the front end, dynamic websites require more complexity on the back end. These websites don’t store each page as its own HTML file. Instead, web servers build pages “on-the-fly” — when the user requests a page, the server pulls information from one or multiple databases and constructs an HTML file custom-built for the client. Once the page is built, the HTML file is shipped back to the user’s browser.

To build pages on the back end, dynamic websites employ server-side scripting languages like PHP, Python, Ruby, or server-side JavaScript, in addition to client-side languages (HTML, CSS, and JavaScript). Depending on the amount of data that is being pulled to construct the page, this process can get quite complex. However, the user doesn’t see any of this process — they only see the web page loaded in the browser, same as with static sites.

These days, most websites you use employ at least some dynamic practices. Online stores, social media sites, membership sites, news sites, publishing sites, blogs, and web applications all rely on dynamic content to some degree.

For example, consider an ecommerce site whose home page recommends products based on what they think you’ll want to buy. This means that every visitor will see a slightly different home page. Of course, it wouldn’t make sense to hard-code a page for each person and store it on the server. Instead, server-side code works to determine what content you should see, fetch that content from various databases, and build a page from it.

Other use cases for dynamic content include changing the page language based on the user’s location or settings, displaying a user’s previous orders from your website after they’ve signed in, and gating certain content on your site according to a user’s membership status.

Dynamic Website Advantages

We’ve already touched on the primary advantage of dynamic websites: They enable you to personalize your website’s content to each visitor, which means a more engaging user experience resulting in more conversions and purchases.

Beyond personalization, server-side scripting is very powerful and unlocks a myriad of possibilities for functionality. Dynamic code allows us to build web applications, SaaS software, and rich experiences that simply aren’t possible with a static approach.

It’s also much easier to make site-wide updates on dynamic websites. Administrators can quickly and easily make sweeping changes on their site, rather than updating the source code for each HTML file. On websites that frequently update content and appearance to keep up with their industries, this is a necessity.

Lastly, dynamic websites are more scalable than static websites, as the server does not store a fixed number of pages. Instead, the server constructs a page when it is needed. Going back to our ecommerce site example, say you want to add several new products to your site. Instead of building separate product pages in HTML, you just need to store product information in a database. Server-side scripts can pull this data to construct the product page automatically.

Dynamic Website Disadvantages

Since dynamic websites are more complex than static websites, they require much more time, effort, and know-how to create from scratch. If you don’t have the technical expertise to build and maintain a dynamic website, you can invest in a developer or development team.

Alternatively, you can use a website builder or a content management system (CMS) to handle the technical side of things, so you can place more focus on your site’s content and design. For example, WordPress works by building its pages dynamically using the server-side language PHP.

One other tradeoff of using a dynamic website is a potential drop in performance. Dynamic websites do more processing on the back end in order to deliver pages to visitors, which can affect load time. There are ways to optimize your site speed, and website building software has improved in this area. Still, speed is definitely something to keep in mind when managing a dynamic site, since delays of fractions of a second can cause higher bounce rates.

Dynamic Website Examples

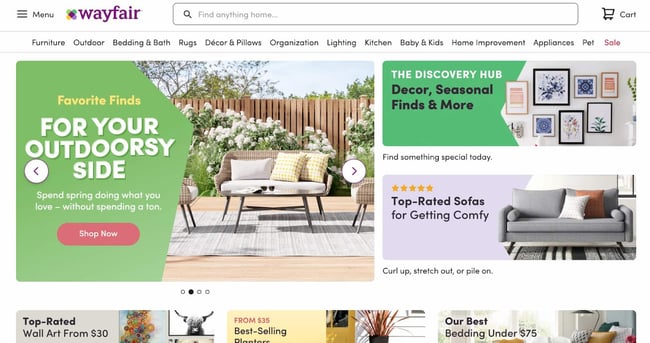
  1. Wayfair (Dynamic Ecommerce Website)
  2. Twitter (Dynamic Social Media Website)
  3. Netflix (Dynamic Entertainment Website)
  4. HubSpot (Dynamic SaaS Website)
  5. The New York Times (Dynamic News Website)

Most websites you use today are likely dynamic ones. To wrap up this post, let’s look at five popular examples of dynamic websites.

1. Wayfair (Dynamic Ecommerce Website)

Anyone who uses Wayfair knows the company tailors its shopping experience to customers. Its dynamic website allows you to view products deemed most relevant based on your browsing and purchases.

dynamic website examples: wayfair homepage

2. Twitter (Dynamic Social Media Website)

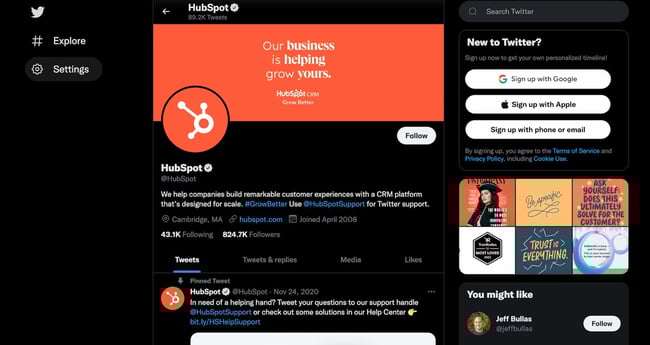
Given that over 300,000 tweets are published per minute, I can’t think of a better use for a dynamic website. Twitter’s dynamic build allows its interface to change in real time with new tweets.

dynamic website examples: twitter

3. Netflix (Dynamic Entertainment Website)

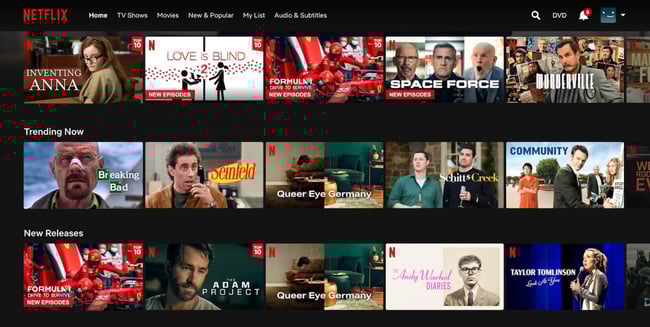
Netflix displays TV and movie recommendations based on your viewing habits and other information that you set in your profile. This dynamic interface has made it into the streaming giant it remains today.

dynamic website examples: netflix

4. HubSpot (Dynamic SaaS Website)

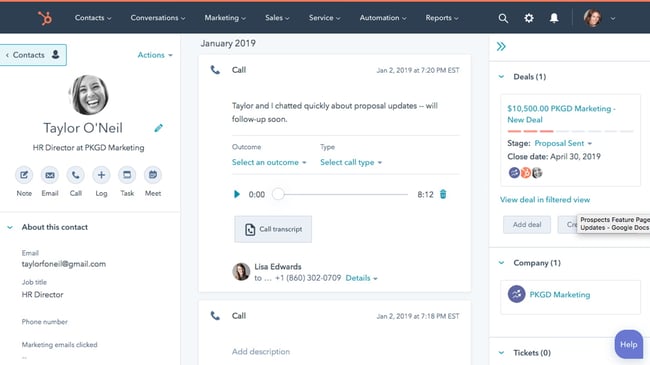
All cloud-based software tools rely on dynamic pages to deliver customized experiences to customers, and HubSpot’s CRM platform is no exception. Every page is, at its core, an amalgamation of customer and business data, organized in a way that helps you take action.

dynamic website examples: hubspot

5. The New York Times (Dynamic News Website)

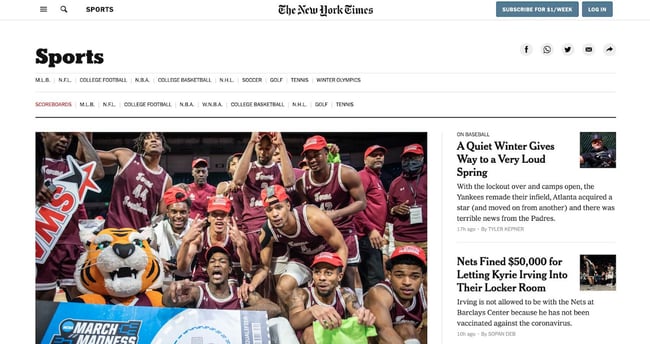
Any large news website requires a setup that enables it to publish frequent articles with minimal friction. The New York Times uses server-side JavaScript frameworks to generate new article pages dynamically and update its home page content accordingly.

dynamic website examples: the new york times homepage

Understanding Static and Dynamic Websites

In the early days of the web, all websites were static — websites were kept as collections of pages stored on servers, and these pages could be delivered to clients when requested.

However, this method became less workable as users started expecting more from websites, like more personalized displays, auto-generated content, and eventually full-blown software available through the cloud.

To sum up, a static approach works well for a small website with no personalization that you want to watch quickly. Anything beyond that, and you’ll probably need a dynamic website.


Originally published Mar 24, 2022 7:00:00 AM, updated March 29 2022

Topics:Website Design

Don’t forget to share this post!

How to Write a Blog Post: A Step-by-Step Guide [+ Free Blog Post Templates]

How to Write a Blog Post: A Step-by-Step Guide [+ Free Blog Post Templates]

Ever read a blog post, you’ve consumed content from a thought leader that is an expert in their industry. Chances are if the blog post was written effectively, you came away with helpful knowledge and a positive opinion about the writer or brand that produced the content.

Anyone can connect with their audience through blogging and enjoy the myriad benefits that blogging provides: organic traffic from search engines, promotional content for social media, and recognition from a new audience you haven’t tapped into yet.

Download Now: 6 Free Blog Post Templates

If you’ve heard about blogging but are a beginner and don’t know where to start, the time for excuses is over because we’ll cover how to write and manage your business’s blog as well as provide helpful templates to simplify your blogging efforts.

  1. What is a blog post?
  2. How to Start a Blog
  3. Writing Your First Blog Post
  4. What makes a good blog post?
  5. Blog Post Examples
  6. How to Write a Blog Post

Let’s get started with an important question.

Blogging may mean different things depending on your niche — so let’s begin with this definition.

What is a blog post?

A blog post is any article, news piece, or guide that’s published in the blog section of a website. A blog post typically covers a specific topic or query, is educational in nature, ranges from 600 to 2,000+ words, and contains other media types such as images, videos, infographics, and interactive charts.

Blog posts allow you and your business to publish insights, thoughts, and stories on your website about any topic. They can help you boost brand awareness, credibility, conversions, and revenue. Most importantly, they can help you drive traffic to your website.

But in order to begin making posts for a blog — you have to learn how to start one, first. Let’s dive in.

How to Start a Blog

  1. Understand your audience.
  2. Check out your competition.
  3. Determine what topics you’ll cover.
  4. Identify your unique angle.
  5. Name your blog.
  6. Create your blog domain.
  7. Choose a CMS and set up your blog.
  8. Customize the look of your blog.
  9. Write your first blog post.

1. Understand your audience.

Before you start writing your blog post, make sure you have a clear understanding of your target audience. 

Ask questions like: What do they want to know about? What will resonate with them? 

This is where the process of creating buyer personas comes in handy. Consider what you know about your buyer personas and their interests while you’re coming up with a topic for your blog post. 

For instance, if your readers are millennials looking to start a business, you probably don’t need to provide them with information about getting started on social media — most of them already have that down.

You might, however, want to give them information about how to adjust their social media approach (for example — from what may be a casual, personal approach to a more business-savvy, networking-focused approach). That kind of tweak is what helps you publish content about the topics your audience really wants and needs. 

Don’t have buyer personas in place for your business? Here are a few resources to help you get started:

2. Check out your competition.

What better way to draw inspiration than to look at your well-established competition?

It’s worth taking a look at popular, highly reviewed blogs because their strategy and execution is what got them to grow in credibility. The purpose of doing this isn’t to copy these elements, but to gain better insight into what readers appreciate in a quality blog.

There are multiple angles you should look at when doing a competitive analysis:

  • Visuals: Look at the blog’s branding, color palette, and theme.
  • Copy: Analyze the tone and writing style of the competition to see what readers respond well to.
  • Topics: See what subject matter their readers enjoy interacting with.

3. Determine what topics you’ll cover.

Before you write anything, pick a topic you’d like to write about. The topic can be pretty general to start as you find your desired niche in blogging.

Some ways to choose topics to cover include asking yourself questions like:

  • Who do I want to write to?
  • How well do I understand this topic?
  • Is this topic relevant?

4. Identify your unique angle.

What perspective do you bring that makes you stand out from the crowd? This is key to determining the trajectory of your blog’s future and there’s many avenues to choose in the process.

  • What unique experience makes you a trusted expert or thought leader on the topic?
  • What problem will you solve for readers?
  • Will you share your opinions on trending debates?
  • Teach your readers how to do something?
  • Compare or share original research?

It’s up to you to decide the unique angle you’ll take on topics.

5. Name your blog.

This is your opportunity to get creative and make a name that gives readers an idea of what to expect from your blog. Some tips on how to choose your blog name include:

  • Keep your blog name easy to say and spell.
  • Link your blog name to your brand message.
  • Consider what your target audience is looking for.

If you still need more assistance, try using a blog name generator.

Make sure the name you come up with isn’t already taken as it could lessen your visibility and confuse readers looking for your content.

6. Create your blog domain.

domain is a part of the web address nomenclature someone would use to find your website or a page of your website online.

Your blog’s domain will look like this: www.yourblog.com. The name between the two periods is up to you, as long as this domain name doesn’t yet exist on the internet.

Want to create a subdomain for your blog? If you already own a cooking business at www.yourcompany.com, you might create a blog that looks like this: blog.yourcompany.com. In other words, your blog’s subdomain will live in its own section of yourcompany.com.

Some CMS platforms offer subdomains as a free service, where your blog lives on the CMS, rather than your business’s website. For example, it might look like this: yourblog.contentmanagementsystem.com. However, to create a subdomain that belongs to your company website, register the subdomain with a website host.

Most website hosting services charge very little to host an original domain — in fact, website costs can be as inexpensive as $3 per month when you commit to a 36-month term.

Here are five popular web hosting services to choose from:

7. Choose a CMS and set up your blog.

CMS (content management system) is a software application that allows users to build and maintain a website without having to code it from scratch. CMS platforms can manage domains (where you create your website) and subdomains (where you create a webpage that connects to an existing website).

HubSpot customers host web content via CMS Hub. Another popular option is a self-hosted WordPress website on a hosting site such as WP Engine. Whether you create a domain or a subdomain to start your blog, you’ll need to choose a web hosting service after you pick a CMS.

8. Customize the look of your blog.

Once you have your domain name set up, customize the appearance of your blog to reflect the theme of the content you plan on creating and your brand.

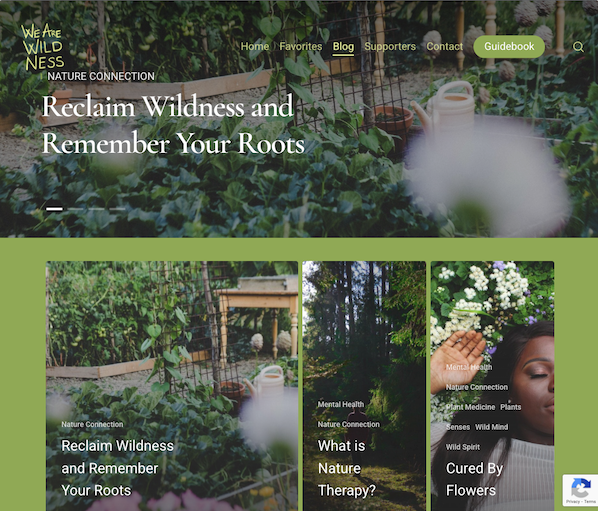
For example, if you’re writing about sustainability and the environment, green might be a color to keep in mind while designing your blog.

Sustainability blog example

Image Source

If you already manage a website and are writing the first post for that existing website, ensure the article is consistent with the website in appearance and subject matter. Two ways to do this are including your:

  • Logo: This can be your business’s name and logo — it will remind blog readers of who’s publishing the content. (How heavily you want to brand your blog, however, is up to you.)
  • “About” Page: You might already have an “About” blurb describing yourself or your business. Your blog’s “About” section is an extension of this higher-level statement. Think of it as your blog’s mission statement, which serves to support your company’s goals.

9. Write your first blog post.

Once you have your blog set up, the only thing missing is the content. While the design and layout are fun and functionally necessary, it’s the content that will draw your readers in and keep them coming back. So how do you actually go about writing one of these engaging and informational pieces?

Writing Your First Blog Post

You’ve got the technical and practical tidbits down — now it’s time to write your very first blog post. And nope, this isn’t the space to introduce yourself and your new blog (i.e. “Welcome to my blog! This is the topic I’ll be covering. Here are my social media handles. Will you please follow?”).

Start with “low-hanging fruit,” writing about a highly specific topic that serves a small segment of your target audience.

That seems unintuitive, right? If more people are searching for a term or a topic, that should mean more readers for you.

But that’s not true. If you choose a general and highly searched topic that’s been covered by major competitors or more established brands, it’s unlikely that your post will rank on the first page of search engine results pages (SERPs). Give your newly born blog a chance by choosing a topic that few bloggers have written about.

Let’s walk through this process.

1. Choose a topic you’re passionate and knowledgeable about.

Before you write anything, pick a topic for your blog post. The topic can be pretty general to start. For example, if you’re a company that sells a CRM for small-to-enterprise businesses, your post might be about the importance of using a single software to keep your marketing, sales, and service teams aligned.

Pro tip: You may not want to jump into a “how-to” article for your first blog post.

Why?

Your credibility hasn’t been established yet. Before teaching others how to do something, you’ll first want to show that you’re a leader in your field and an authoritative source.

For instance, if you’re a plumber writing your first post, you won’t yet write a post titled “How to Replace the Piping System in your Bathroom.” First, you’d write about modern faucet setups, or tell a particular success story you had rescuing a faucet before it flooded a customer’s house.

Here are four other types of blog posts you could start with:

  • List (“Listicle”): 5 ways to fix a leaky faucet
  • Curated Collection: 10 faucet and sink brands to consider today
  • SlideShare Presentation: 5 types of faucets to replace your old one (with pictures)
  • News Piece: New study shows X% of people don’t replace their faucet frequently enough

If you’re having trouble coming up with topic ideas, a good topic brainstorming session should help. In the post I’ve linked, my colleague walks you through a helpful process for turning one idea into many. Similar to the “leaky faucet” examples above, you would “iterate off old topics to come up with unique and compelling new topics.”

This can be done by:

  • Changing the topic scope
  • Adjusting your time frame
  • Choosing a new audience
  • Taking a positive/negative approach
  • Introducing a new format

And if you’re still stuck, let’s take a look at some first blog post idea examples.

First Blog Post Ideas

The Difference Between [Niche Topic] and [Niche Topic], Explained by a [Niche Expert]

  • The Difference Between SEM and SEO, Explained by a Marketing Expert
  • The Difference Between Sedans and Coupes, Explained by a Car Mechanic
  • The Difference Between Baking and Broiling, Explained by a Professional Baker

The 10 Best and Worst [Niche Tools] for [Niche Activity]

  • The 10 Best and Worst Writing Software for Fiction Writing
  • The 10 Best and Worst CRMs for Nurturing Prospects
  • The 10 Best and Worst Family Cars for Cross-Country Roadtrips

8 [Niche Activity] Common Mistakes (+ Ways to Fix Them)

  • 8 Non-Fiction Writing Common Mistakes (+ Ways to Fix Them)
  • 8 Salmon Broiling Common Mistakes (+ Ways to Fix Them)
  • 8 Car Maintenance Common Mistakes (+ Ways to Fix Them)

9 Proven Tips for [Niche Activity]

  • 9 Proven Tips for Checking Plumbing Problems under Your Kitchen Sink
  • 9 Proven Tips for Writing a Non-Fiction Bestseller
  • 9 Proven Tips for Doing DIY Car Maintenance

Why We/I Switched from [Niche Tool] to [Niche Tool] (Comparison)

  • Why We Switched from Pipedrive to HubSpot (Comparison)
  • Why I Switched from Microsoft Word to Scrivener (Comparison)
  • Why We Switched from iMacs to Surface Studio (Comparison)

[Niche Tool] vs [Niche Tool]: Which [Tool] is Best for You?

  • Zendesk vs Freshcaller: Which Call Software is Best for You?
  • Air Fryer vs Convection Oven: Which One is Best for You?
  • Mazda Miata vs Toyota Supra: Which Sports Car is Best for You?

The Ultimate Roundup of [Niche Activity] Tips and Tricks

  • The Ultimate Roundup of Novel Writing Tips and Tricks
  • The Ultimate Roundup of Macaroon Baking Tips and Tricks
  • The Ultimate Roundup of Solo Traveling Tips and Tricks

Want some real examples of blog posts? See what your first blog post can look like based on the topic you choose and the audience you’re targeting.

2. Target a low-volume keyword to optimize around.

Finding a keyword with low searches in Google (we recommend sticking to about 10 to 150 monthly searches). These topics offer less competition and should therefore allow your new blog post to rank more easily.

To choose a topic, you can either do a traditional brainstorming session or carry out keyword research. We suggest the latter because you can actually see how many people are looking for that topic.

Now, don’t be intimidated by the term “keyword research.” It’s not just for marketers, but for new bloggers, too. And it’s really easy to do.

To jumpstart your keyword research, first begin by identifying the general topic of your blog.

Say you’re a plumber. Your general, high-level topic might be “plumbing” (67K monthly searches).

Next, put this term into a keyword research tool such as:

When you run this term through the tool, a list of related keywords will appear. Scan the list and choose one with a lower search volume. For this example, we’ll use “under sink plumbing” (1.4K monthly searches).

Run that keyword in the keyword research tool again. Look at the related keywords. Find one with a lower search volume. Do that again.

For this example, we’ll settle on “plumbing problems under kitchen sink” (10 monthly searches). That’s the topic for our first post.

TLDR; Choose a low-volume, low-competition keyword that will ensure your first post ranks.

For more help on keyword research, here are more resources you can use:

3. Google the term to understand your audience’s search intent.

You’ve got your topic — now, you need to check that the user’s search intent would be fulfilled by a blog post.

What does that mean?

If someone is looking for “plumbing problems under a kitchen sink,” they might be looking for a tutorial, a diagram, an article, or a product that can fix the issue. If they’re looking for the first three, you’re good — that can be covered in a blog post. A product, however, is different, and your blog post won’t rank.

How do you double-check search intent?

Google the term and look at the results. If other articles and blog posts rank for that term, you’re good to go. If you only find product pages or listicles from major publications, then find a new topic to cover in your first post.

Consider the term “under sink plumbing bathroom” (30 monthly searches). It seemed like a perfect fit because it had low monthly searches.

Upon Googling the term, we found product carousels, product pages from Home Depot and Lowes, and guides written by major publications. (You’ll also want to avoid topics that have been covered by major publications, at least for now.)

TLDR; Before writing your first blog post about a low-volume topic, double-check the user intent by Googling the keyword. Also, don’t forget to take a look at who’s written about that topic so far. If you see a major brand, consider writing about another topic.

4. Find questions and terms related to that topic.

You’ve got a highly unique topic that’s been covered by just a few people so far. It’s time to flesh it out by covering related or adjacent topics.

Use the following tools:

  • Answer the Public: When you place your keyword into this tool, it will give you a list of questions related to that term.
  • Google: Google is your best friend. Search for the term and look under “People also ask” and “People also search for.” Be sure to touch upon those topics in the post.

You can also use these keyword research tools we mentioned above in step one.

5. Come up with a working title.

You might come up with a few different working titles — in other words, iterations of approaching that topic to help you focus your writing.

For example, you may decide to narrow your topic to “Tools for Fixing Leaky Faucets” or “Common Causes of Leaky Faucets.” A working title is specific and will guide your post so you can start writing.

Let’s take a real post as an example: “How to Choose a Solid Topic for Your Next Blog Post.”

Appropriate, right? The topic, in this case, was probably “blogging.” Then the working title may have been something like, “The Process for Selecting a Blog Post Topic.” And the final title ended up being “How to Choose a Solid Topic for Your Next Blog Post.”

See that evolution from topic, to working title, to final title? Even though the working title may not end up being the final title (more on that in a moment), it still provides enough information so you can focus your blog post on something more specific than a generic, overwhelming topic.

6. Create an outline.

Sometimes, blog posts can have an overwhelming amount of information — for the reader and the writer. The trick is to organize the info in a way so readers aren’t intimidated by length or amount of content. This organization can take multiple forms — sections, lists, tips — whatever’s most appropriate. But it must be organized!

Featured Resource: 6 Free Blog Post Templates

Blog-Post-Template

Download These Templates for Free

Let’s take a look at the post, “How to Use Snapchat: A Detailed Look Into HubSpot’s Snapchat Strategy.” There’s a lot of content in the piece, so it’s broken up into a few sections using descriptive headers. The major sections are separated into subsections that go into more detail, making the content easier to read.

To complete this step, all you really need to do is outline your post. This way, before you start writing, you’ll know which points you want to cover and the best order to do so. And to make things even easier, you can download and use our free blog post templates, which are pre-organized for six of the most common blogs. Just fill in the blanks!

7. Write an intro (and make it captivating).

We’ve written more specifically about writing captivating introductions in the post “How to Write an Introduction,” but let’s review, shall we?

First, grab the reader’s attention. If you lose the reader in the first few paragraphs — or even sentences — of the introduction, they’ll stop reading (even before they’ve given your post a fair shake). You can do this in a number of ways: tell a story or a joke, be empathetic, or grip the reader with an interesting fact or statistic.

Then, describe the purpose of your post and explain how it will address a problem the reader may be experiencing. This will give the reader a reason to continue reading and show them how the post will help them improve their work or lives.

Here’s an example of an intro we think does a good job of attracting a reader’s attention right away:

“Blink. Blink. Blink. It’s the dreaded cursor-on-a-blank-screen experience that all writers — amateur or professional, aspiring or experienced — know and dread. And of all times for it to occur, it seems to plague us the most when trying to write an introduction.”

8. Build out each section of your outline.

The next step — but not the last — is actually writing the content. We can’t forget about that, of course.

Now that you have your outline or template, you’re ready to fill in the blanks. Use your outline as a guide and expand on all points as needed. Write about what you already know, and if necessary, conduct additional research to gather more information, examples, and data to back up your points, while providing proper attribution when incorporating external sources. When you do, always try to find accurate and compelling data to use in your post.

If you’re having trouble stringing sentences together, you’re not alone. Finding your “flow” can be challenging for a lot of folks. Luckily, there are a ton of tools you can lean on to help you improve your writing. Here are a few to get you started:

  • Power Thesaurus: Stuck on a word? Power Thesaurus is a crowdsourced tool that provides users with a number of alternative word choices from a community of writers.
  • ZenPen: If you’re having trouble staying focused, check out this distraction-free writing tool. ZenPen creates a minimalist “writing zone” designed to help you get words down without having to fuss with formatting right away.
  • Cliché Finder: Feeling like your writing might be coming off a little cheesy? Identify instances where you can be more specific using this handy cliché tool.

You can also refer to our complete list of tools for improving your writing skills. And if you’re looking for more direction, the following resources are chock-full of valuable writing advice:

9. Publish and promote your first post any way you can.

As a new blogger, you likely don’t have a social media following yet. Thankfully, you don’t need a huge following before you can create a promotion strategy.
https://www.youtube.com/embed/Gg-E-NJ10zc?feature=oembed

A promotion strategy is your master plan for how you create, post, and engage with your social media content. It helps you take advantage of social and digital technologies to share your business, or in this case, your content. Having a solid promotional strategy offers your audience from different marketing channels more ways to find your blog posts.

Here are more blog post promotion resources:

What makes a good blog post?

Before you write a blog, make sure you know the answers to questions like, “Why would someone keep reading this entire blog post?” and “What makes our audience come back for more?”

To start, a good blog post is interesting and educational. Blogs should answer questions and help readers resolve a challenge they’re experiencing — and you have to do so in an interesting way.

It’s not enough just to answer someone’s questions — you also have to provide actionable steps while being engaging. For instance, your introduction should hook the reader and make them want to continue reading your post. Then, use examples to keep your readers interested in what you have to say.

Remember, a good blog post is interesting to read and provides educational content to audience members.

(Want to learn how to apply blogging and other forms of content marketing to your business?

Check out HubSpot Academy’s free content marketing course.)

Quick Blog Writing Tips

  • Conduct research if necessary to convey your point.
  • Make your content skimmable; break it into digestible chunks.
  • Include interesting quotes or facts for emphasis on the subject.
  • Paint a full picture with images, graphics or video.
  • Use Grammarly to catch mistakes.
  • If you don’t know where to start, start by telling a story.
  • Reference social media posts.
  • Each sentence should convey a single idea.

While you have several tools and tips already, we wanted to provide you with some formatting guidelines to use before you publish your own.

Blog Format Guidelines

  1. Include H2s to arrange ideas.
  2. Center your Images.
  3. Add alt text.
  4. Keep your sentences clear and concise.
  5. Use media with purpose.

1. Include H2s to arrange ideas.

When you begin typing your blog content, it’s important that you divide paragraphs into sections that make it easier for the reader to find what they need.

If you’re just starting out, then focus on the overarching H2s you want to talk about, and you’ll be able to branch off into subheaders and more naturally as you continue.

2. Center your images.

This is a simple practice that can help your content look more professional with little effort. Centering your images keeps the reader’s attention drawn to the subject — not searching for elsewhere.

Centering also looks better when translating from PC to mobile devices. As formatting transitions to small screens or windows, a centered image will remain the focal point.

3. Add alt text.

So those images you centered earlier, make sure you have descriptive alt text for them, too.

Image alt text allows search engines, like Google, to crawl and rank your blog post better than pages lacking the element. It also leads readers to your blog post if the keywords included are what they searched for in the first place.

Besides SERP features, image alt text is beneficial to readers by providing more accessibility. Image alt text allows people to better visualize images when they can’t see them, and with assistive technology, can be auditorially read aloud for people to enjoy.

4. Keep your sentences short and concise.

When you begin working on the body of your blog post, make sure readers can clearly understand what you’re trying to accomplish.

You shouldn’t feel pressure to elongate your post with unnecessary details, and chances are that if you keep it concise, readers will derive more value from your work.

5. Use media with a purpose.

Break up the monotony of your blog post with some multimedia content where seen fit.

Your reader will enjoy visiting a blog page with images, videos, polls, audio or slideshows as opposed to a page of black and white text.

It also makes it more interactive and improves your on-page search engine optimization (SEO).

Now, do you want some real examples of blog posts? See what your first blog post can look like based on the topic you choose and the audience you’re targeting.

Blog Post Examples

  1. List-Based Post
  2. Thought Leadership Post
  3. Curated Collection Post
  4. SlideShare Presentation
  5. Newsjacking Post
  6. Infographic Post
  7. How-to Post
  8. Guest Post

1. List-Based Blog Post

List-Based Post Example: 17 Blogging Mistakes to Avoid in 2021, According to HubSpot Bloggers

List-based posts are sometimes called “listicles,” a mix of the words “list” and “article.” These are articles that deliver information in the form of a list. A listicle uses sub-headers to break down the blog post into individual pieces, helping readers skim and digest your content more easily.

As you can see in the example from our blog, listicles can offer various tips and methods for solving a problem.

2. Thought Leadership Post

Example: How HubSpot’s Customers Are Shaping the Next Normal

Thought-leadership-blog-example

Thought leadership posts allow you to share your expertise on a particular subject matter and share firsthand knowledge with your readers.

These pieces — which can be written in the first person, like the post shown above — help you build trust with your audience so people take your blog seriously as you continue to write for it.

3. Curated Collection Post

Example: 8 Examples of Evolution in Action

An example blog post featuring a curated collection

Curated collections are a special type of listicle blog post. Rather than sharing tips or methods for doing something, this type of blog post shares a list of real examples that all have something in common in order to prove a larger point.

In the example post above, Listverse shares eight real examples of evolution in action among eight different animals — starting with the peppered moth.

4. Slide Presentation

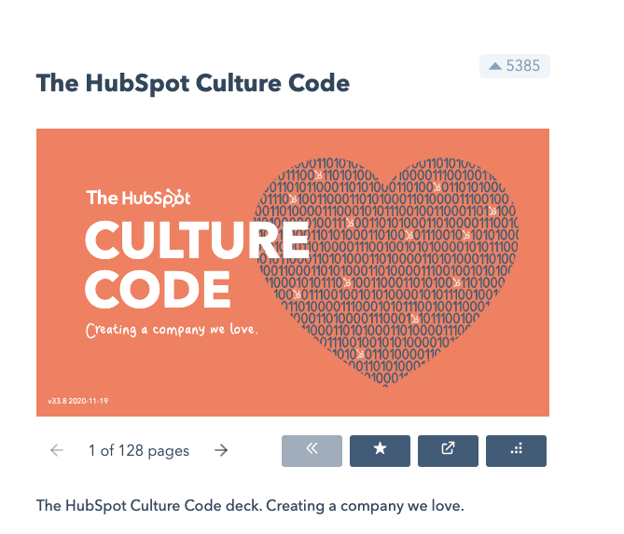
Example: The HubSpot Culture Code

Example slides presentation, HubSpot Culture Code

HubSpot Slides is a presentation tool that helps publishers package a lot of information into easily shareable slides. Think of it like a PowerPoint, but for the web. With this in mind, SlideShare blog posts help you promote your SlideShare so that it can generate a steady stream of visitors.

Unlike blogs, slide decks don’t often rank well on search engines, so they need a platform for getting their message out there to the people who are looking for it. By embedding and summarizing your SlideShare on a blog post, you can share a great deal of information and give it a chance to rank on Google at the same time.

Need some slideshow ideas? In the example above, we turned our company’s “Culture Code” into a slides presentation that anyone can look through and take lessons from, and then promoted it in a blog post.

5. Newsjacking Post

Example: Ivy Goes Mobile With New App for Designers

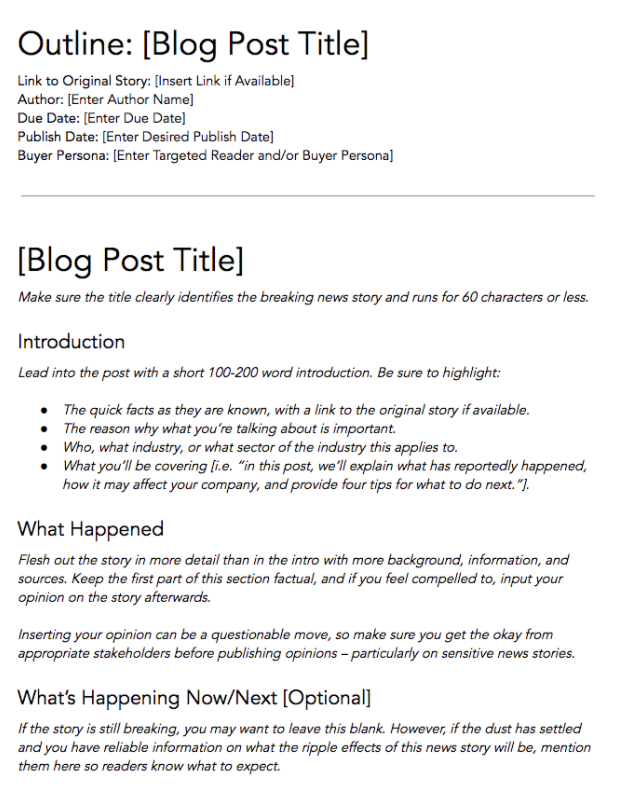
An example of a newsjacking blog post

“Newsjacking” is a nickname for “hijacking” your blog to break important news related to your industry. Therefore, the newsjack post is a type of article whose sole purpose is to garner consumers’ attention and, while offering them timeless professional advice, prove your blog is a trusted resource for learning about the big things that happen in your industry.

The newsjack example above was published by Houzz, a home decor merchant and interior design resource, about a new mobile app that was launched just for interior designers. Houzz didn’t launch the app, but the news of its launching is no less important to Houzz’s audience.

6. Infographic Post

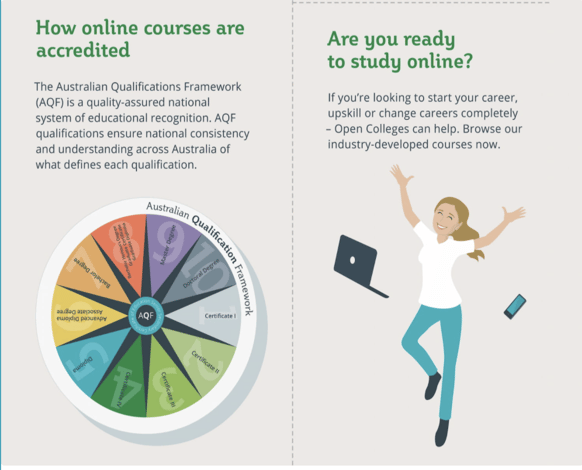
Example: The Key Benefits of Studying Online [Infographic]

An example from an infographic blog postThe infographic post serves a similar purpose as the SlideShare post — the fourth example, explained above — in that it conveys information for which plain blog copy might not be the best format.
For example, when you’re looking to share a lot of statistical information (without boring or confusing your readers), building this data into a well-designed, even engaging infographic can keep your readers engaged with your content. It also helps readers remember the information long after they leave your website.

7. How-to Post

Example: How to Write a Blog Post: A Step-by-Step Guide

For this example, you need not look any further than the blog post you’re reading right now! How-to guides like this one help solve a problem for your readers. They’re like a cookbook for your industry, walking your audience through a project step by step to improve their literacy on the subject.

The more posts like this you create, the more equipped your readers will be to work with you and invest in the services you offer.

8. Guest Post

Example: Your Bookmarkable Guide to Social Media Image Sizes in 2021 [Infographic]

Guest posts are a type of blog post that you can use to include other voices on your blog. For example, if you want to get an outside expert’s opinion on a topic, a guest post is perfect for that.

Additionally, these posts give your blog variety in topic and viewpoint. If your customer has a problem you can’t solve, a guest post is a great solution.

If you begin accepting guest posts, set up editorial guidelines to ensure they’re up to the same standards as your posts.

So we’ve gone through the different types of blog posts you can make, but how do you consistently make quality blog posts that your viewers will enjoy?

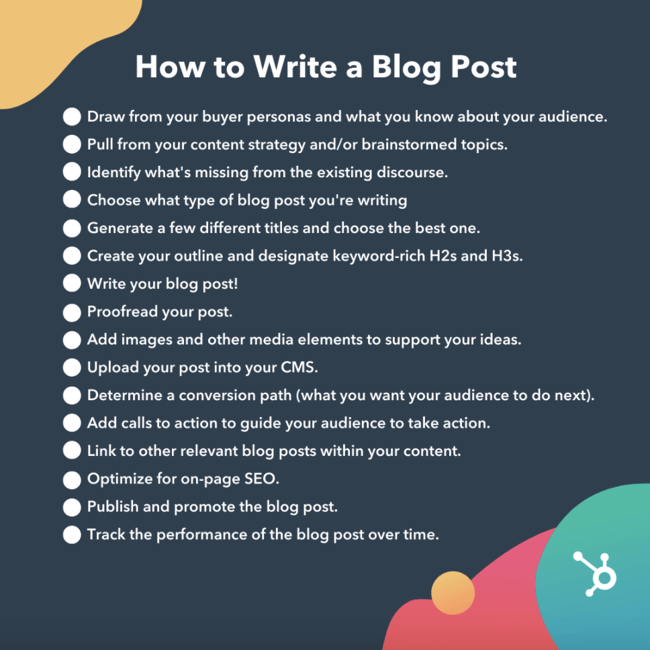
How to Write a Blog Post Graphic

How to Write a Blog Post

  1. Draw from your buyer personas and what you know about your audience.
  2. Pull from your content strategy and/or brainstormed topics.
  3. Identify what’s missing from the existing discourse.
  4. Choose what type of blog post you’re writing.
  5. Generate a few different titles and choose the best one.
  6. Create your outline and designate keyword-rich H2s and H3s.
  7. Write your blog post!
  8. Proofread your post.
  9. Add images and other media elements to support your ideas.
  10. Upload your post into your CMS.
  11. Determine a conversion path (what you want your audience to do next).
  12. Add calls to action to guide your audience to take action.
  13. Link to other relevant blog posts within your content.
  14. Optimize for on-page SEO.
  15. Publish and promote the blog post.
  16. Track the performance of the blog post over time.

1. Draw from your buyer personas and what you know about your audience.

Before you start writing your blog post, make sure you have a clear understanding of your target audience.

Ask questions like: What do they want to know about? What will resonate with them?

This is where the process of creating buyer personas comes in handy. Consider what you know about your buyer personas and their interests while you’re coming up with a topic for your blog post.

For instance, if your readers are millennials looking to start a business, you probably don’t need to provide them with information about getting started in social media — most of them already have that down.

You might, however, want to give them information about how to adjust their social media approach (for example — from what may be a casual, personal approach to a more business-savvy, networking-focused approach). That kind of tweak is what helps you publish content about the topics your audience really wants and needs.

Don’t have buyer personas in place for your business? Here are a few resources to help you get started:

2. Pull from your content strategy and/or brainstormed topics.

If you already have a pre-existing portfolio to look back on, it would benefit you to pull from those brainstormed post ideas or previous content strategy.

3. Identify what’s missing from the existing discourse.

Fill in the gaps of the existing discourse in the topic of your choosing.

You want to meet a need that hasn’t already been met in your topic cluster. Otherwise, you run the risk of writing content for topics that are already over-saturated. It’s hard to beat saturated search queries when you’re trying to rank against high authority publications — but not impossible if your content is answering the queries the competition hasn’t.

4. Choose what type of blog post you’re writing.

There are several types of blog posts you can create, and they each have different formats to follow.

Six of the most common formats include:

  • The List-Based Post
  • The “What Is” Post
  • The Pillar Page Post (“Ultimate Guide”)
  • The Newsjacking Post
  • The Infographic Post
  • The “How-To” Post

Save time and download six blog post templates for free.FEATURED RESOURCE

5. Generate a few different titles and choose the best one.

Your blog title should tell readers what to expect, yet it should leave them wanting to know more — confusing, right?

This is why when you’re coming up with a blog post title that you should brainstorm multiple ones instead of just one.

6. Create your outline and designate keyword-rich H2s and H3s.

When outlining, you need to center your main ideas with keyword-rich H2s and H3s. These are going to be your headers and subheaders that readers typically search for, and the information that Google crawls when indexing and ranking content.

7. Write your blog post!

We already told you how to build out your outline earlier in the post, so we’ll quickly go over the main points once more.

You’ve already outlined your main headings and subheadings, so now’s the time to add the body.

Write about what you already know, and if necessary, conduct additional research to gather more information, examples, and data to back up your points, while providing proper attribution when incorporating external sources. When you do, always try to find accurate and compelling data to use in your post.

This is also your opportunity to show personality in your writing. Blog posts don’t have to be strictly informational, they can be filled with interesting anecdotes and even humor if it serves a purpose in expressing your ideas. It also factors into creating and maintaining your blog’s brand voice.

Don’t be discouraged if you’re having trouble stringing sentences together, you’re not alone. Finding your “flow” can be challenging, but there are many tools to ease the process.

8. Proofread your post.

The editing process is an important part of blogging — don’t overlook it.

Ask a grammar-conscious co-worker to copy edit and proofread your post. You may also consider enlisting the help of The Ultimate Editing Checklist or using a free grammar checker like Grammarly.

If you’re looking to brush up on your self-editing skills, turn to these helpful posts for some tips and tricks to get you started:

9. Add images and other media elements to support your ideas.

When you’re finished checking for grammar, shift your focus to adding other elements to the blog post than text. There’s much more to making a good blog post than copy, here’s some following elements to add in support of your ideas:

Featured Image

Choose a visually appealing and relevant image for your post. As social networks treat content with images more prominently, visuals are more responsible than ever for the success of your blog content.

For help selecting an image for your post, read “How to Select the Perfect Image for Your Next Blog Post” and pay close attention to the section about copyright law.

Visual Appearance

No one likes an unattractive blog post. And it’s not just pictures that make a post visually appealing — it’s the formatting and organization of the post, too.

In a well-formatted and visually-appealing blog post, you’ll notice that header and sub-headers are used to break up large blocks of text — and those headers are styled consistently.

Here’s an example of what that looks like:

Visual appearance example in a blog post

Screenshots should always have a similar, defined border so they don’t appear as if they’re floating in space — that style should stay consistent from post to post.

Maintaining this consistency makes your content look more professional and easier on the eyes.

Topics and Tags

Tags are specific, public-facing keywords that describe a post. They also allow readers to browse for more content in the same category on your blog. Refrain from adding a laundry list of tags to each post. Instead, put some thought into a blog tagging strategy.

Think of tags as “topics” or “categories,” and choose 10-20 tags that represent all the main topics you want to cover on your blog. Then stick to those.

10. Upload your post into your CMS.

You filled out your blog post with all the optimized content you can, now is the time to publish it in your content management system.

You can opt to post your content immediately, save it as a draft, or schedule when you want it to be posted live in case you adhere to a posting schedule.

11. Determine a conversion path (what you want your audience to do next).

conversion path is a process by which an anonymous website visitor becomes a known lead. It sounds simple enough, but creating an effective conversion path requires a clear understanding of your target audience and their needs.

Having a conversion path is important because when you share your content on the web, you should have an idea of what your audience should do next, or in other words, provide them with a path forward.

The HubSpot Flywheel model is a great example of this as it shows how our organization gains and maintains leads.

HubSpot Flywheel Model

12. Add calls to action to guide your audience to take action.

Call to action (CTA) are a part of a webpage, advertisement, or piece of content that encourages the audience to do something. You can add them to your blog post to guide your reader with “next steps” or a conversion path.

Different types of call to actions include asking readers to:

  • Subscribe to your newsletter to see when you publish more content.
  • Join an online community in your blog domain.
  • Learn more about a topic with downloadable content.
  • Try something for free or discount to convert readers to customers.

To get a better idea of how to make a CTA that readers want to click, we have a whole list of effective call to action examples for you to check out.

13. Link to other relevant blog posts within your content.

When you’re completing your blog post, you should link relevant content throughout it. An effective way to do this is to link within the same content cluster.https://www.youtube.com/embed/m-nx1fHhJ2M?feature=oembed

Keeping relevant content throughout your post can provide your readers with more helpful information, and potentially boost search engine rankings with corresponding longtail keywords.

But we’ll talk more about how to improve your ranking in the next step.

14. Optimize for on-page SEO.

After you finish writing, go back and optimize the on-page elements of your post.

Don’t obsess over how many keywords to include. If there are opportunities to incorporate keywords you’re targeting, and it won’t impact reader experience, do it. If you can make your URL shorter and more keyword-friendly, go for it. But don’t cram keywords or shoot for some arbitrary keyword density — Google’s smarter than that!

Here’s a little blog SEO reminder about what you should review and optimize:

  • Write your meta description.

Meta descriptions are the descriptions below the post’s page title on Google’s search results pages. They provide searchers with a short summary of the post before clicking into it. They are ideally between 150-160 characters and start with a verb, such as “Learn,” “Read,” or “Discover.”

While meta descriptions no longer factor into Google’s keyword ranking algorithm, they give searchers a snapshot of what they’ll get from reading the post and help improve your clickthrough rate from search.

  • Optimize your page title and headers.

Most blogging software uses your post title as your page title, which is the most important on-page SEO element at your disposal. But if you’ve followed our formula so far, you should already have a working title that will naturally include keywords or phrases your target audience is interested in.

Don’t over-complicate your title by trying to fit in keywords where they don’t naturally belong. With that said, if there are clear opportunities to add keywords you’re targeting to your post title and headers, feel free to take them. Also, try to keep your headlines short — ideally, under 65 characters — so they don’t get truncated in the search engine results.

  • Consider anchor text best practices as you interlink to other pages.

Anchor text is the word or words that link to another page — either on your website or on another website. Carefully select which keywords you want to link to other pages on your site because search engines take that into consideration when ranking your page for certain keywords.

It’s also important to consider which pages you link to. Consider linking pages that you want to rank for a specific keyword. You could end up getting it to rank on Google’s first page of results instead of its second page — and that isn’t small potatoes!

  • Write alt text for all of your images.

Alt text conveys the “why” of an image as it relates to the content of your blog post to Google. By adding alt text correlating to the topic clusters and keywords of the post, Google can better direct users’ searches to you.

  • Check that all images are compressed for page speed.

When Google crawls different websites, a page’s load speed holds weight in page ranking. Make sure the images you include throughout the page aren’t unnecessarily large to shorten the duration it takes to load.

Use apps like Squoosh to minimize the size of your images without losing the quality.

  • Ensure that your blog post is mobile friendly.

More than 60% of organic visits are carried out on a mobile device. As such, having a website with a responsive design is critical. In addition to making sure your website’s visitors (including your blog’s visitors) have the best experience possible, optimizing for mobile will score your website some SEO points.

15. Publish and promote the blog post.

Share your post across all the marketing channels in your repertoire. The further the reach, the more of a possibility that readers will find it.

Channels to expand your blog post promotion strategy include:

16. Track the performance of the blog post over time.

Your post is published for the world to see, make sure you’re keeping an eye on its performance over time so you can see if your blog post strategy is working well enough for your goals.

There’s a plethora of website traffic analysis tools that you can take advantage of to better understand your audience’s behavior on your blog posts.

Ready to blog?

Blogging can help you build brand awareness, become a thought-leader and expert in your industry, attract qualified leads, and boost conversions. Follow the steps and tips we covered above to begin publishing and enhancing your blog today.

Editor’s note: This post was originally published in October 2013 and has been updated for comprehensiveness.

Originally published Jan 21, 2022 7:00:00 AM, updated March 16 2022

Topics:How to Write a Blog Post

Don’t forget to share this post

How to Create an Effective Customer Journey Map [Examples + Template]

How to Create an Effective Customer Journey Map [Examples + Template]

Written by Aaron Agius @IAmAaronAgius

Free Download: Customer Journey Map Template Access Free Journey Map Templates  

woman looking at a map that represents the customer journey

Understanding the minds of customers can be challenging. You think you have accounted for their wants and needs, but then new technology, preferences, and buying trends emerge.

According to Baymard Institute, nearly 70% of online shoppers abandoned their cart in 2021. Why does a customer spend hours adding products to their cart just to close the tab? Why is it taking customers several steps to get from point A to point B when it should only take one?

It is likely that you do not have a clear grasp of the customer’s journey to purchasing your product or service.

Download Now: Free Customer Journey Map Templates

customer journey map templates download

Download Now

In this post, we’ll explain everything you need to know about the customer journey, including what it is and how to map it. If you’re in a rush, you can use the links below to navigate to the exact information you’re looking for.

FEATURED RESOURCE

Table of Contents

 What is a customer journey map?

A customer journey map is a visual representation of a customer’s experience with a company. It provides an understanding into the needs and concerns of potential customers which directly motivate or inhibit their actions. This information allows companies to boost customer experience leading to higher conversion rates and improved customer retention.

The customer journey is the process by which a customer interacts with a company in order to achieve a goal. From gaining awareness of a brand via social media to receiving an email after a successful transaction, there are usually many and varied steps in between. It is not something to assume or predict based on your internal perspective. A customer journey is very specific to the physical experiences your customers have.

Thus, the best way to understand the journeys of your customers is by asking them

Why is a journey map important?

The customer journey seems simple. Companies offer a product or service, and customers buy it. The journey is actually more complex than that. Salesforce reported that 80% of customers consider their experience with a company to be as important as its products. From the time a customer is introduced to a product to when they purchase it, they go through the buyer’s journey.

On this journey, customers might see ads, speak to a customer service representative, or attempt to check out. These are stops along the journey that affect their actions. Understanding the process and its consequences on customer interactions allows a business to plan and prepare to drive customers towards a sale.

However, simply understanding the customer journey isn’t enough. It’s best to visualize this complicated journey into a diagram that you and other employees can refer to as a resource. This is where designing a customer journey map comes into play. 

The Customer Journey Mapping Process

Customer journey mapping is the process of creating a customer journey map — the visual representation of a company’s customer experience. It compiles a customer’s experience as they interact with a business and combines the information into a visual map.

By understanding this relationship, you can structure your touchpoints to create the most effective and efficient process for your customers. A customer journey map visualizes the current process customers take, from the first to final touchpoint, to see if they’re currently reaching their goals and, if not, how they can.

Customer journeys are not linear.

The customer journey can rarely be represented in a linear journey from point A to point B because buyers often take a back and forth, cyclical, multi-channel journey. This makes customer journey mapping difficult to accurately visualize.

For this reason, savvy business leaders use a variety of methods to represent the journey, from post-it notes on a boardroom wall, to Excel Spreadsheets, to infographics. The most important thing is that the map makes sense to those who’ll be using it.

However, before you can dive into creating your customer journey map, you need to first collect data from your customers and prospects. The process of creating an effective customer journey map is extensive but valuable.

What’s included in a customer journey map?

  1. The Buying Process
  2. User Actions
  3. Emotions
  4. Pain Points
  5. Solutions

1. The Buying Process

A customer journey map includes significant milestones in the customer journey. You’ll begin by drafting the path your business intends for a customer to take in order to reach a goal. Using the typical buying process stages, you’ll list each stage horizontally.

2. User Actions

This element of the customer journey map details what a customer does in each stage of the buying process. They might speak with friends and family about their needs and potential ways to fulfill those needs in the awareness stage. From there, they might take a demo on your website, and then finally, they’ll use cash or a debit card to make their purchase. This element explores the various ways your customers might achieve the goal.

3. Emotions

Whether the goal is big or small, it’s important to remember your customers are solving a problem. That means they’re probably feeling some emotion — whether that is relief, happiness, excitement, or worry. If your process is long or complicated, they might feel a range of emotions at every stage. Adding these emotions to the journey map can help you mitigate negative emotions about the journey so that they don’t become negative opinions about your brand.

4. Pain Points 

Where there is a negative emotion, there’s a pain point that caused it. Adding pain points to your customer journey map can help you identify which stage your customer is experiencing negative emotions and deduce the reason why.

5. Solutions

As the final element in your customer journey map, solutions are where you and your team will brainstorm potential ways to improve your buying process so that customers encounter fewer pain points and have positive moods as they patronize your business.

What is a touchpoint in a customer journey map?

A touchpoint in a customer journey map is an instance where your customer can form an opinion of your business. Touchpoints can be found in places where your business comes in direct contact with the potential or existing customer. A display ad, an interaction with an employee, a 404 error, and even a Google review can be considered a customer touchpoint.

Your brand exists beyond your website and marketing materials, so it’s important that the different types of touchpoints are considered in your customer journey map because they can help uncover opportunities for improvement in the buying journey.

How to Create a Customer Journey Map 

  1. Set clear objectives for the map.
  2. Profile your personas and define their goals.
  3. Highlight your target customer personas.
  4. List out all the touchpoints.
  5. Identify the elements you want your map to show.
  6. Determine the resources you have and the ones you’ll need.
  7. Take the customer journey yourself.
  8. Make necessary changes.

1. Set clear objectives for the map.

Before you can dive into creating your map, you need to ask yourself why you are making one in the first place. What goals are you directing this map towards? Who is it specifically about? What experience is it based upon?

Based on this, you may want to create a buyer persona. This is a fictitious customer with all of their demographics and psychographics who represents your average customer. Having a clear persona is helpful in reminding you to direct every aspect of your customer journey map towards them.

2. Profile your personas and define their goals.

Next, you should conduct research. Some great ways to get valuable customer feedback is through questionnaires and user testing. The important thing is to only reach out to actual customers or prospects.

You want the feedback of people who are actually interested in purchasing your products and services and who have interacted with your company before or plan to do so.

Some examples of good questions to ask are:

  • How did you hear about our company?
  • What first attracted you to our website?
  • What are the goals you want to achieve with our company? In other words, what problems are you trying to solve?
  • How long have you / do you typically spend on our website?
  • Have you ever made a purchase with us? If so, what was your deciding factor?
  • Have you ever interacted with our website with the intent of making a purchase but decided not to? If so, what led you to this decision?
  • On a scale of 1 to 10, how easy is it for you to navigate our website?
  • Did you ever require customer support? If so, how helpful was it, on a scale of 1 to 10?
  • Is there any way that we can further support you to make your process easier?

You can use this buyer persona tool to fill in the details you procure from customer feedback.

3. Highlight your target customer personas. 

Once you’ve learned about the different customer personas that interact with your business, you’ll need to narrow your focus on one or two of them. Remember, a customer journey map tracks the experience of one customer who’s taking a very specific path with your company. If you group too many personas into one journey, your map won’t accurately reflect your customers’ experience.

If you’re creating your first map, it’s best to pick your most common customer persona and consider the route they would typically take when engaging with your business for the first time. You can use a marketing dashboard to compare each one and determine which would be the best fit for your journey map. Don’t worry about the ones you leave out, as you can always go back and create a new map that’s specific to these customer types. 

4. List out all the touchpoints.

Touchpoints are all the places on your website that your customers can interact with you. Based on your research, you should list out all the touchpoints your customers and prospects are currently using, as well as the ones you believe they should be using if there is no overlap.

This is an important step in creating a customer journey map because it gives you insight into what actions your customers are performing. If they are using fewer touchpoints than expected, does this mean they are quickly getting turned away and leaving your site early? If they are using more than expected, does this mean your website is complicated and it requires them several steps to get to an end goal?

Whatever the case may be, understanding the touchpoints is a tool that can help you understand the ease and objectives of customer journeys.

This doesn’t just mean your website. You need to look at all the ways in which your customer might come across you online. These might include:

  • Social channels
  • Paid ads
  • Email marketing
  • Third-party review sites or mentions

Run a quick Google search of your brand to see all the pages that mention you. Verify these by checking in on your Google Analytics to see where your traffic is coming from.

Whittle your list down to those touchpoints that are the most common and will be most likely to see an action associated with it. Consider these touchpoints as you create your journey map: 

Customer Actions

List out all of the actions your customers perform throughout their interaction with your brand. This might be a Google search for your keywords or clicking on an email from you. You may wind up with a long list of actions. That’s fine. You’ll get a chance to rationalize your information later.

It’s important to recognize when customers are being expected to take too many actions to achieve their goals. Reducing the number of steps a customer needs to take can feel risky, but pays off in higher conversion rates.

Customer Emotions & Motivations

All marketing is a result of cause and effect. Likewise, every action your customer takes is motivated by emotion. And your customer’s emotions will change depending on which part of their journey they’re at.

The emotional driver of each of your customer’s actions is usually caused by a pain point or a problem. Knowing this will help you to provide the right content at the right time so that you smooth the customer’s emotional journey through your brand. 

Customer Obstacles & Pain Points

Get to know what roadblocks are stopping your customer from making their desired action. One common obstacle is cost. For example, one of your customers could love your product but abandon their cart upon discovering unexpectedly high shipping rates.

Highlighting these potential obstacles in your customer journey can help you mitigate them. For example, you could provide an FAQ page that answers common questions about shipping costs.

5. Determine the resources you have and the ones you’ll need. 

Your customer journey map is going to touch on nearly every part of your business. This will highlight all of the resources that go into creating the customer experience. So, it’s important to take inventory of the resources you have and the ones you’ll need to improve the customer’s journey.

For example, maybe your map highlights some flaws in your customer service offer and you notice that your team doesn’t have the tools they need to properly follow up with customers after a service interaction. Using your map, you can advise management to invest in customer service tools that will help your team manage customer demand.

And, by including these new tools in your map, you can accurately predict how they’ll impact your business and drive outsized value. This makes it much easier to convince gatekeepers and decision-makers to invest in your proposals. 

6. Take the customer journey yourself. 

Just because you’ve designed your map doesn’t mean your work is done. This is the most important part of the process: analyzing the results. How many people are clicking to your website but then closing out before making a purchase? How can you better support customers? These are some of the questions you should be able to answer with your finished map.

Analyzing the results can show you where customer needs aren’t being met. By approaching this, you can ensure that you are providing a valuable experience and making it clear that people can find solutions to their problems with your company’s help.

The whole exercise of mapping the customer journey remains hypothetical until you try it out yourself.

For each of your personas, follow the journey they take through their social media activity, through to reading their emails, through to searching online.

7. Make the necessary changes 

Your data analysis should give you a sense of what you want your website to be. You can then make the appropriate changes to your website to achieve these goals. Perhaps this is making more distinct call-to-action links. Or, maybe, it’s writing longer descriptions under each product to make its purpose more clear.

No matter how big or small the changes are, they will be effective as they are directly correlated with what customers listed as their pain points. Rather than blindly making changes in the hopes that they will improve customer experiences, you can feel certain that they will. And, with the help of your visualized customer journey map, you can ensure those needs and pain points are always addressed.

How often should you update your customer journey map?

Your map should be a constant work-in-progress. Reviewing it on a monthly or quarterly basis will help you to identify gaps and opportunities for streamlining your customer journey further. Use your data analytics along with customer feedback to check for any roadblocks.

I find it useful to keep all stakeholders involved in this process, which is why my maps are usually visualized on Google Sheets shared amongst the people I work closely with. It’s also beneficial to have regular meetings (quarterly or yearly) to analyze how new products or offerings might have changed the customer journey. 

Types of Customer Journey Maps and Examples

There are four types of customer journey maps, each having their own unique benefits. Depending on the specific purpose you have for the map, you can choose the proper one. 

Current State

These customer journey maps are the most widely-used type. They visualize the actions, thoughts, and emotions your customers currently experience while interacting with your company. They are best used for continually improving the customer journey. Customer Journey Map Example: Current State Journey Map

Image Source

Day in the Life

These customer journey maps visualize the actions, thoughts, and emotions your customers currently experience in all the activities in which they partake on a daily basis, whether or not that includes your company. This type gives a wider lens into the lives of your customers and what their pain points are in real life. They are best used for addressing unmet customer needs before customers even know they exist. Your company may use this type of customer journey map when exploring new market development strategies.

Customer Journey Map Example: Day in the Life

Image Source

Future State

These customer journey maps visualize what actions, thoughts, and emotions your customers will experience in future interactions with your company. Based on what their current experience is, you’ll have a clear picture of where your business fits in. They are best used for illustrating your vision and setting clear, strategic goals.

Customer Journey Map Example: Future State Journey Map Example

Image Source

Service Blueprint

These customer journey maps begin with a simplified version of one of the above map styles. Then, they layer on the factors responsible for delivering that experience, including people, policies, technologies, and processes. They are best used for identifying the root causes of current customer journeys or identifying the steps needed to attain desired future customer journeys.

Customer Journey Map Example: Service Blueprint journey map

 Image Source

Customer Journey Mapping Best Practices

  1. Set a goal for the journey map.
  2. Survey customers to understand their buying journey.
  3. Ask customer service reps about the questions they receive most frequently.
  4. Create a customer journey map for each buyer persona.
  5. Review and update each journey map after every major product release.
  6. Make the customer journey map accessible to cross-functional teams.

1. Set a goal for the journey map.

Determine whether you’re aiming to improve the buying experience or launch a new product. Knowing what you need the customer journey map to tell you can prevent scope creep on a large project like this.

2. Survey customers to understand their buying journey.

What you know about the customer experience and what they actually experience can be two very different things. Ask your customers directly what it’s like doing business with your company so you have a more accurate snapshot of the customer’s journey.

3. Ask customer service reps about the questions they receive most frequently.

Sometimes, customers aren’t aware of their specific pain points — they simply feel when something isn’t working for them. That’s where your customer service reps come in. They can help fill in the gaps and translate customer pain points into business terms that you and your team can understand and act on.

4. Create a customer journey map for each buyer persona.

It’s easy to assume each customer operates the same way, but that couldn’t be further from the truth. Demographics, psychographics, and even how long someone has been a customer can determine the way a person interacts with your business and makes purchasing decisions. Group overarching themes into buyer personas and create a customer journey map for each one.

5. Review and update each journey map after every major product release.

Every time your product or service changes, the customer’s buying process changes too. Even a slight tweak, like adding an additional field to a lead form, can become a significant roadblock for customers. So, it’s important to review the customer journey map before and after implementing changes.

6. Make the customer journey map accessible to cross-functional teams.

Customer journey maps aren’t very valuable in a silo. Creating a journey map is a convenient way to bring cross-functional teams together to provide feedback. Afterward, make a copy of the map accessible to each team so they always keep the customer top of mind.

Benefits of Customer Journey Mapping

You might be telling yourself, “This doesn’t seem necessary for me or my company. We understand the needs and pain points of our customers, thank you very much.” This may be true at surface level.

However, breaking down the customer journey phase by phase, aligning each step with a goal, and restructuring your touchpoints accordingly are essential steps towards maximizing customer success. After all, everything you do should be about solving customer problems and helping them achieve long-term success with your product or service.

1. You can refocus your company with an inbound perspective.

Rather than trying to discover your customers through outbound marketing, you can have your customers discover you with the help of inbound marketing. Outbound marketing involves tactics that are poorly targeted at generalized or uninterested audiences and that seek to interrupt customers from their daily lives.

Outbound marketing is costly and inefficient. It annoys and deters customers and prospects. Inbound marketing involves creating interesting content that is useful and that your customers are already searching for. It grabs their attention first and focuses on the sales later.

By mapping out the customer journey, you can understand what is interesting and helpful to your customers about your company and website, and what is turning them away. You can create the kind of content that will attract them to your company and keep them there.

2. You can create a new target customer base.

If you don’t properly understand the customer journey, you probably don’t completely know the demographics and psychographics of your customers. This is dangerous; it’s a waste of time and money to repeatedly target too broad of an audience than who will actually be interested in your products, services, and content.

Researching the needs and pain points of your typical customers and mapping out their journey will give you a good picture of the kinds of people who are trying to achieve a goal with your company. Thus, you can hone in your marketing to that specific audience.

3. You can implement proactive customer service.

A customer journey map is like a roadmap to the customer’s experience. It shows you moments where people will experience delight as well as situations where they might be faced with friction. Knowing this ahead of time allows you to plan your customer service strategy accordingly, and intervene at ideal times that maximize your brand’s value to the buyer.

Proactive customer service also makes your brand appear more reliable to your customer base. For example, if it’s around the holidays and you’re anticipating a customer service surge, you can send a message to your customers letting them know about your team’s adjusted holiday hours.

You can also let them know about additional support options if your team is unavailable and what to do if there’s an urgent problem that needs immediate attention.

This way, customers won’t feel surprised if they’re waiting on hold a little longer than usual or call you outside your new working hours. They’ll even have alternative options to choose from — like a chatbot or knowledge base — if they need to find a faster solution.

4. You can improve your customer retention rate.

When you have a complete view of the customer journey, it’s easier to pick out areas where you can stand to improve it. When you do, customers experience fewer pain points which leads to fewer people leaving your brand for competitors. After all, 33% of customers will consider switching brands after just one poor experience.

Customer journey mapping can point out individuals who are on the path to churn. If you log the common behaviors and actions that these customers have, you can start to spot them before they leave your business. While you might not save them all, it’s worth the try since increasing customer retention rates by just 5% can increase profits by 25%-95%.

5. You can create a customer-focused mentality throughout the company.

As your company gets larger, it can be hard to coordinate all the departments to be as customer-focused as your customer service, support, and success teams. They can often have sales and marketing goals that aren’t based on what real customers want.

A clear customer journey map can be shared with your entire organization. The great thing about these maps is that they map out every single step of the customer journey from initial attraction to post-purchase support. And, yes, this concerns marketing, sales, and service.

Based on this rationale, you can’t deny the importance of a customer journey map. Thus, we’ve created the following steps for crafting the best map to help your company and customers prosper.

Customer Journey Mapping Examples

The goal of a company is to get its customers from point A to point B. While it’s up to the business or organization to decide what that goal is, it typically involves the purchase of a product or service. Potential customers and clients need to be led along this journey. To help guide your business in its direction, here are examples to draw inspiration from for building out your customer journey map.

1. HubSpot’s Customer Journey Map Templates

free editable customer journey map template

Featured Resource: Customer Journey Map Template

Download a free, editable customer journey map template.

HubSpot’s free Customer Journey Map Templates provide an outline for companies to understand their customers’ experiences. Download them today to start working on your customer journey map.

2. B2B Customer Journey Map ExampleB2B customer journey map example

Image Source

This customer journey map clearly outlines the five steps Dapper Apps believes a customer goes through when interacting with them. As you can see, it goes beyond the actual purchasing phase by incorporating initial research and post-purchase needs.

This map is effective because it helps employees get into the mind of the customer by understanding the normal questions they have and the emotions they’re feeling. There are incremental action steps that Dapper Apps can take in response to these questions and feelings that will help it solve all the current problems customers are having.

3. Ecommerce Customer Journey Map Example

ecommerce customer journey map example
Image Source

This fictitious customer journey map is a clear example of a day in the life map. Rather than just focusing on the actions and emotions involved with the customer’s interaction with the company, this map outlines all the actions and emotions the customer experiences on a normal day.

This map is helpful because it measures a customer’s state of mind or emotional state based on the level of freedom they get from certain stimuli. This is helpful for a company that wants to understand what its target customers are stressed about and what problems may need solving that they don’t even know exist.

4. Future B2C Customer Journey Map Example

 future BTC customer journey map

Image Source

This customer journey map, designed for Carnegie Mellon University, exemplifies the usefulness of a future state customer journey map. It outlines the thoughts, feelings, and actions the university wants its students to be having and the touchpoints, devices, people, and environments it wants students to be interacting with.

Based on these goals, CMU chose specific proposed changes for each phase and even wrote out example scenarios for each phase. This is a clear diagram that can visualize the company vision and help any department understand where they will fit into building a better user experience.

5. Retail Customer Journey Map Example

 retail-customer-journey-map

Image Source

This customer journey map shows an in-depth customer journey map of a customer interacting with a fictitious restaurant. It’s clear that this style of map is more comprehensive than the others as it includes the front of stage (direct) and back of stage (non-direct or invisible) interactions a customer has with the company, as well as the support processes.

This map is more complicated, but it lays out every action involved in the customer experience, including those of the customer, employees directly serving, and employees working behind the scenes. By analyzing how each of these factors influences the customer journey, a company can find the root cause of mishaps and problem-solve this for the future.

Free Customer Journey Map Templates

To get your business from point A — deciding to focus on customer journeys — to point B — having a customer journey map in place — a critical step to the process is selecting which customer mindset your business will focus on. It will decide which of the following templates you can use to drive customers or clients to your goal.

1. Current State Template

 If you’re using this template for a B2B product, the phases may reflect the search, awareness, consideration of options, purchasing decision, and post-purchase support processes. For instance, in the Dapper Apps example, its phases were research, comparison, workshop, quote, and sign-off.

 current state customer journey map template

2. Day in the Life Template

Since this template reflects all the thoughts, feelings, actions, needs, and pain points a customer has in their entire daily routine — whether or not that includes your company — you’ll want to map out this template in a chronological structure. This way, you can highlight the times of day at which you can offer the best support.

Click here for an interactive day in the life template.Customer journey map template day in the life

3. Future State Template

Similar to the current state template, these phases may also reflect the future predicted or desired search, awareness, consideration of options, purchasing decision, and post-purchase support processes. Since this takes place in the future, you can tailor these phases based on what you’d like the customer journey to look like, rather than what it currently looks like.

Click here for an interactive future state template.

 Customer journey map template future state

4. Service Blueprint Template

Since this template is more in-depth, it doesn’t follow certain phases in the customer journey. Rather, it is based on physical evidence — the tangible factors that can create impressions about the quality and prices of the service — that often come in sets of multiple people, places, or objects at a time.

For instance, in the fictitious restaurant example above, the physical evidence includes all of the staff, tables, decorations, cutlery, menus, food, and anything else a customer comes into contact with.

You would then list out the appropriate customer actions and employee interactions to correspond with each physical evidence.

For example, when the physical evidence is plates, cutlery, napkins, and pans, the customer gives their order, the front-of-stage employee — the waiter — takes the order, the back-of-stage employee — the receptionist — processes the order, and the support processes — the chefs — prepare the food.

Click here for an interactive service blueprint template.Customer journey map template service

5. Buyer’s Journey Template

You can also use the classic buyer’s journey — awareness, consideration, and decision — to design your customer journey map.

Click here for an interactive buyer’s journey template.Customer journey map template buyer

Charter the Path to Customer Success

Once you fully understand your customer’s experience with your business, you can delight them at every stage in their buying journey. There are many factors that can affect this journey including customer pain points, emotions, and your company’s touchpoints and processes.

A customer journey map is the most effective way to visualize this information, whether you’re optimizing your journey for the customer or exploring a new business opportunity to serve a customer’s unrecognized needs. Use the free templates in this article to start mapping the future of customer success in your business.

Editor’s note: This post was originally published in August, 2018 and has been updated for comprehensiveness.

Originally published Mar 7, 2022 7:15:00 AM, updated March 07 2022

Don’t forget to share this post

How to Do Market Research: A Guide and Template

How to Do Market Research: A Guide and Template

Written by Debbie Farese

Discover the different types of market research, how to conduct your own market research, and use a free template to help you along the way. Today’s consumers have a lot of power. They can research your product or service and make purchase decisions entirely on their own. Moreover, rather than talking to one of your sales reps, they’re more likely to ask for referrals from members of their networks or read online reviews. With this in mind, have you adapted your marketing strategy to complement the way today’s consumers research, shop, and buy?

To do just that, you must have a deep understanding of who your buyers are, your specific market, and what influences the purchase decisions and behavior of your target audience members. Enter: Market Research. 

→ Download Now: Market Research Templates [Free Kit]

Whether you’re new to market research, this guide will provide you with a blueprint for conducting a thorough study of your market, target audience, competition, and more.

  1. What is Market Research?
  2. Primary vs. Secondary Research
  3. Types of Market Research
  4. How To Do Market Research
  5. Market Research Report Template
  6. Market Research Examples

What is market research?

Market research is the process of gathering information about your target market and customers to verify the success of a new product, help your team iterate on an existing product, or understand brand perception to ensure your team is effectively communicating your company’s value effectively.

Market research can answer various questions about the state of an industry, but it’s hardly a crystal ball that marketers can rely on for insights on their customers. Market researchers investigate several areas of the market, and it can take weeks or even months to paint an accurate picture of the business landscape.

However, researching just one of those areas can make you more intuitive to who your buyers are and how to deliver value that no other business is offering them right now.

Certainly you can make sound judgment calls based on your experience in the industry and your existing customers. However, keep in mind that market research offers benefits beyond those strategies. There are two things to consider: 

  1. Your competitors also have experienced individuals in the industry and a customer base. It’s very possible that your immediate resources are, in many ways, equal to those of your competition’s immediate resources. Seeking a larger sample size for answers can provide a better edge. 
  2. Your customers don’t represent the attitudes of an entire market. They represent the attitudes of the part of the market that is already drawn to your brand. 

The market research services market is growing rapidly, which signifies a strong interest in market research as we enter 2022. The market is expected to grow from roughly $75 billion in 2021 to $90.79 billion in 2025 at a compound annual growth rate of 5%. 

Why do market research?

Market research allows you to meet your buyer where they are. As our world (both digital and analog) becomes louder and demands more and more of our attention, this proves invaluable. By understanding your buyer’s problems, pain points, and desired solutions, you can aptly craft your product or service to naturally appeal to them.

Market research also provides insight into a wide variety of things that impact your bottom line, including:

  • Where your target audience and current customers conduct their product or service research
  • Which of your competitors your target audience looks to for information, options, or purchases
  • What’s trending in your industry and in the eyes of your buyer
  • Who makes up your market and what their challenges are
  • What influences purchases and conversions among your target audience 
  • Consumer attitudes about a particular topic, pain, product, or brand
  • Whether there’s demand for the business initiatives you’re investing in
  • Unaddressed or underserved customer needs that can be flipped into selling opportunity
  • Attitudes about pricing for a particular product or service

Ultimately, market research allows you to get information from a larger sample size of your target audience, eliminating bias and assumptions so that you can get to the heart of consumer attitudes. As a result, you can make better business decisions from knowing the bigger picture.

As you begin honing in on your market research, you’ll likely hear about primary and secondary market research. The easiest way to think about primary and secondary research is to envision to umbrellas sitting beneath market research: one for primary market research and one for secondary market research. 

Beneath these two umbrellas sits a number of different types of market research, which we’ll highlight below. Defining which of the two umbrellas your market research fits beneath isn’t necessarily crucial, although some marketers prefer to make the distinction. 

So, in case you encounter a marketer who wants to define your types of market research as primary or secondary — or if you’re one of them — let’s cover the definitions of the two categories next. Then, we’ll look at the different types of market research in the following section

Primary vs. Secondary Research

To give you an idea of how extensive market research can get, consider that it can either be qualitative or quantitative in nature — depending on the studies you conduct and what you’re trying to learn about your industry.

Qualitative research is concerned with public opinion, and explores how the market feels about the products currently available in that market. Quantitative research is concerned with data, and looks for relevant trends in the information that’s gathered from public records.

There are two main types of market research that your business can conduct to collect actionable information on your products, including primary research and secondary research. Let’s dive into those two types, now. 

Primary Research

Primary research is the pursuit of first-hand information about your market and the customers within your market. It’s useful when segmenting your market and establishing your buyer personas. Primary market research tends to fall into one of two buckets: exploratory and specific research.

Exploratory Primary Research

This kind of primary market research is less concerned with measurable customer trends and more about potential problems that would be worth tackling as a team. It normally takes place as a first step — before any specific research has been performed — and may involve open-ended interviews or surveys with small numbers of people.

Specific Primary Research

Specific primary market research often follows exploratory research and is used to dive into issues or opportunities the business has already identified as important. In specific research, the business can take a smaller or more precise segment of their audience and ask questions aimed at solving a suspected problem.

Secondary Research

Secondary research is all the data and public records you have at your disposal to draw conclusions from (e.g. trend reports, market statistics, industry content, and sales data you already have on your business). Secondary research is particularly useful for analyzing your competitors. The main buckets your secondary market research will fall into include:

Public Sources

These sources are your first and most-accessible layer of material when conducting secondary market research. They’re often free to find and review — lots of bang for your buck here.

Government statistics are one of the most common types of public sources according to Entrepreneur. Two U.S. examples of public market data are the U.S. Census Bureau and the Bureau of Labor & Statistics, both of which offer helpful information on the state of various industries nationwide.

Commercial Sources

These sources often come in the form of market reports, consisting of industry insight compiled by a research agency like PewGartner, or Forrester. Because this info is so portable and distributable, it typically costs money to download and obtain.

Internal Sources

Internal sources deserve more credit for supporting market research than they generally get. Why? This is the market data your organization already has!

Average revenue per sale, customer retention rates, and other historical data on the health of old and new accounts can all help you draw conclusions on what your buyers might want right now.

Now that we’ve covered these overarching market research categories, let’s get more specific and look at the various types of market research you might choose to conduct. 

Types of Market Research

  1. Interviews
  2. Focus Groups
  3. Product/ Service Use Research
  4. Observation-Based Research
  5. Buyer Persona Research
  6. Market Segmentation Research
  7. Pricing Research
  8. Competitive Analysis Research
  9. Customer Satisfaction and Loyalty Research
  10. Brand Awareness Research
  11. Campaign Research

1. Interviews

Interviews allow for face-to-face discussions (in-person and virtual) so you can allow for a natural flow or conversation and watch your interviewee’s body language while doing so. 

Your interviewees can answer questions about themselves to help you design your buyer personas. These buyer personas describe your ideal customer’s age, family size, budget, job title, the challenges they face at work, and similar aspects of their lifestyle. Having this buyer profile in hand can shape your entire marketing strategy, from the features you add to your product to the content you publish on your website.

2. Focus Groups

Focus groups provide you with a handful of carefully-selected people that you can have test out your product, watch a demo, provide feedback, and/or answer specific questions.

This type of market research can give you ideas for product differentiation, or the qualities of your product that make it unique in the marketplace. Consider asking your focus group questions about (and showing them examples of) your services, and ultimately use the group’s feedback to make these services better.

3. Product/Service Use Research

Product or service use research offers insight into how and why your audience uses your product or service, and specific features of that item. This type of market research also gives you an idea of the product or service’s usability for your target audience. 

In a 2020 report, respondents rated usability testing most highly in terms of usefulness for discovering user insights (rating it 8.7 out of 10). By comparison, digital analytics was rated 7.7, and user surveys 6.4.

4. Observation-Based Research

Observation-based research allows you to sit back and watch the ways in which your target audience members go about using your product or service, what works well in terms of UX, what roadblocks they hit, and which aspects of it could be easier for them to use and apply. 

5. Buyer Persona Research

Buyer persona research gives you a realistic look at who makes up your target audience, what their challenges are, why they want your product or service, what they need from your business and brand, and more. 

6. Market Segmentation Research

Market segmentation research allows you to categorize your target audience into different groups (or segments) based on specific and defining characteristics — this way, you can determine effective ways to meet their needs, understand their pain points and expectations, learn about their goals, and more. 

7. Pricing Research

Pricing research gives you an idea of what similar products or services in your market sell for, what your target audience expects to pay — and is willing to pay — for whatever it is you sell, and what’s a fair price for you to list your product or service at. All of this information will help you define your pricing strategy

8. Competitive Analysis

Competitive analyses are valuable because they give you a deep understanding of the competition in your market and industry. You can learn about what’s doing well in your industry, what your target audience is already going for in terms of products like yours, which of your competitors should you work to keep up with and surpass, and how you can clearly separate yourself from the competition

9. Customer Satisfaction and Loyalty Research

Customer satisfaction and loyalty research give you a look into how you can get current customers to return for more business and what will motivate them to do so (e.g. loyalty programs, rewards, remarkable customer service). This research will help you discover the most-effective ways to promote delight among your customers.

10. Brand Awareness Research

Brand awareness research tells you about what your target audience knows about and recognizes from your brand. It tells you about the associations your audience members make when they think about your business and what they believe you’re all about.  

11. Campaign Research

Campaign research entails looking into your past campaigns and analyzing their success among your target audience and current customers. It requires experimentation and then a deep dive into what reached and resonated with your audience so you can keep those elements in mind for your future campaigns and hone in on the aspects of what you do that matters most to those people. 

Now that you know about the categories and types of market research, let’s review how you can conduct your market research.

Here’s how to do market research step-by-step.

How to Do Market Research

  1. Define your buyer persona.
  2. Identify a persona group to engage.
  3. Prepare research questions for your market research participants.
  4. List your primary competitors.
  5. Summarize your findings.

1. Define your buyer persona.

Before you dive into how customers in your industry make buying decisions, you must first understand who they are.

This is where your buyer personas come in handy. Buyer personas — sometimes referred to as marketing personas — are fictional, generalized representations of your ideal customers.

Use a free tool to create a buyer persona that your entire company can use to market, sell, and serve better.

How to do market research defining your buyer persona

They help you visualize your audience, streamline your communications, and inform your strategy. Some key characteristics you should be keen on including in your buyer persona are:

  • Age
  • Gender
  • Location
  • Job title(s)
  • Job titles
  • Family size
  • Income
  • Major challenges

The idea is to use your persona as a guideline for  how to effectively reach and learn about the real audience members in your industry. Also, you may find that your business lends itself to more than one persona — that’s fine! You just need to be  thoughtful about each specific persona when you’re optimizing and planning your content and campaigns.

To get started with creating your personas, check out these free templates, as well as this helpful tool. 

2. Identify a persona group to engage.

Now that you know who your buyer personas are, use that information to help you identify a group to engage to conduct your market research with — this should be a representative sample of your target customers so you can better understand their actual characteristics, challenges, and buying habits.

The group you identify to engage should also be made of people who recently made a purchase or purposefully decided not to make one. Here are some more guidelines and tips to help you get the right participants for your research. 

How to Identify the Right People to Engage for Market Research

When choosing who to engage for your market research, start by focusing on people who have the characteristics that apply to your buyer persona. You should also:Aim for 10 participants per buyer persona.

We recommend focusing on one persona, but if you feel it’s necessary to research multiple personas, be sure to recruit a separate sample group for each one.

Select people who have recently interacted with you.

You may want to focus on people that have completed an evaluation within the past six months — or up to a year if you have a longer sales cycle or niche market. You’ll be asking very detailed questions so it’s important that their experience is fresh.

Gather a mix of participants.

You want to recruit people who have purchased your product, purchased a competitor’s product, and decided not to purchase anything at all. While your customers will be the easiest to find and recruit, sourcing information from those who aren’t customers (yet!) will help you develop a balanced view of your market. Here are some more details on how to select this mix of participants:

  • Pull a list of customers who made a recent purchase. As we mentioned before, this is usually the easiest set of buyers to recruit. If you’re using a CRM system, you can run a report of deals that closed within the past six months and filter it for the characteristics you’re looking for. Otherwise, you can work with your sales team to get a list of appropriate accounts from them.
  • Pull a list of customers who were in an active evaluation, but didn’t make a purchase. You should get a mix of buyers who either purchased from a competitor or decided not to make a purchase. Again, you can get this list from your CRM or from whatever system your Sales team uses to track deals.
  • Call for participants on social media. Try reaching out to the folks that follow you on social media, but decided not to buy from you. There’s a chance that some of them will be willing to talk to you and tell you why they ultimately decided not to buy your product.
  • Leverage your own network. Get the word out to your coworkers, former colleagues, and LinkedIn connections that you’re conducting a study. Even if your direct connections don’t qualify, some of them will likely have a coworker, friend, or family member who does.
  • Choose an incentive. Time is precious, so you’ll need to think about how you will motivate someone to spend 30-45 minutes on you and your study. On a tight budget? You can reward participants for free by giving them exclusive access to content. Another option? Send a simple handwritten ‘thank you’ note once the study is complete. 

3. Prepare research questions for your market research participants.

The best way to make sure you get the most out of your conversations is to be prepared. You should always create a discussion guide — whether it’s for a focus group, online survey, or a phone interview — to make sure you cover all of the top-of-mind questions and use your time wisely.

(Note: This is not intended to be a script. The discussions should be natural and conversational, so we encourage you to go out of order or probe into certain areas as you see fit.)

Your discussion guide should be in an outline format, with a time allotment and open-ended questions for each section.

Wait, all open-ended questions?

Yes — this is a golden rule of market research. You never want to “lead the witness” by asking yes and no questions, as that puts you at risk of unintentionally swaying their thoughts by leading with your own hypothesis. Asking open-ended questions also helps you avoid one-word answers (which aren’t very helpful for you).

Example Outline of a 30-Minute Survey 

Here’s a general outline for a 30-minute survey for one B2B buyer. You can use these as talking points for an in-person interview, or as questions posed on a digital form to administer as a survey to your target customers.

Background Information (5 Minutes)

Ask the buyer to give you a little background information (their title, how long they’ve been with the company, and so on). Then, ask a fun/easy question to warm things up (first concert attended, favorite restaurant in town, last vacation, etc.).

Remember, you want to get to know your buyers in pretty specific ways. You might be able to capture basic information such as age, location, and job title from your contact list, there are some personal and professional challenges you can really only learn by asking.

Here are some other key background questions to ask your target audience:

  • Describe how your team is structured.
  • Tell me about your personal job responsibilities.
  • What are the team’s goals and how do you measure them?
  • What has been your biggest challenge in the past year?

Now, make a transition to acknowledge the specific purchase or interaction they made that led to you including them in the study. The next three stages of the buyer’s journey will focus specifically on that purchase.

Awareness (5 Minutes)

Here, you want to understand how they first realized they had a problem that needed to be solved without getting into whether or not they knew about your brand yet.

  • Think back to when you first realized you needed a [name the product/service category, but not yours specifically]. What challenges were you facing at the time?
  • How did you know that something in this category could help you?
  • How familiar were you with different options on the market?

Consideration (10 Minutes)

Now you want to get very specific about how and where the buyer researched potential solutions. Plan to interject to ask for more details.

  • What was the first thing you did to research potential solutions? How helpful was this source?
  • Where did you go to find more information?

If they don’t come up organically, ask about search engines, websites visited, people consulted, and so on. Probe, as appropriate, with some of the following questions:

  • How did you find that source?
  • How did you use vendor websites?
  • What words specifically did you search on Google?
  • How helpful was it? How could it be better?
  • Who provided the most (and least) helpful information? What did that look like?
  • Tell me about your experiences with the sales people from each vendor.

Decision (10 Minutes)

  • Which of the sources you described above was the most influential in driving your decision?
  • What, if any, criteria did you establish to compare the alternatives?
  • What vendors made it to the short list and what were the pros/cons of each?
  • Who else was involved in the final decision? What role did each of these people play?
  • What factors ultimately influenced your final purchasing decision?

Closing

Here, you want to wrap up and understand what could have been better for the buyer.

  • Ask them what their ideal buying process would look like. How would it differ from what they experienced?
  • Allow time for further questions on their end.
  • Don’t forget to thank them for their time and confirm their address to send a thank-you note or incentive.

4. List your primary competitors.

List your primary competitors — keep in mind listing the competition isn’t always as simple as Company X versus Company Y.

Sometimes, a division of a company might compete with your main product or service, even though that company’s brand might put more effort in another area.

For example. Apple is known for its laptops and mobile devices but Apple Music competes with Spotify over its music streaming service.

From a content standpoint, you might compete with a blog, YouTube channel, or similar publication for inbound website visitors — even though their products don’t overlap with yours at all.

And a toothpaste company might compete with magazines like Health.com or Prevention on certain blog topics related to health and hygiene even though the magazines don’t actually sell oral care products.

Identifying Industry Competitors

To identify competitors whose products or services overlap with yours, determine which industry or industries you’re pursuing. Start high-level, using terms like education, construction, media & entertainment, food service, healthcare, retail, financial services, telecommunications, and agriculture.

The list goes on, but find an industry term that you identify with, and use it to create a list of companies that also belong to this industry. You can build your list the following ways:

  • Review your industry quadrant on G2 Crowd: In certain industries, this is your best first step in secondary market research. G2 Crowd aggregates user ratings and social data to create “quadrants,” where you can see companies plotted as contenders, leaders, niche, and high performers in their respective industries. G2 Crowd specializes in digital content, IT services, HR, ecommerce, and related business services.
  • Download a market report: Companies like Forrester and Gartner offer both free and gated market forecasts every year on the vendors who are leading their industry. On Forrester’s website, for example, you can select “Latest Research” from the navigation bar and browse Forrester’s latest material using a variety of criteria to narrow your search. These reports are good assets to save on your computer.
  • Search using social media: Believe it or not, social networks make great company directories if you use the search bar correctly. On LinkedIn, for example, select the search bar and enter the name of the industry you’re pursuing. Then, under “More,” select “Companies” to narrow your results to just the businesses that include this or a similar industry term on their LinkedIn profile.

Identifying Content Competitors

Search engines are your best friends in this area of secondary market research. To find the online publications with which you compete, take the overarching industry term you identified in the section above, and come up with a handful of more specific industry terms your company identifies with.

A catering business, for example, might generally be a “food service” company, but also consider itself a vendor in “event catering,” “cake catering,” “baked goods,” and more.

Once you have this list, do the following:

  • Google it: Don’t underestimate the value in seeing which websites come up when you run a search on Google for the industry terms that describe your company. You might find a mix of product developers, blogs, magazines, and more.
  • Compare your search results against your buyer persona: Remember the buyer persona you created during the primary research stage, earlier in this article? Use it to examine how likely a publication you found through Google could steal website traffic from you. If the content the website publishes seems like the stuff your buyer persona would want to see, it’s a potential competitor, and should be added to your list of competitors.

After a series of similar Google searches for the industry terms you identify with, look for repetition in the website domains that have come up.

Examine the first two or three results pages for each search you conducted. These websites are clearly respected for the content they create in your industry, and should be watched carefully as you build your own library of videos, reports, web pages, and blog posts.

5. Summarize your findings.

Feeling overwhelmed by the notes you took? We suggest looking for common themes that will help you tell a story and create a list of action items.

To make the process easier, try using your favorite presentation software to make a report, as it will make it easy to add in quotes, diagrams, or call clips.

Feel free to add your own flair, but the following outline should help you craft a clear summary:

  • Background: Your goals and why you conducted this study.
  • Participants: Who you talked to. A table works well so you can break groups down by persona and customer/prospect.
  • Executive Summary: What were the most interesting things you learned? What do you plan to do about it?
  • Awareness: Describe the common triggers that lead someone to enter into an evaluation. (Quotes can be very powerful.)
  • Consideration: Provide the main themes you uncovered, as well as the detailed sources buyers use when conducting their evaluation.
  • Decision: Paint the picture of how a decision is really made by including the people at the center of influence and any product features or information that can make or break a deal.
  • Action Plan: Your analysis probably uncovered a few campaigns you can run to get your brand in front of buyers earlier and/or more effectively. Provide your list of priorities, a timeline, and the impact it will have on your business.

Lastly, let’s review a resource that can help you compile everything we just discussed in a simple yet effective way (plus, it’s free!).

Market Research Report Template

Within a market research kit, there are a number of critical pieces of information for your business’s success. Let’s take a look at what those different kit elements are next. 

Pro Tip: Upon downloading HubSpot’s free Market Research Kit, you’ll receive editable templates for each of the given parts of the kit as well as instructions on how to use the templates and kit, and a mock presentation that you can edit and customize. 

market research kit and templates from HubSpot

Download HubSpot’s free, editable market research report template here. 

1. Five Forces Analysis Template

five forces analysis template

Use Porter’s Five Forces Model to understand an industry by analyzing five different criteria and how high the power, threat, or rivalry in each area is — here are the five criteria: 

  • Competitive rivalry
  • Threat of new entrants
  • Threat of substitution
  • Buyer power
  • Supplier power

Download a free, editable Five Forces Analysis template here. 

2. SWOT Analysis Template

free editable swot analysis template

  A SWOT (Strengths, Weaknesses, Opportunities, Threats) analysis looks at your internal strengths and weaknesses, and your external opportunities and threats within the market.A SWOT analysis highlights direct areas of opportunity your company can continue, build, focus on, and work to overcome. Download a free, editable SWOT Analysis template here. 

3. Market Survey Template

Both market surveys and focus groups (which we’ll cover in the next section) help you uncover important information about your buyer personas, target audience, current customers, market, competition, and more (e.g. demand for your product or service, potential pricing, impressions of your branding, etc.).

Surveys should contain a variety of question types, like multiple choice, rankings, and open-ended responses. Ask quantitative and short-answer questions to save you time and to more easily draw conclusions. (Save longer questions that will warrant more detailed responses for your focus groups.)

Here are some categories of questions you should ask via survey: 

  • Demographic questions
  • Business questions
  • Competitor questions
  • Industry questions
  • Brand questions
  • Product questions

Download a free, editable Market Survey template here. 

4. Focus Group Template

Focus groups are an opportunity to collect in-depth, qualitative data from your real customers or members of your target audience. You should ask your focus group participants open-ended questions. While doing so, keep these tips top of mind:

  • Set a limit for the number of questions you’re asking (after all, they’re open-ended). 
  • Provide participants with a prototype or demonstration.
  • Ask participants how they feel about your price.
  • Ask participants about your competition.
  • Offer participants time at the end of the session for final comments, questions, or concerns.

Download a free, editable Focus Group template here. 

Market Research Examples 

1. Disney uses kid-centric focus groups to test new characters and ideas.

The Walt Disney Company can spend millions crafting what its Animation Studio team believes is a worthwhile story, but it wisely focuses on its intended audience — children — when testing how well a character or topic performs. 

A few times each year, Disney executives meet with preschoolers and kindergartners in kid-centric focus groups to get their opinions and insights on TV episodes, Disney characters, and more. 

Why is this an effective market research strategy? Because children are ultimately the audience Disney hopes to delight — so collecting their feedback is invaluable to iterating on their existing content and ensuring it continues to meet its audiences’ preferences.

2. KFC tested its meatless product in select markets before launching nationwide.

In 2019, KFC began developing and testing a new meatless version of its chicken. Rather than instantly rolling the product out nationwide, however, it started small: In select stores in the Atlanta, Georgia area

This is an easy, effective example of conducting market research to determine how well a new product sells on a smaller scale before dedicating too many resources to it. If the meatless chicken flopped in Georgia, KFC would need to change the product before re-launching it to the market.

3. Yamaha conducted a survey to determine whether they should use knobs or sliding faders on the Montage keyboard.

When Yamaha, a Japanese-based corporation that produces a variety of products ranging from motorcycles to golf cars to musical instruments, began developing its new Montage keyboard, the team was unsure whether to use knobs or sliding faders on the product.

So Yamaha used Qualtrics to send a survey to their customers, and received 400 responses in a few hours. 

Using survey feedback helped Yamaha ensure it was designing a product that exactly fit its audiences’ preferences.

4. The Body Shop used social listening to determine how they should re-position brand campaigns to respond to what their customers cared most about.

The Body Shop has long been known for offering ethically sourced and natural products, and proudly touts “sustainability” as a core value. 

To dive deeper into the sustainability sub-topics that meant the most to their audiences, the team at The Body Shop tracked conversations and ultimately found their audiences cared a lot about refills. 

Using this information helped the Body Shop team feel confident when relaunching their Refill Program across 400 stores globally in 2021, and another 400 in 2022. Market research proved they were on the right track with their refill concept, and demonstrated increased efforts were needed to show Body Shop customers that the Body Shop cared about their customers’ values. 

Conduct Market Research to Grow Better

Conducting market research can be a very eye-opening experience. Even if you think you know your buyers pretty well, completing the study will likely uncover new channels and messaging tips to help improve your interactions.

Editor’s note: This post was originally published in March 2016 and has been updated for comprehensiveness.

market research kit

New call-to-action


Originally published Feb 24, 2022 7:00:00 AM, updated February 24 2022

Topics:Conducting Marketing Research

Don’t forget to share this post!

0
    0
    Your Cart
    Your cart is emptyReturn to Shop
    Verified by MonsterInsights